If you'd rather speak to someone now, call
+91 7219084311.
You can also email us at hello@valardigital.com
+91 7219084311.
You can also email us at hello@valardigital.com
You can only have a successful business on Shopify if you’re able to target a massive user base and allow Google to provide excellent visibility for your store.
To achieve success through ads, the easiest way would be Google Shopping, and to start selling, you need to connect your Shopify store to Google Merchant Center.
In this article, let’s explore what Google Merchant Center is, how you can connect it to your Shopify store, and whether it is worth linking to Google Merchant Center to Shopify.
Google Merchant Center is a central hub for all your online businesses, from managing store appearance to managing lists online across all e-commerce products.
The Google Merchant Store is generally used to upload and maintain product media and information that is later displayed on the shopping results.
Google Merchant Center becomes a gateway to control robust e-commerce services through Google’s My Business integrations.
Once navigated through the Shopify integration process, Google Merchant Center can bring several benefits.
✓ Catalog Type Product Listings: Buyers can see the relevant products in a list format after searching for specific keywords. Doing this will increase Seller’s product visibility and ultimately increase the audience base.
✓ Website funnels: Clicking the products on public listings can directly take the buyers to the product page of that store.
✓ Google Analytics Support: Users can add Custom Segments using Google Analytics to specifically send the Google Merchant hits separately from others to keep the stats intact and organized.
✓ Integrated Google AdWords: Techniques such as remarketing (to remind visitors of their previously viewed products) can be used through Google AdWords by tying specific AdWords Ads to every product on your site.
✓ Local Search integration by Google: Geographical tagging is also provided with the listing so your buyers can redirect to their local stores nearby.
✓ Online product reviews: The user can also see product reviews with star ratings in the product list. Products that have ratings above 4 are capable of receiving preferential placement.
Many Product Listing Advertisements (PLAs) fail when your Google Merchant Account Center is not used efficiently. You need an excellent Merchant account for a successful Google Shopping campaign.
Although it seems tempting to tackle all the settings by yourself and explore the various options out there, but It’ll take most of your time with the least results.
However, if you follow the below steps in our article, which are tailor-made to optimize your shopping experience, you’ll save a lot of time and effort that you can put into cashing in all your products from the store.
Let’s set up your account!
Follow the below steps carefully:
Determine the right email address first for creating a Google Merchant account. (We suggest you select the same email you’re using for your Google Ads account) This will help you simplify the process. Although it is not restricted to using multiple emails, keeping track of one email address for all your Google accounts is easy.
After selecting the correct email address, press the ‘Sign up’ button, and your Google account is linked to the Merchant store.
We recommend you link your Merchant account to Google Ads by following the process: Tap the three dots, open the drop-down menu, select the Account link button, and connect the email address with the Google Ads account.

If you want to use a different email address for Google Merchant Centre, select Link Account and enter your Google Ads ID.
After selecting the correct email, you’ll be asked basic questions about your business. You can click the appropriate options, enter your pre-constructed website (If you have one), and select YES/NO if you hold a physical store in your area.
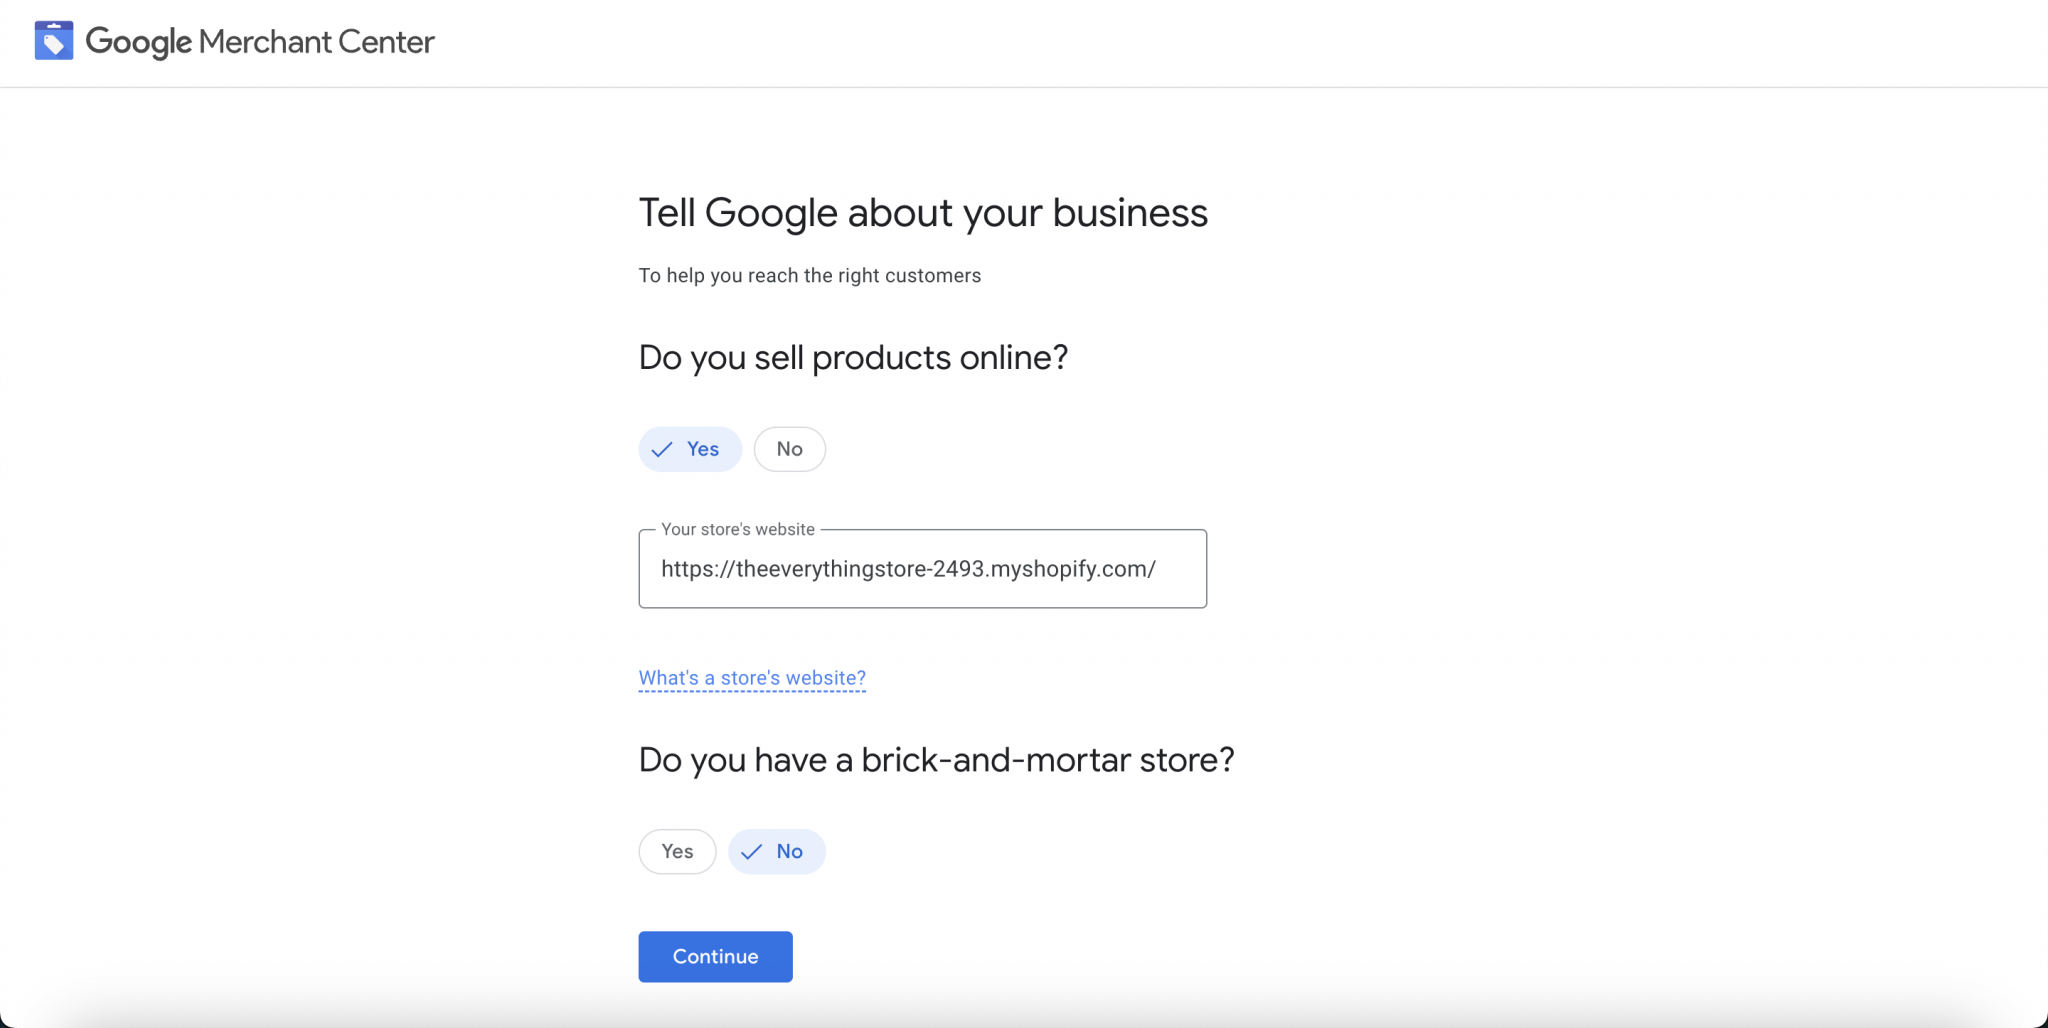
Enter your business name and registered country, and select Continue to Merchant Center.
Creating a successful Google Shopping campaign is challenging. You can skip all the hard work as ValarDigital can help you create your Google Merchant account with Google Ads and Connect to your Shopify store (Or create one). We will import all your products from your web store and ensure your first successful Google Shopping campaign.
Contact Us: Schedule a call now! +91 7219084311.
You can also email us at accounts@valardigital.com
Including your business information is one of the crucial steps in connecting GMC to your Shopify store. If you complete this process during account creation, you can skip this step. Otherwise, you can process the following:
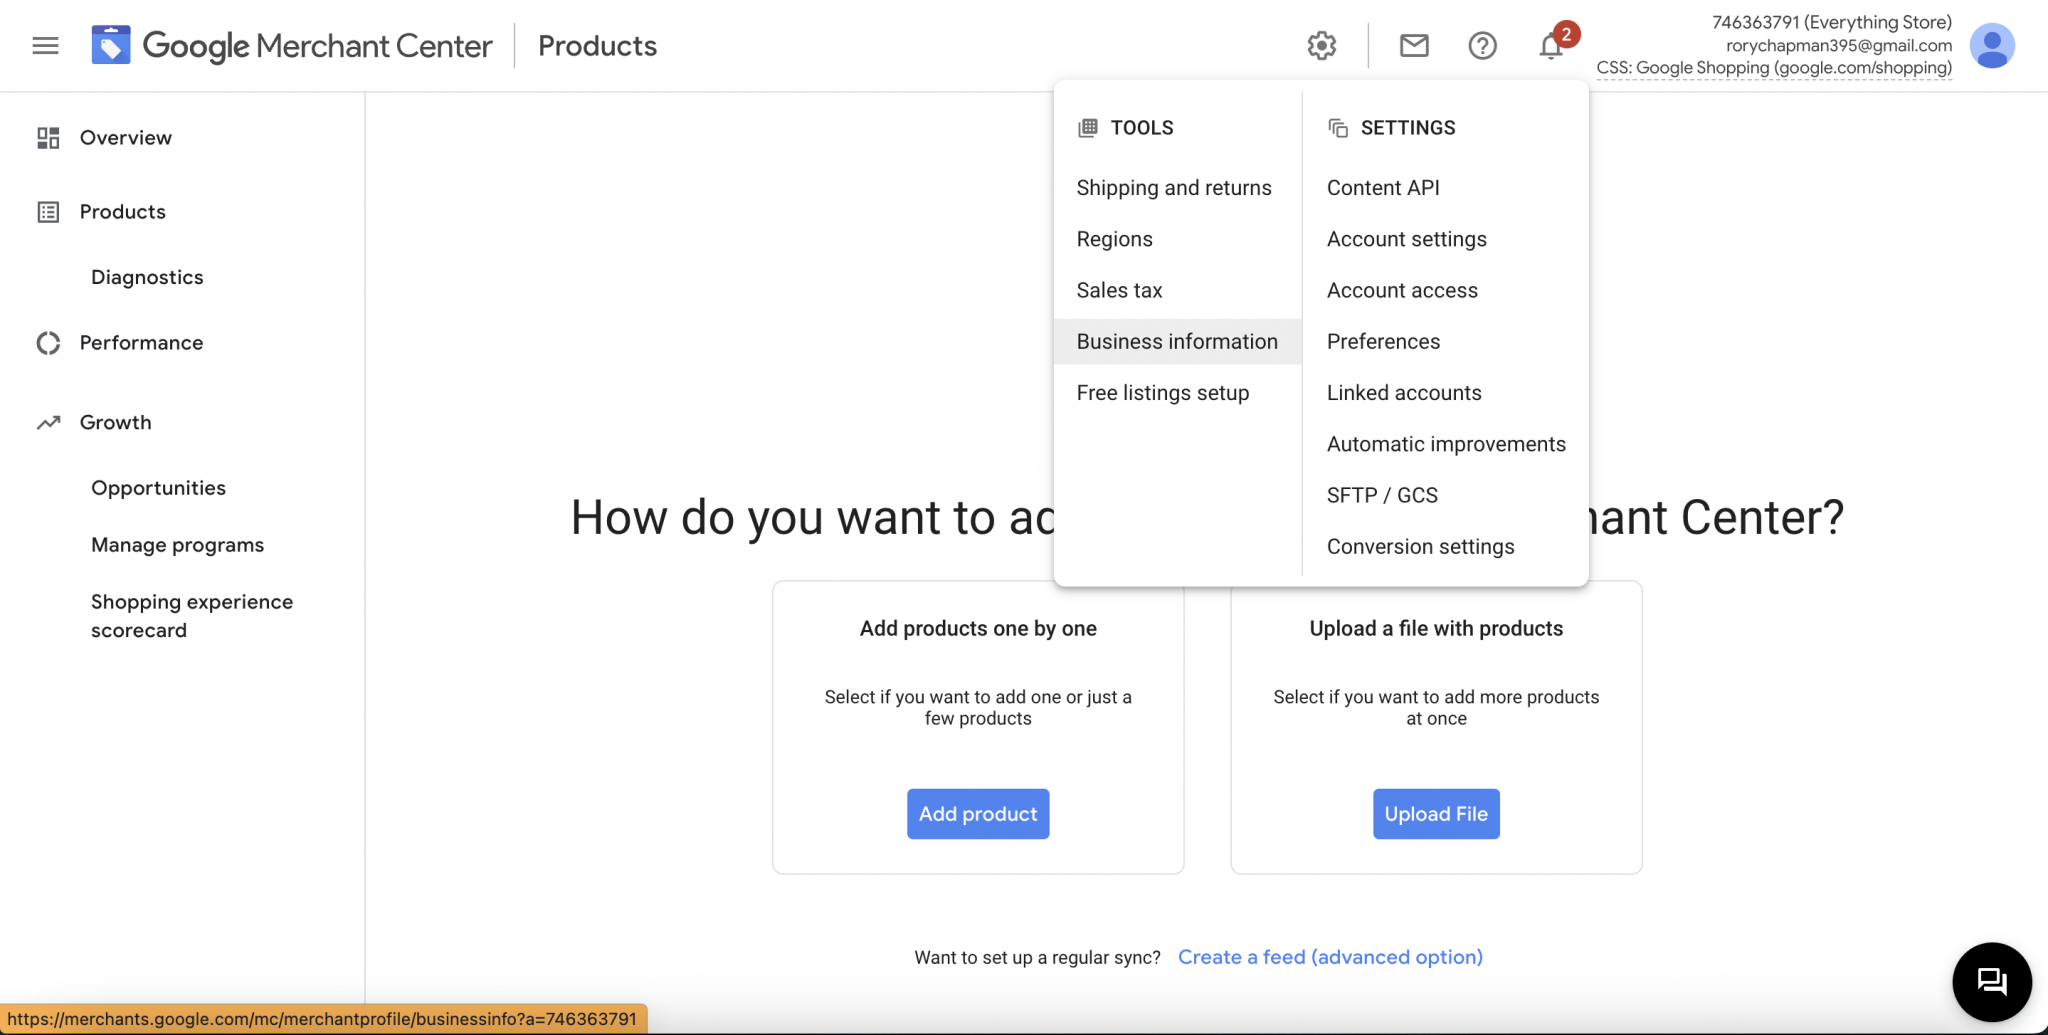
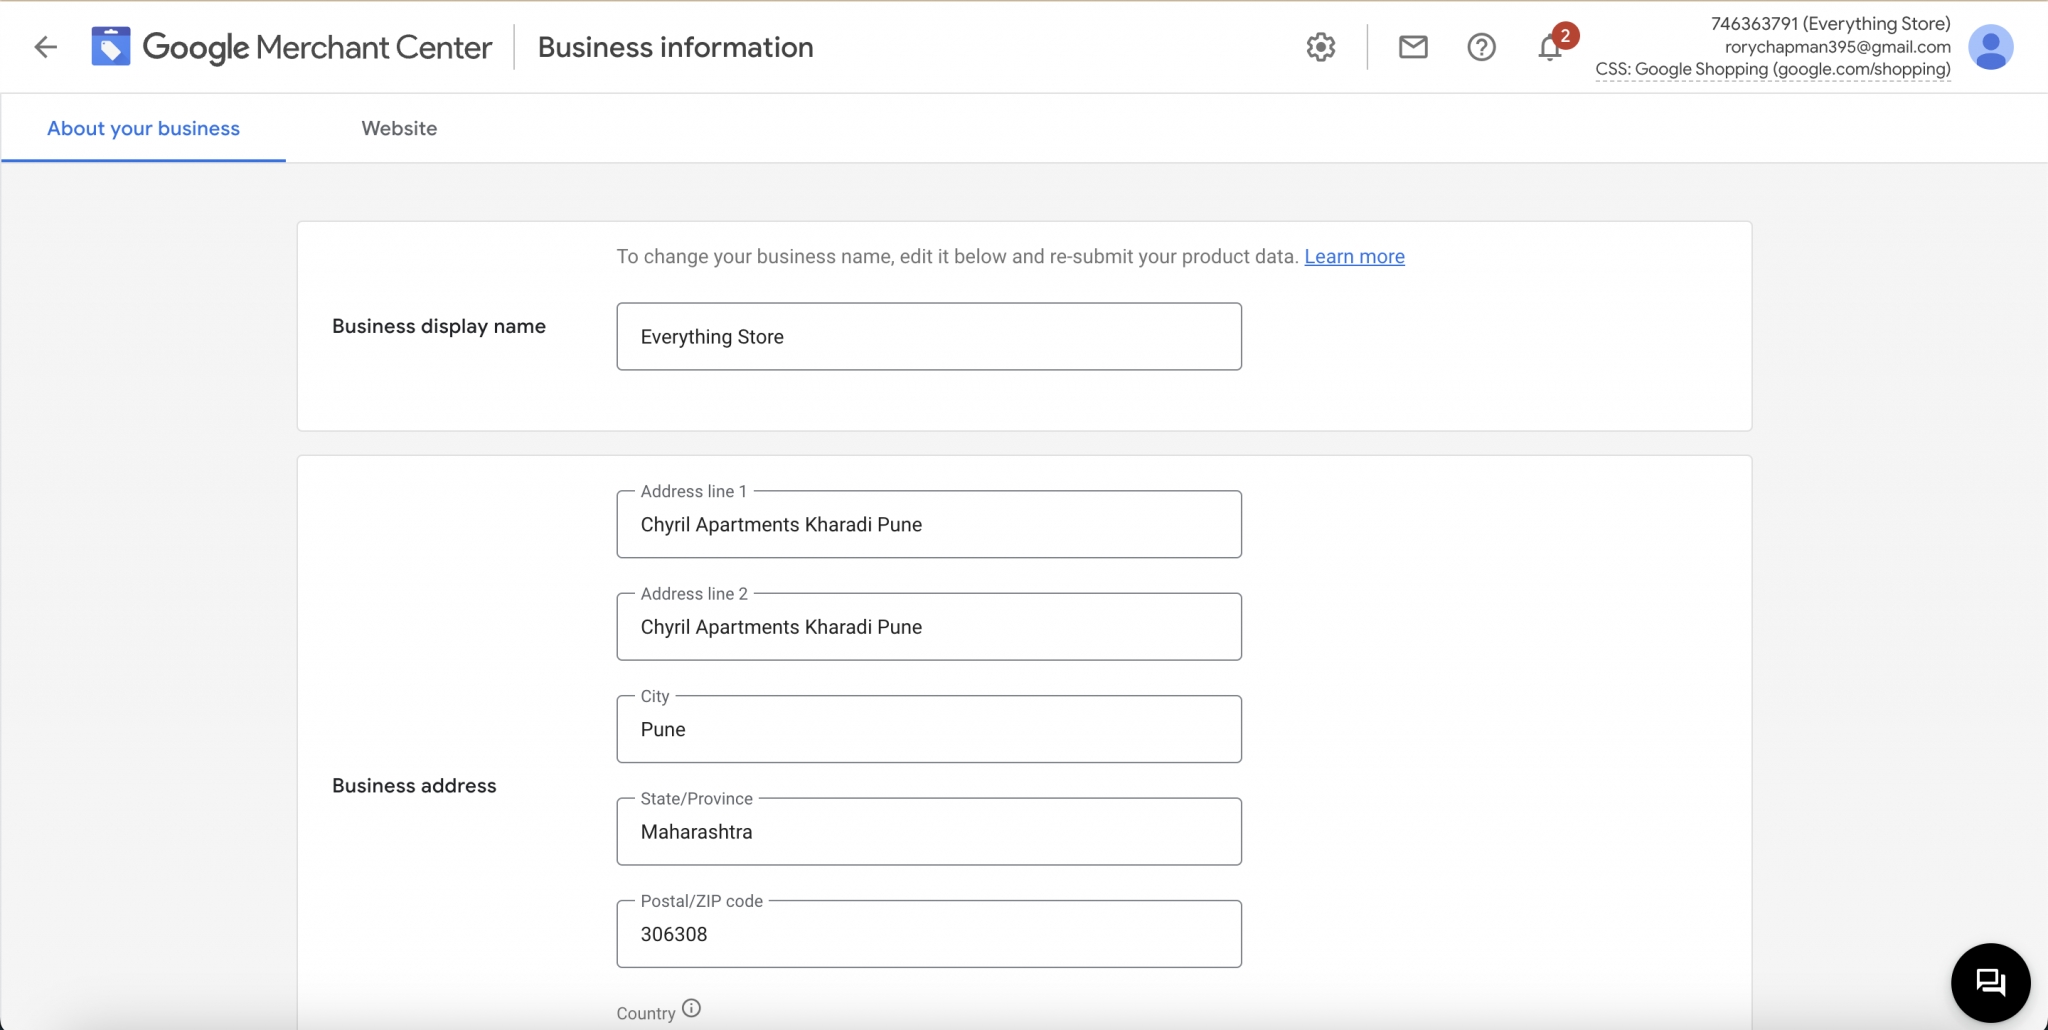
Linking your Shopify store to Google Merchant Center (GMC) is essential to ensure you’re the owner of the website and are ready to run a Google Ads campaign.
You can do this by going to the Your Business section on the left side of your screen (under the products section) and Your Online Shop.
Press the Edit Online Shop to verify and claim your Shopify store.

You can verify your website URL in four steps:
✓ By Connecting your Shopify store through raw code integration.
✓ By Connecting through an HTML tag. (Recommended)
✓ By verifying through Google Tag Manager
✓ By verifying through Google Analytics
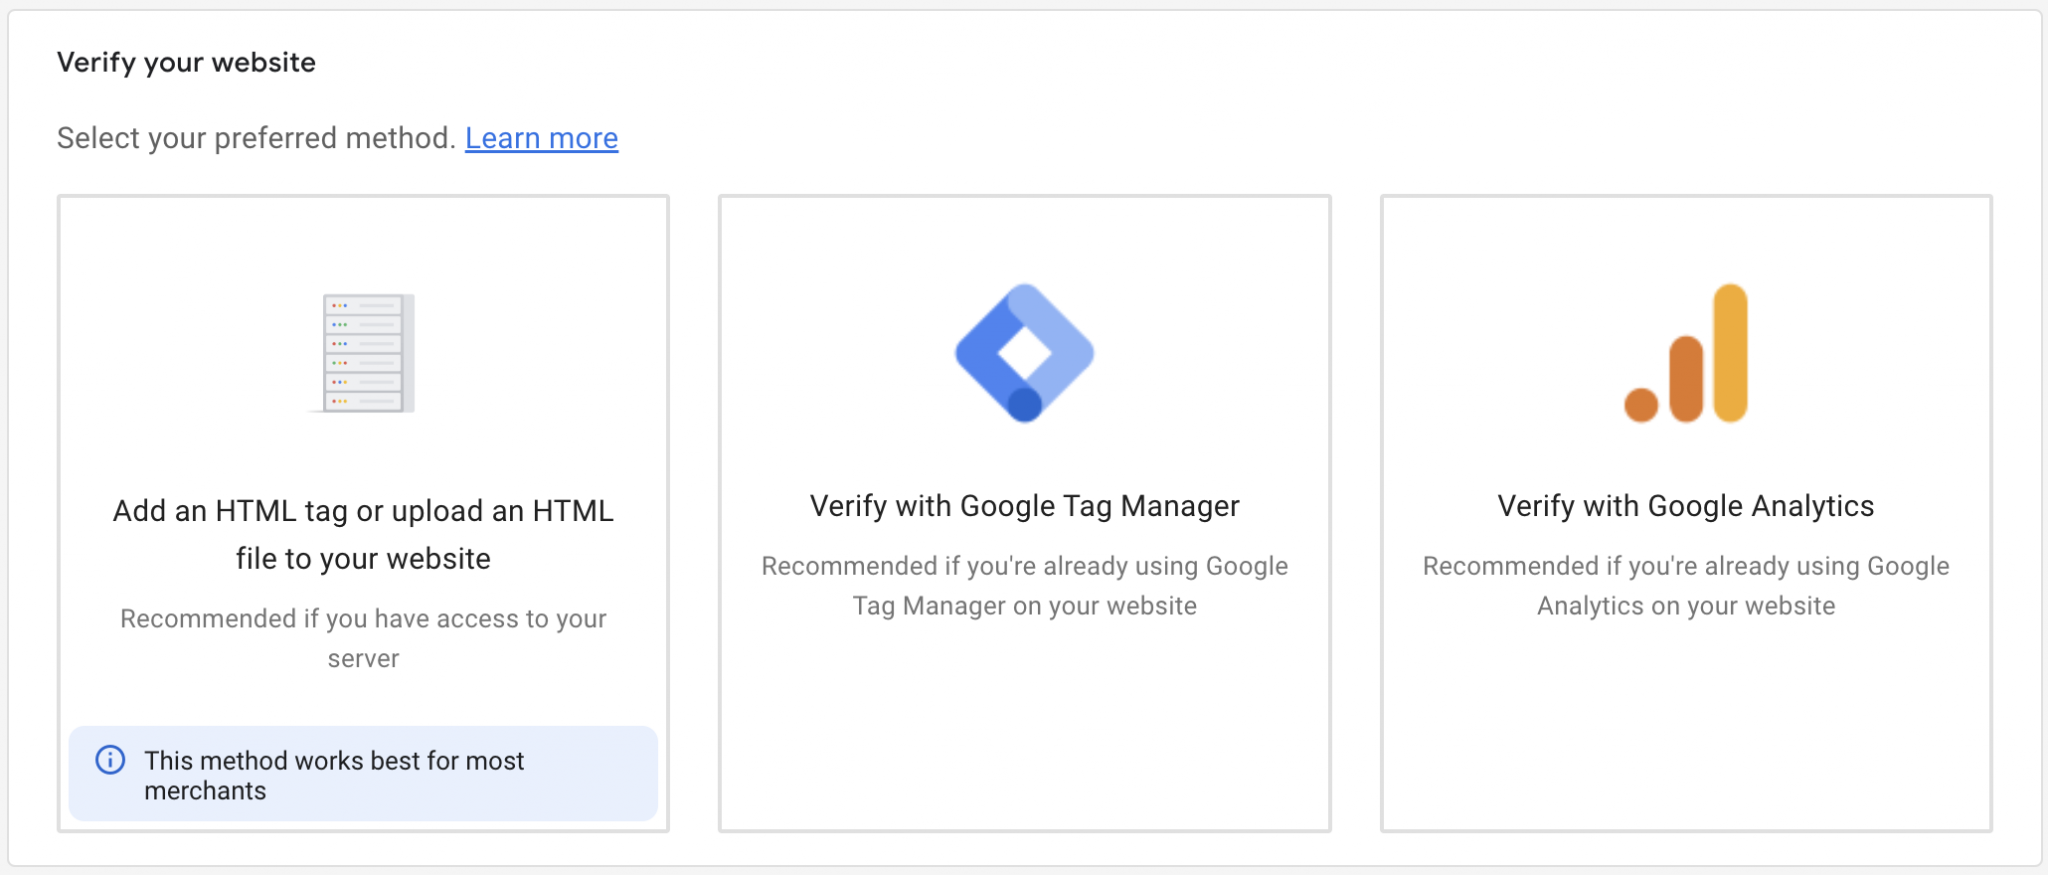
The process for every choice is the same if you see the steps carefully:
After selecting the preferred choice, copy the HTML code given below and head over to your Shopify store > admin > Online Store (under sales channel) > themes > select three dots beside the Customize button and press Edit Code.
In the code window, look for the file called theme.liquid and paste the given code anywhere between <head> and </head> tag.
Click Save.
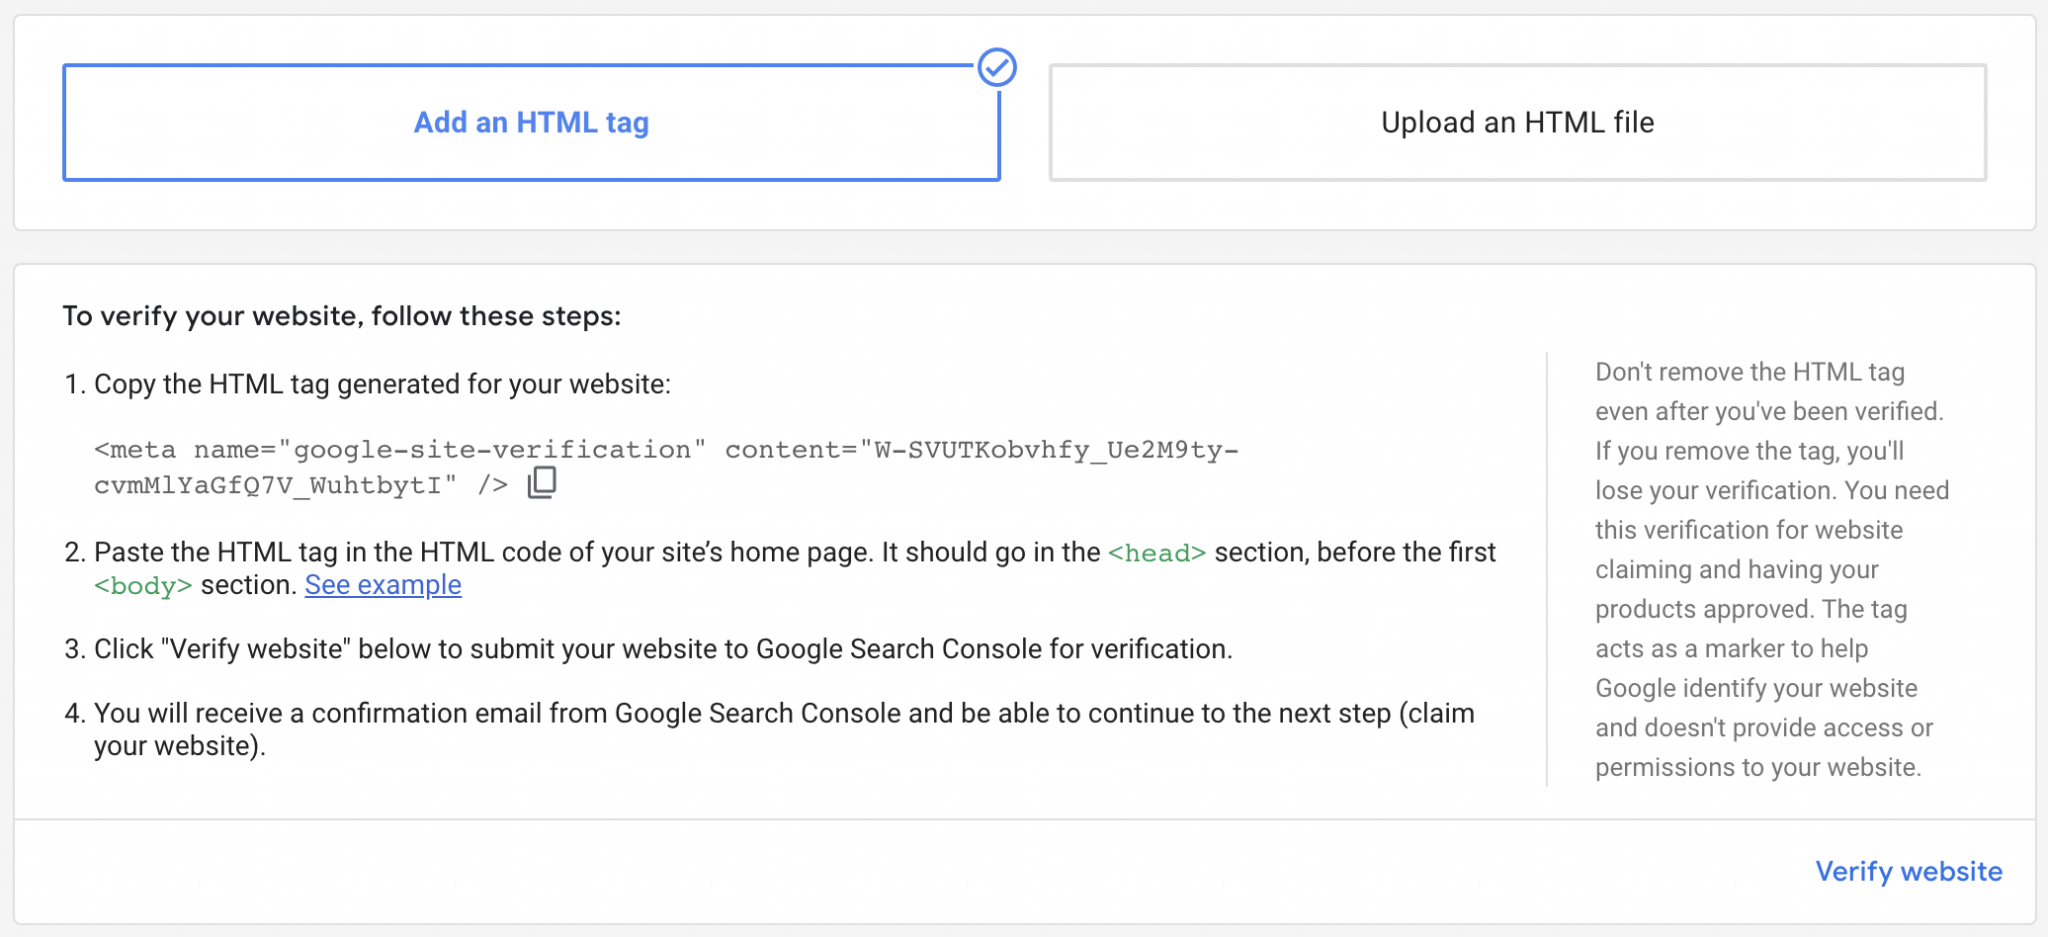
Now head over to your Google Merchant Centre and click Verify Website.
If you encounter any issues during the process, here are a few possible reasons:
1. Your store is password protected: GMC fails to verify your store code if your store is secure. You can do this by removing the password in the settings > preferences.
If you can’t remove the password from your store, you must buy a relevant Shopify plan to launch your store without any issues.
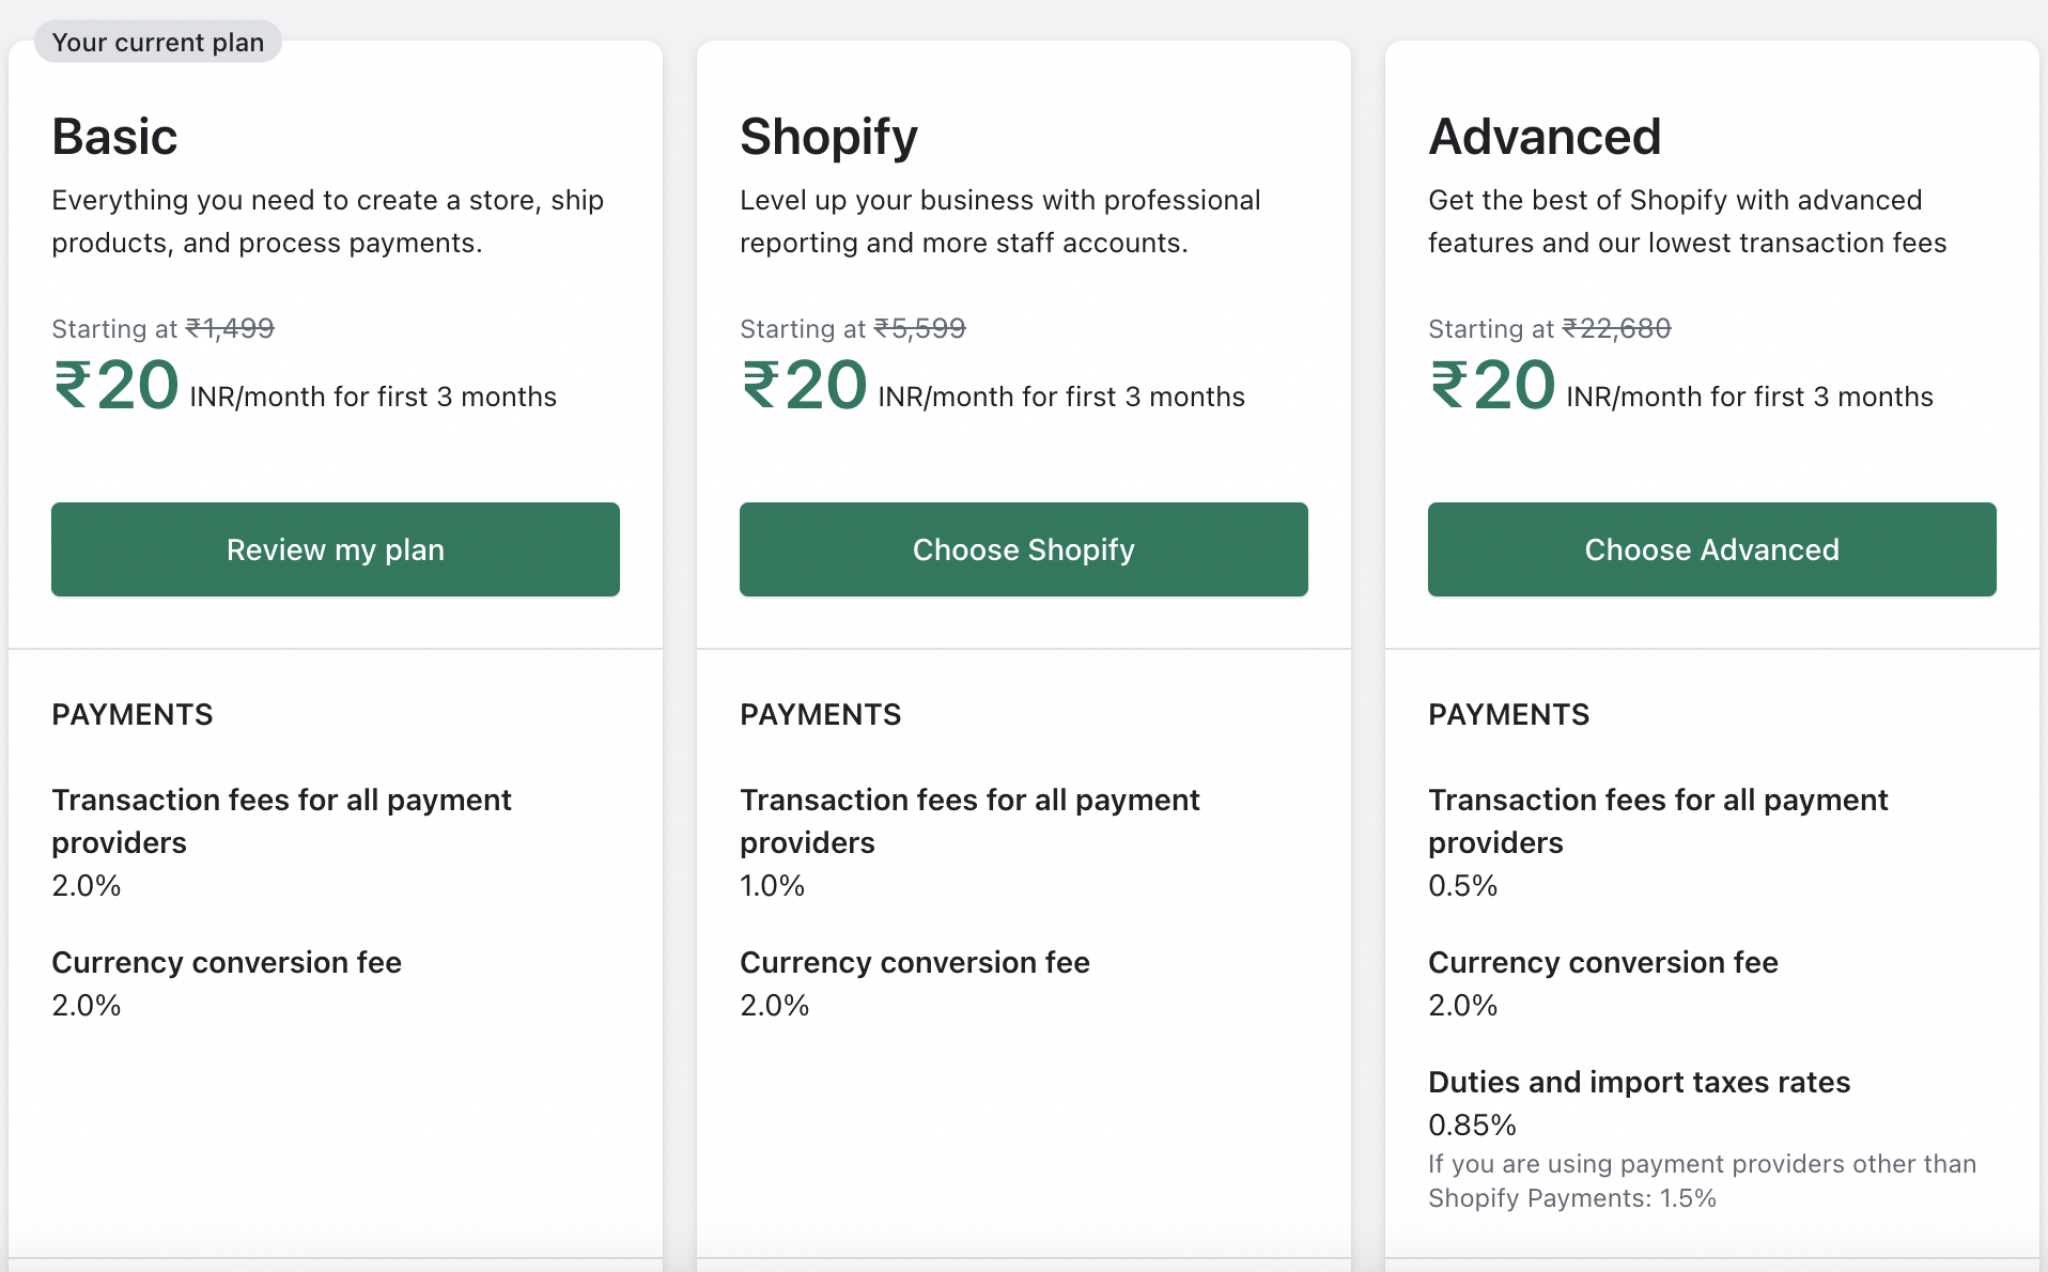
Don’t know which plan to choose? Here’s a complete guide to Shopify prices and which is right for your business.
2. Incorrect Meta Tag: You have probably entered an incorrect tag in the homepage file or have clicked somewhere incorrectly.
Regardless of the issues, find them from the above possibilities and rectify them accordingly.
Before adding products to your Google Tag Manager Center, one should know a few things. Your brand presence matters totally on the visual appearance of a product.
Therefore, you must ensure your products are well-optimized before adding them to your product feed.
Let’s explore the image requirements provided by Google down below:
✓ Do not apply your brand logo on product images.
✓ No need to add promotional tags or borders on product images.
✓ One must ensure image quality.
✓ Maximum image resolution is 64 megapixels.
✓ The required image file is less than 16MB.
✓ Suggest image size is 800*800 pixels.
✓ Minimum image size is 250*250 pixels for apparel products and 100*100 pixels for the rest.
After confirming all the necessary requirements for the product images, you are ready to create a feed on the GMC.
You can use any feed-creating software according to your need and platform convenience. For instance, we’ve chosen FeedGeni to create a product feed for our Shopify store.
Creating a feed is easy and varies according to which app you’re using. In this case, here’s how we’ve created a Google feed on FeedGeni:
Now that we’ve created a product file, head over to your Google Merchant Account, and in the products section, click Create a feed (advanced option).
Note: If you can’t find this option, change your account to Google Merchant Classic and try again. (You can find this option in the GMC Settings)
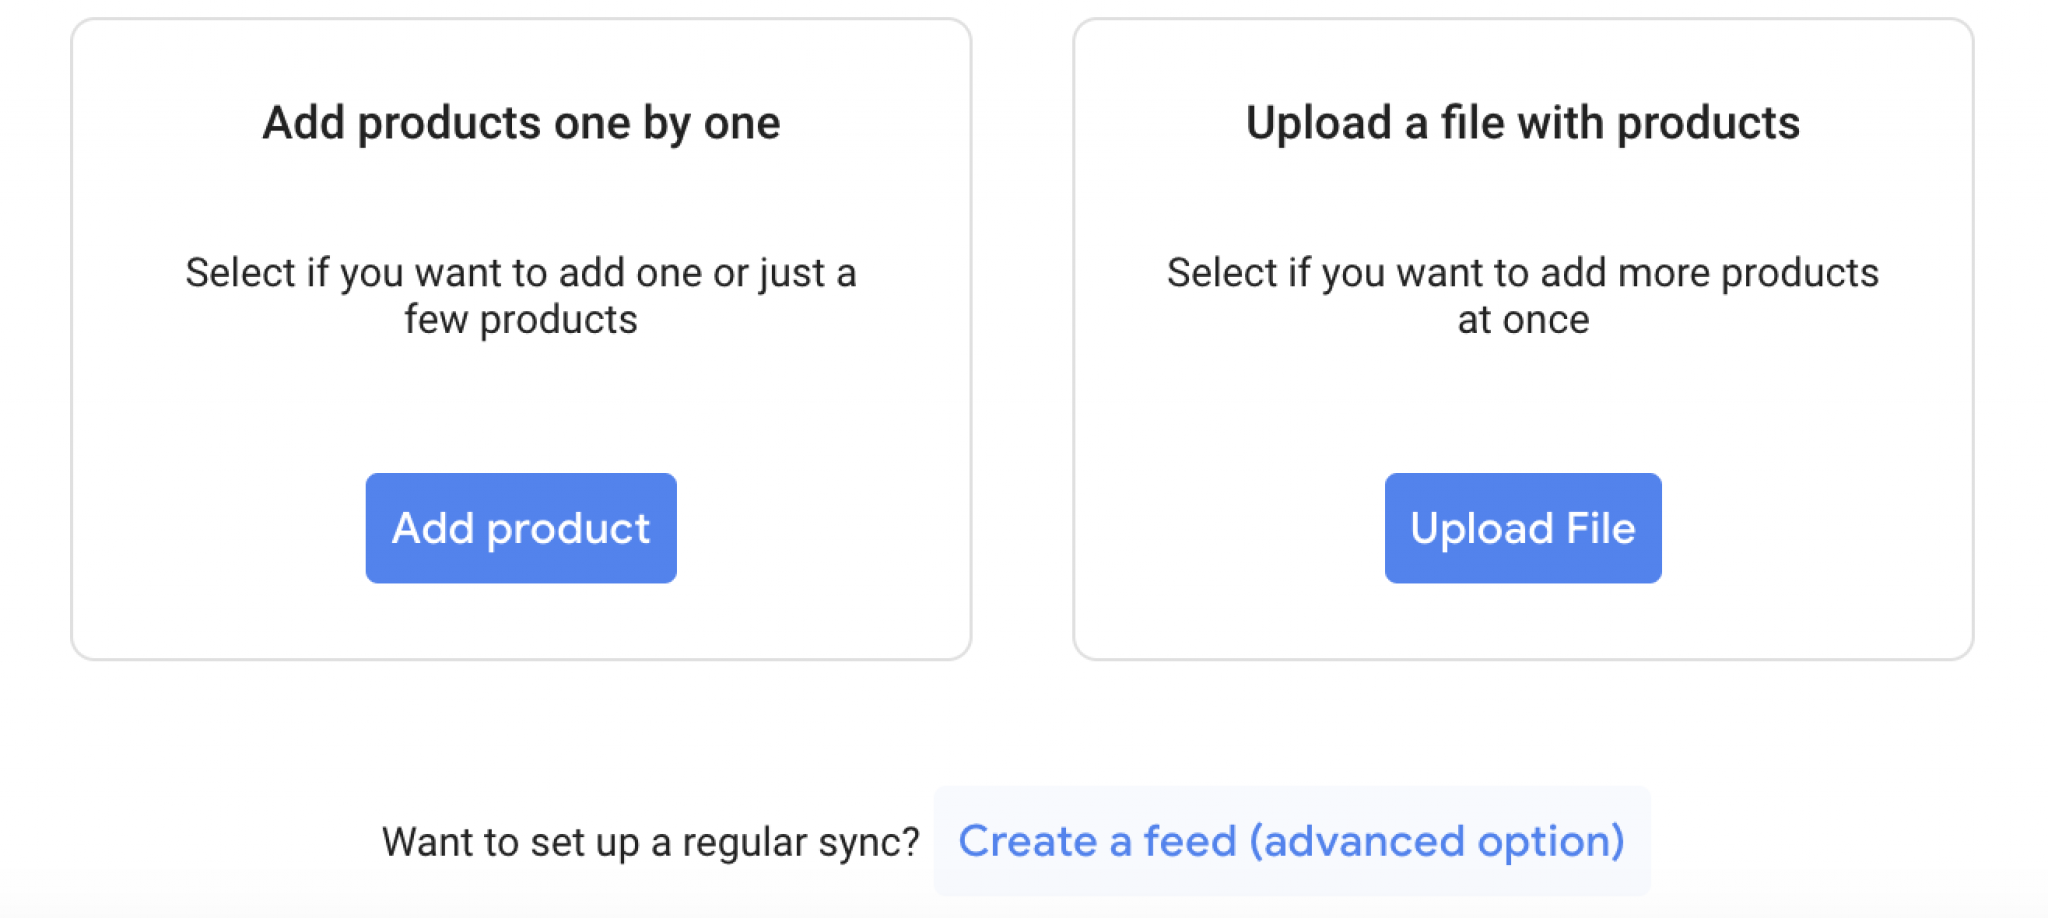
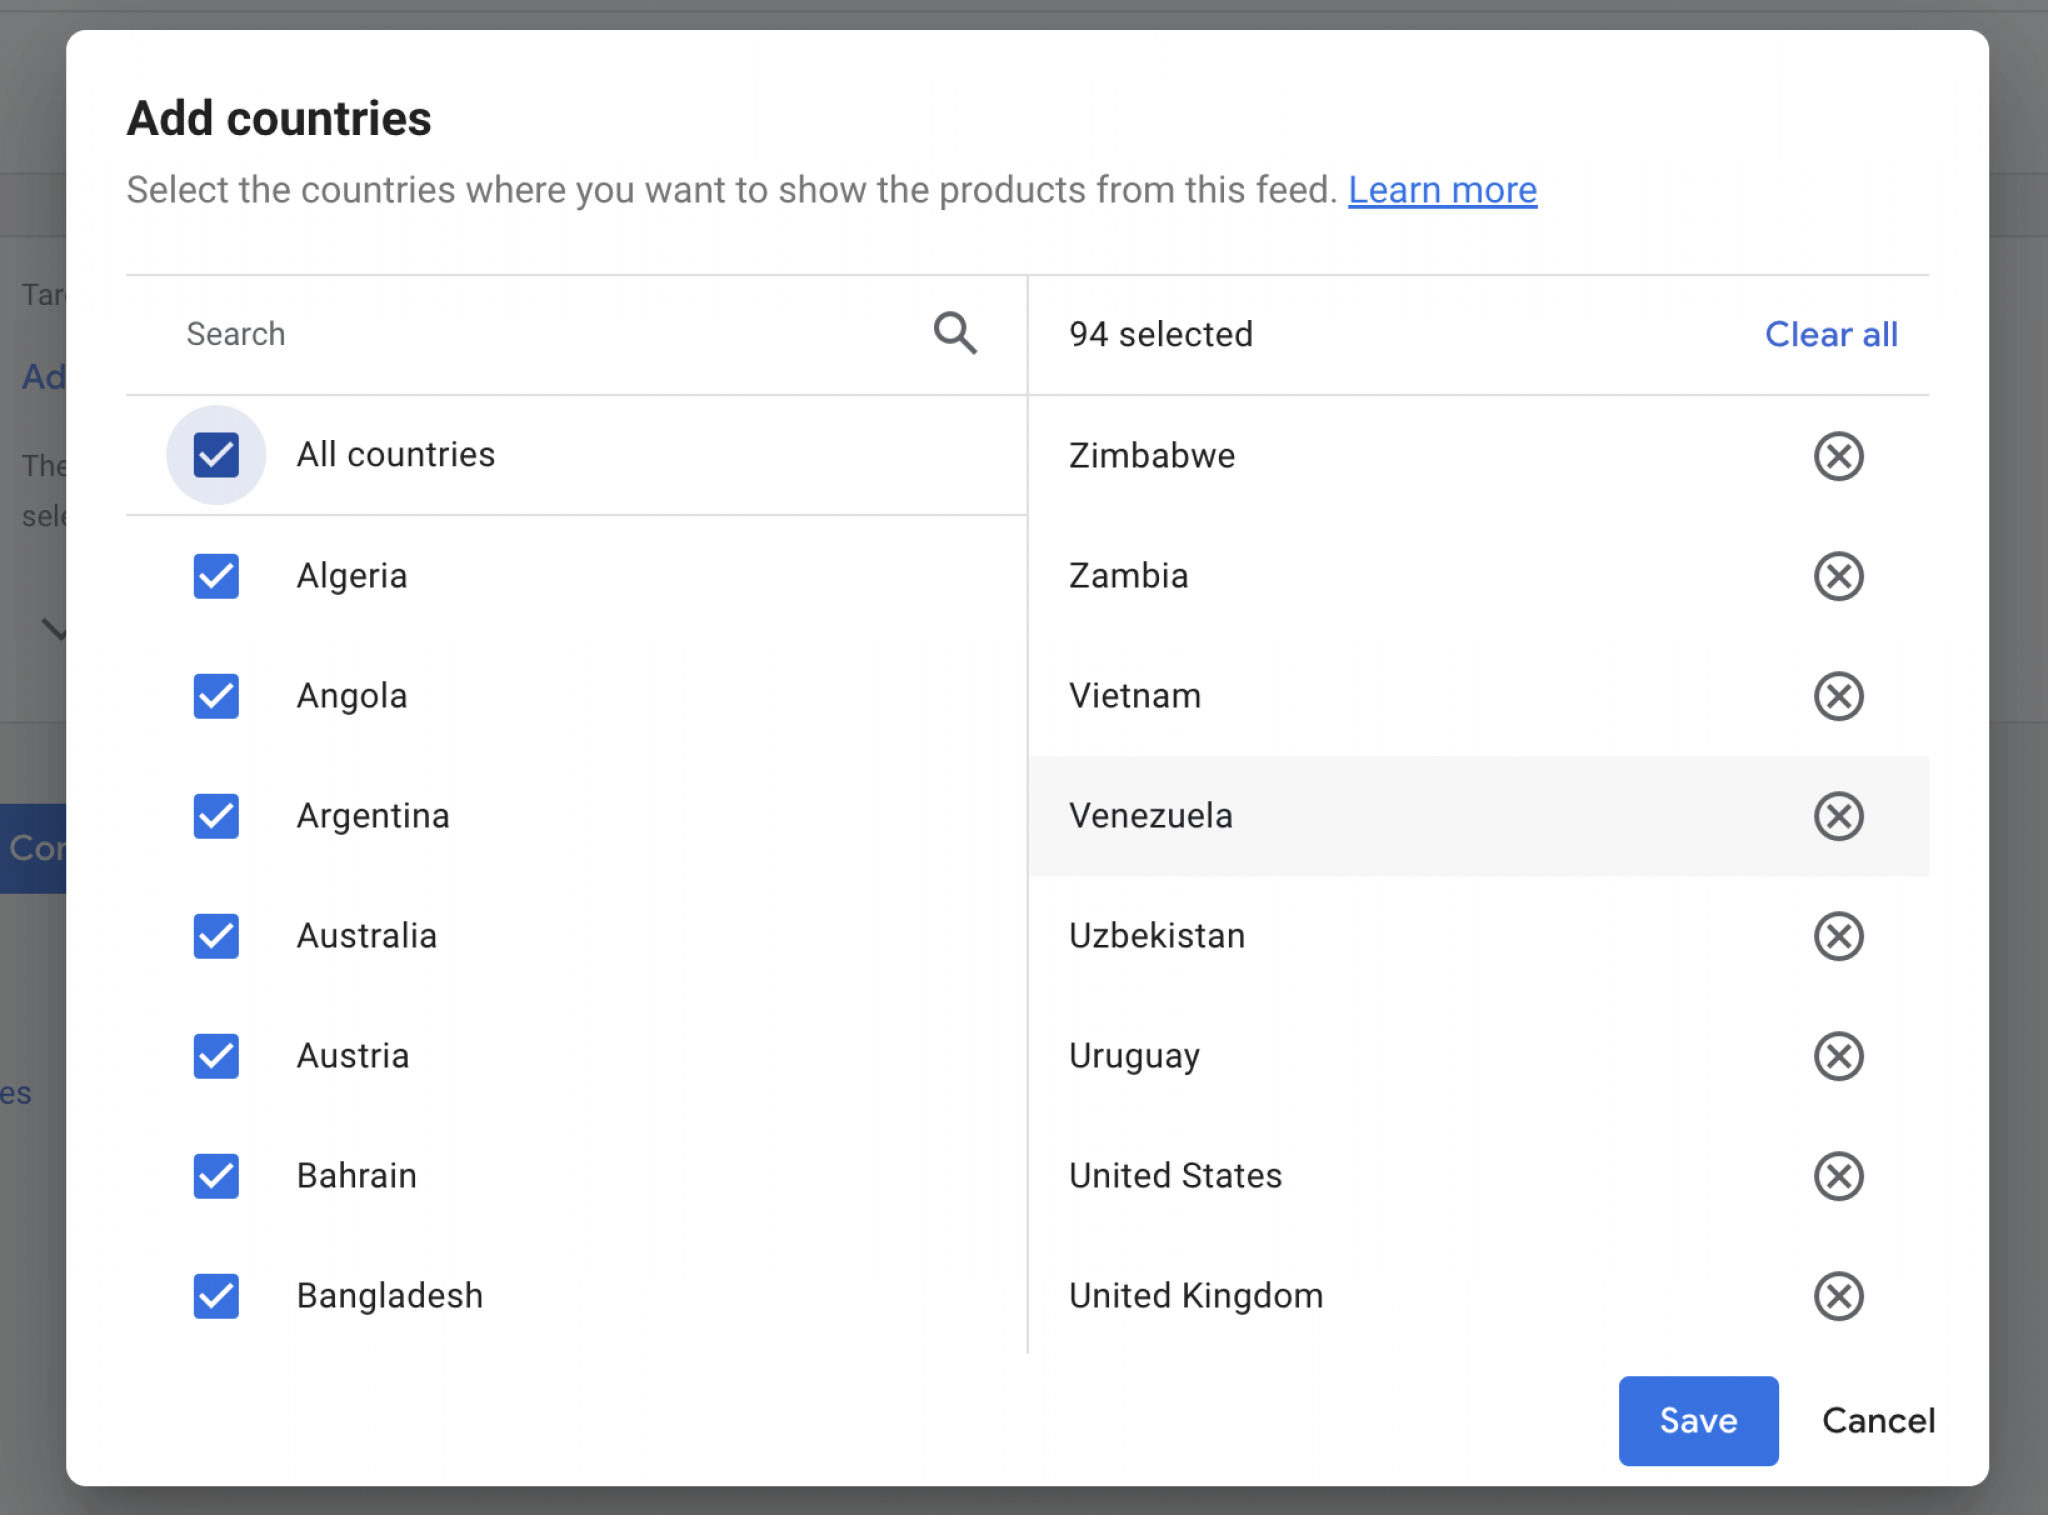
After selecting ‘Create a feed,’ add the countries you want to target by pressing the Add button below.
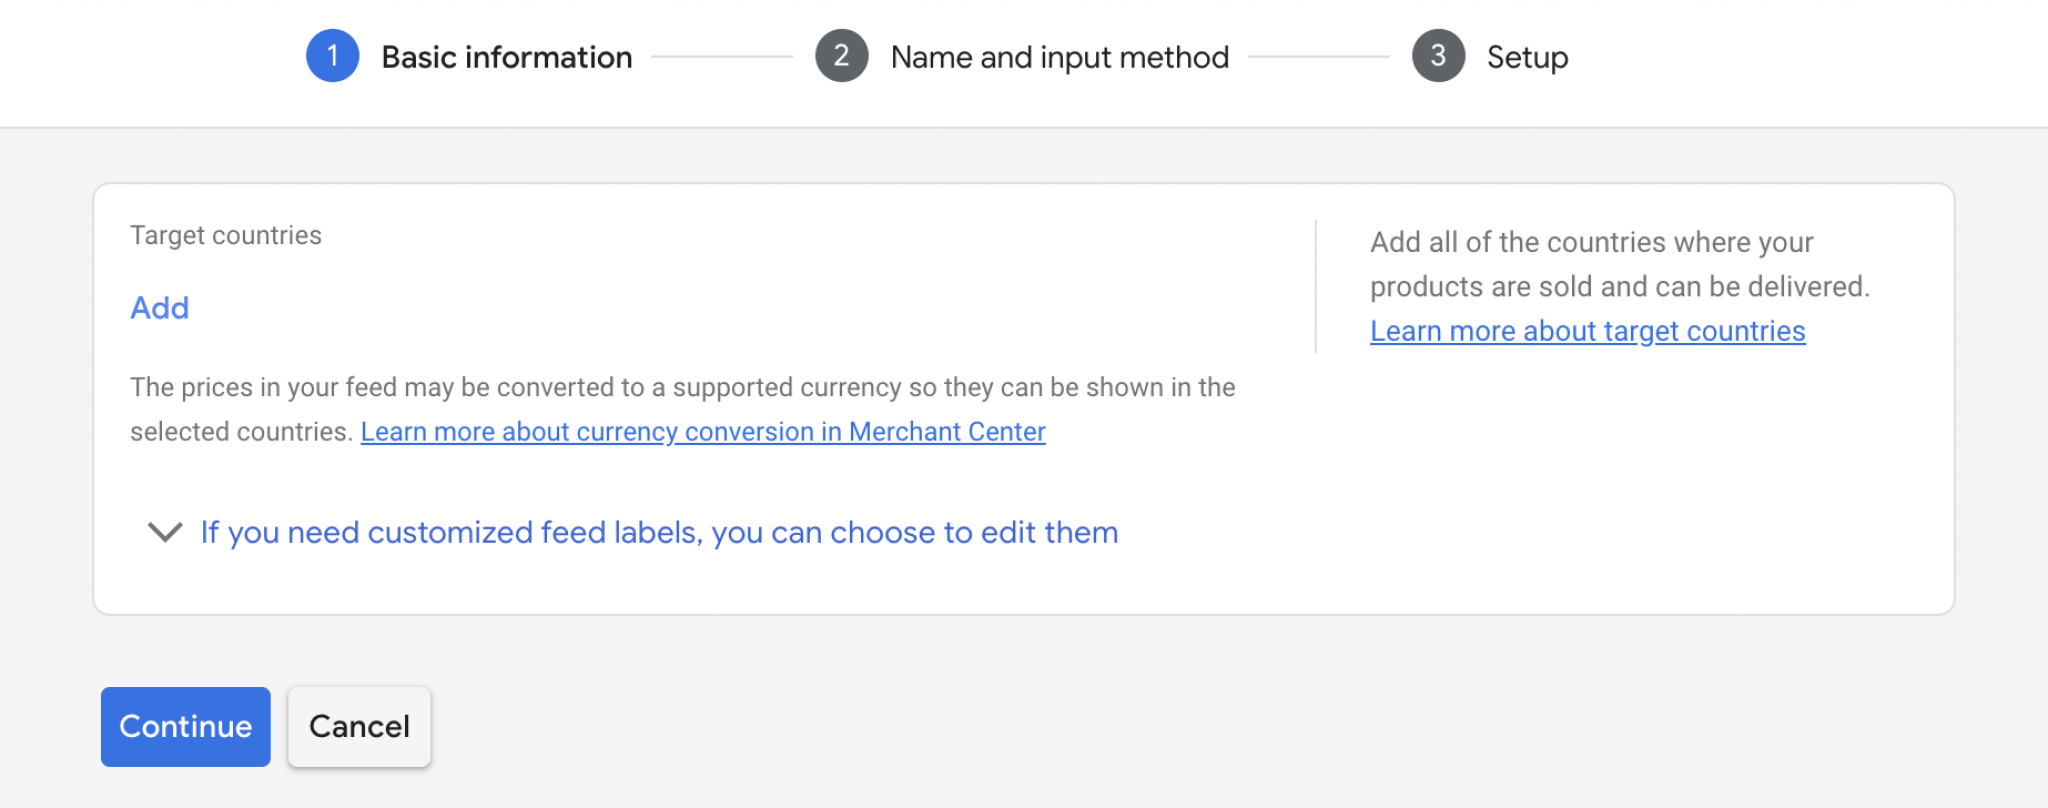
Select the number of countries you want to target.
Note: You can also add feed labels to customize them.
Press Save & Continue.
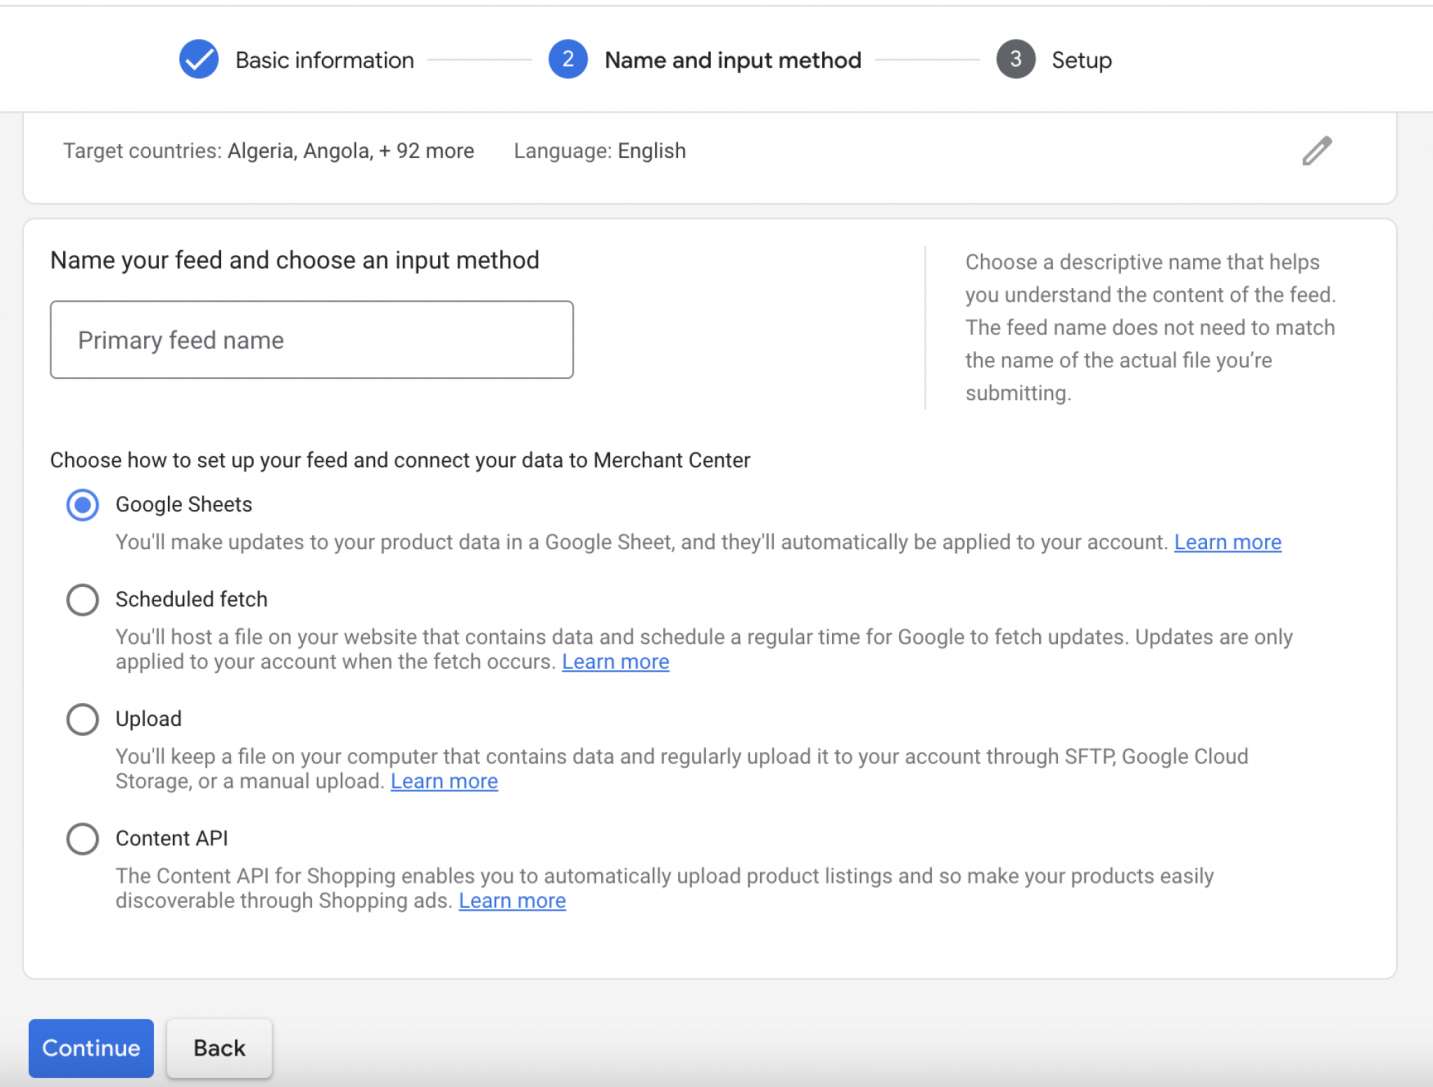
Uploading product feeds via Google Sheets is one of the typical ways in Google Merchant Center. You can submit all your products on Google using the Google Sheet option. Just select the Google Sheets as a feed input and process the following.
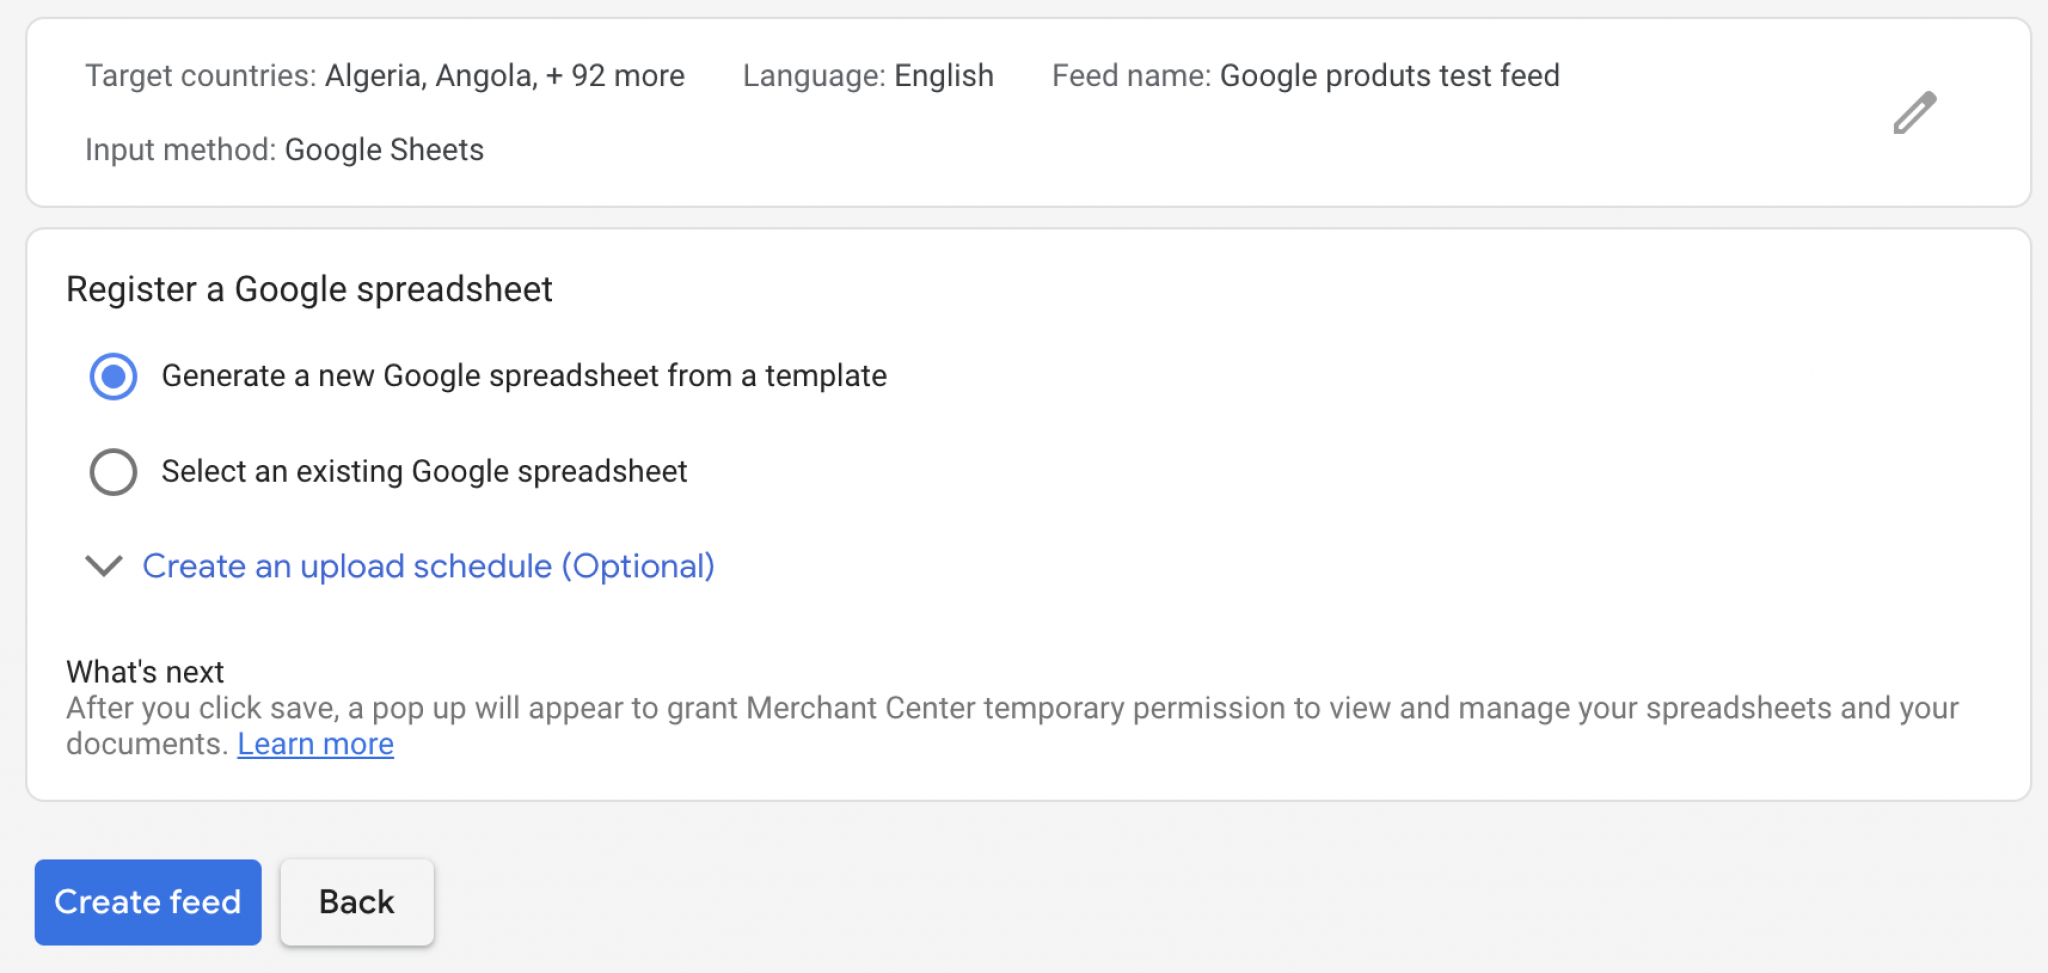
Click Continue after selecting the Google Sheet option. You’ll be asked to provide your Google account to register the file. You can choose an existing Google spreadsheet or use any preferred template to create a new one.
Press Create Feed.
Note: You can select the upload schedule creation option to schedule all future feed uploads.
File Transfer Protocol (FTP) may be one of the most convenient choices when uploading products to your Google Merchant Center.
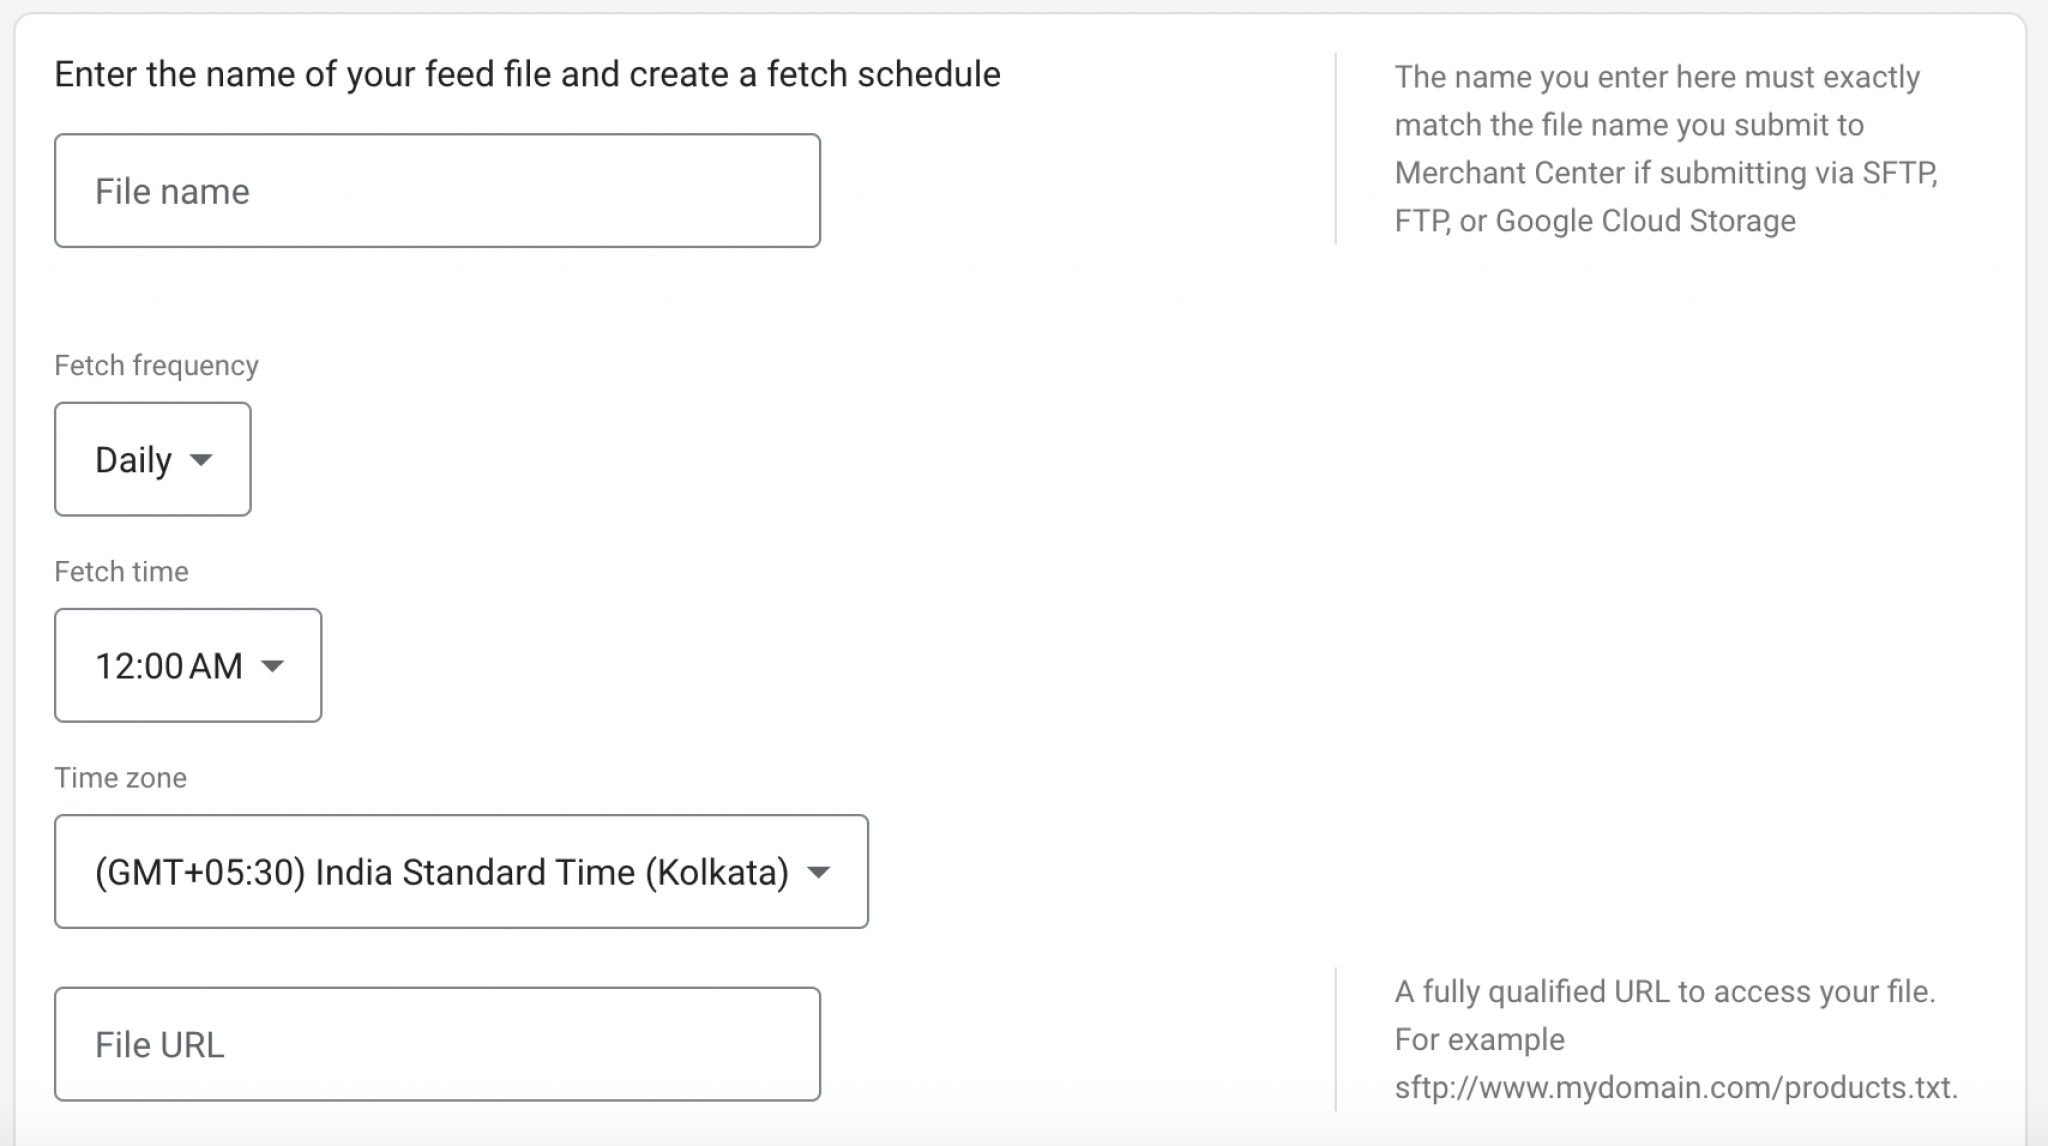
You can paste the URL in the provided form and are ready.
Select Scheduled fetch as your feed input method to do this process, and click Continue.
Now enter the following information in the form:
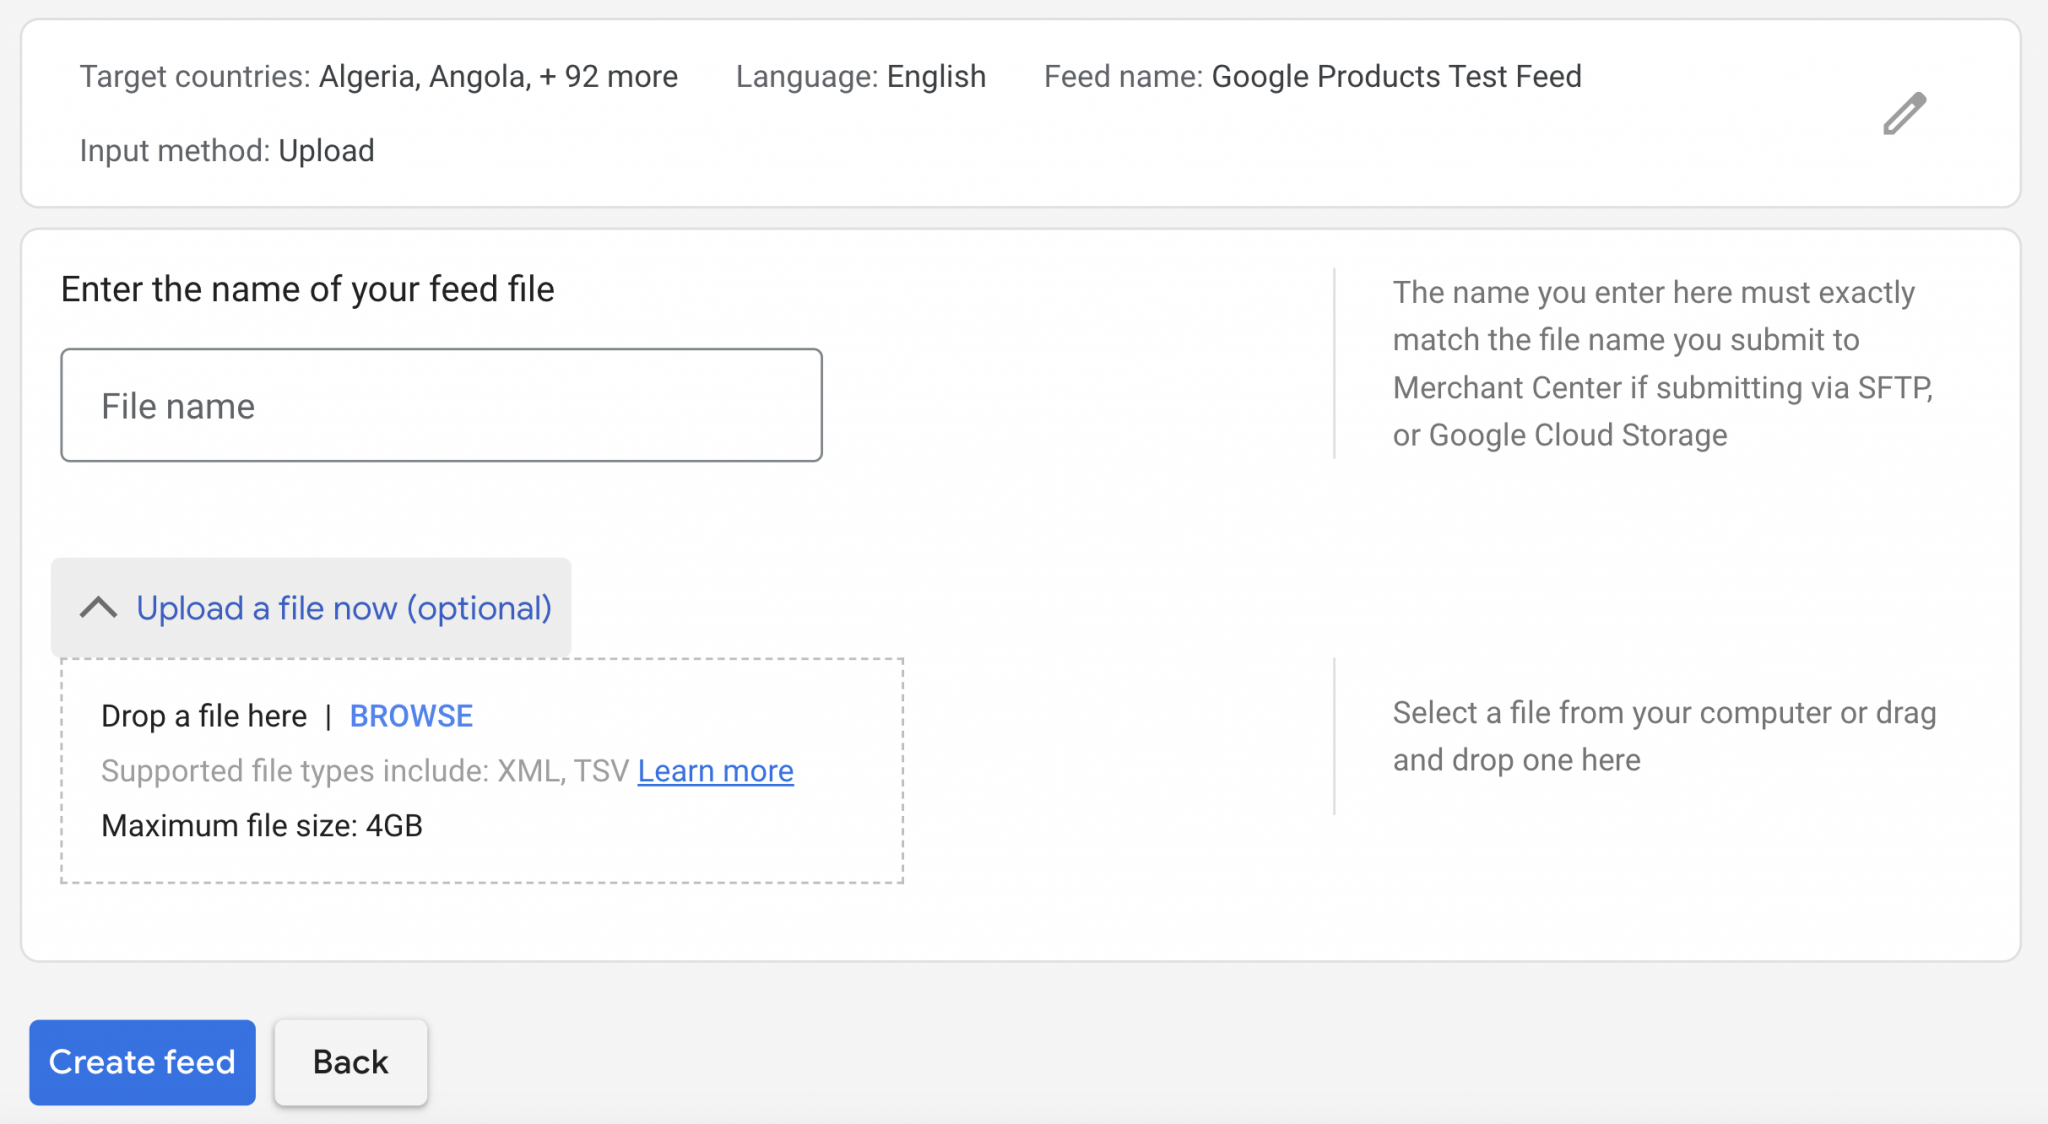
Uploading products directly as files to Google Merchant Center can be the practical option for product feeds.
Besides linking products from online sources, you can individually upload them to the Google Merchant Center.
Before uploading directly to GMC, you must follow the specific rules stated below:
✓ The file format of the feed must be XML or TSV.
✓ The maximum feed file size should be 4GB.
Enter the feed file name in the first section.
After ensuring the feed file follows the above rules, you can directly drag and drop the file into the upload box.
This will upload your product file, and the Google Merchant Center automatically collects the data.
If you have an online business and you’re not taking a leap toward Google Shopping Ads, you’re missing the biggest opportunity that happened after the invention of a franchise!
Creating a product is one thing, but leading customers towards it is one of the most important steps in marketing
Google Shopping Ads is a perfect way to bring your store under the spotlight and to the top of your Google search results to help you obtain traffic and attract the right customers.
Now that you’ve connected your store to the Google Merchant Center, it’s time to bring value to those products in-store!
If you’ve ever searched for a specific product on Google, you may have seen product ad visuals at the top of the search results.
These product ad visuals are products promoted by Google with product images and a description to entice users to click them and buy the specific product.
If you plan to attract any target customers, Google shopping ads are the right option to make them buy your products.
We’re sure now you have a good understanding of Google Shopping Ads. Let’s see how to set them up step-by-step.
Before we create our first Shopping campaign, here are a few pre-setup instructions you have to follow:
✓ Ensure you’ve signed up for your Google Merchant Center (As ensured above):
Get started with Google Shopping Ads by following the steps above and creating a new account by adding products after signing up through your Google account.
✓ Ensure you’ve created a shopping feed for products by following the above process:
Google uses the shopping feed created in your Google Merchant Center to display products in the page listings. After completing a spreadsheet with the required information, such as your product ID, Title, Link, Media, and Price, your product shopping feed is ready to be promoted.
✓ Link your Google Ads account to Merchant Center (Follow through the guide above):
To have it a short way, Go to your GMC and follow the below steps:
Tools > Settings > Linked accounts > Google Ads customer ID > Send link request.
✓ Create Google Shopping Ads
After setting up all the necessary tasks, you’re ready to launch Google Shopping Ads! Here’s how:
Google Shopping Ads and product listings are one of the best ways to boost your traffic and advertise products directly to the right audience. But if you want us to launch a successful Google Ads campaign, you’re at the right place.
Our potent team of experts will help you design the just right Google Ads campaign for your business. Contact us at: https://valardigital.com/contact/
Call us here: +91 7219084311
Creating a new shopping campaign is the first step to creating successful shopping ads. Follow the steps below, and you’re all set:
Open Google Ads from your favorite web browser and sign in to your new account.
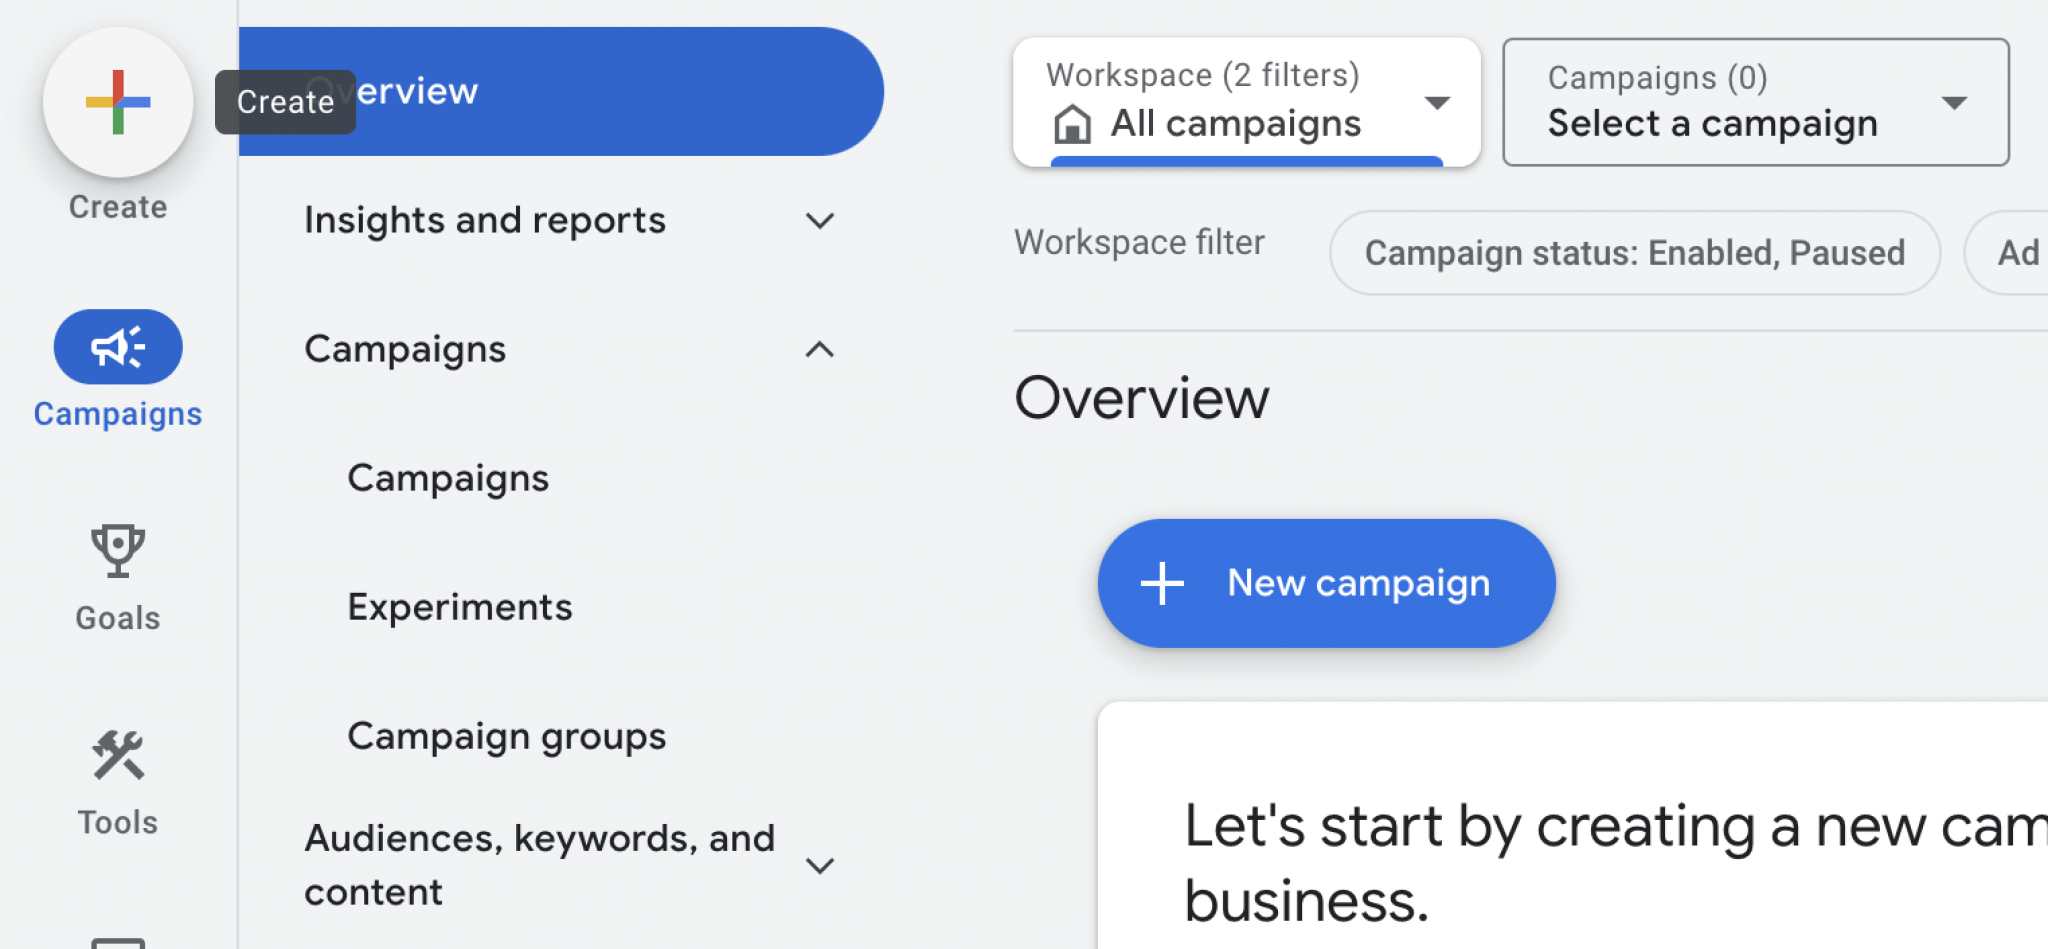
Select the Plus icon or click New Campaign below the Overview section.
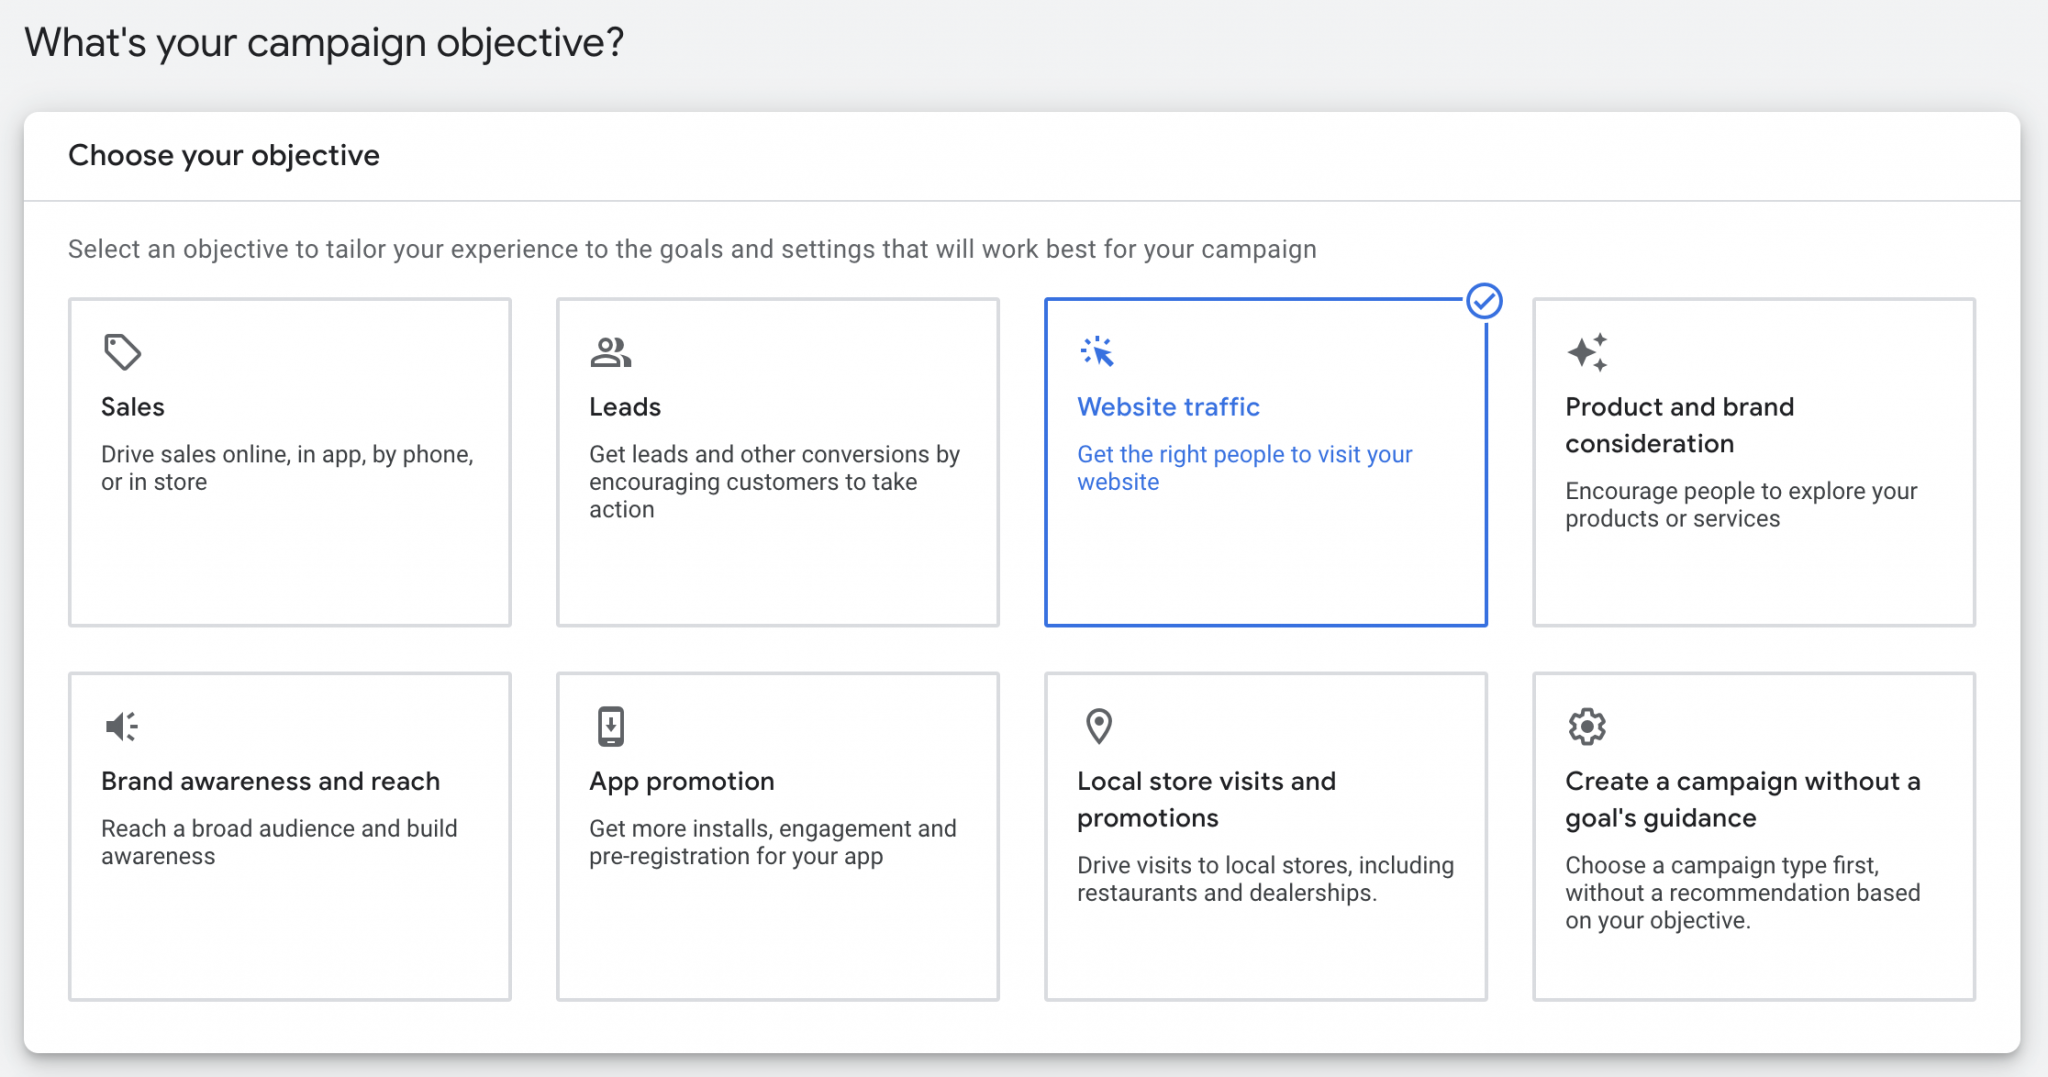
Select the preferred shopping type for your campaign. Since we want to attract our audience to our store to buy products, we’ll choose Website traffic.
After selecting the campaign type as ‘website traffic‘ a new panel will be revealed where you must choose Shopping to properly convey your campaign motive.
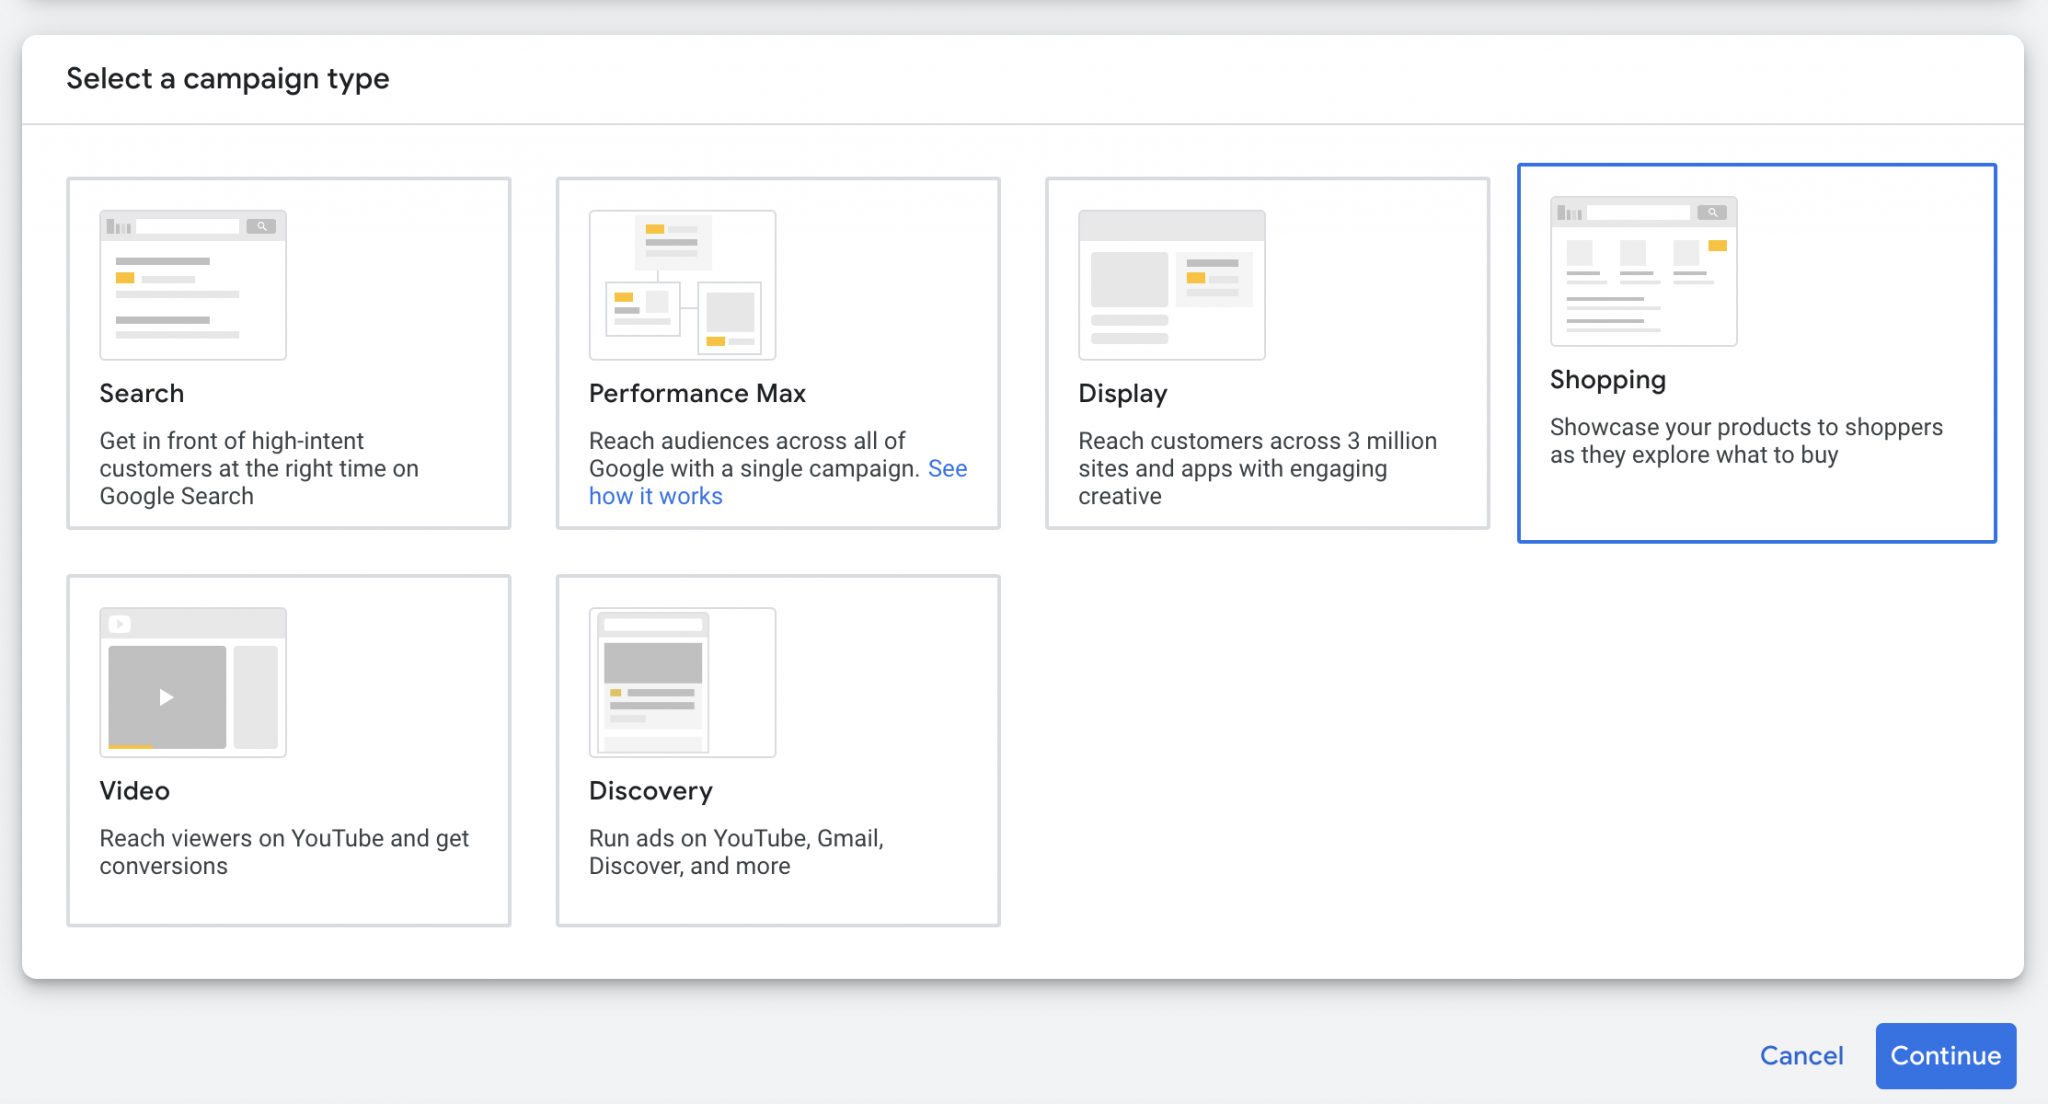
Now select your Google Merchant Center account to proceed.
You can also select a campaign subtype to use max performance with Google automation or standard performance to go the typical way. (We’re selecting Performance Max campaign)
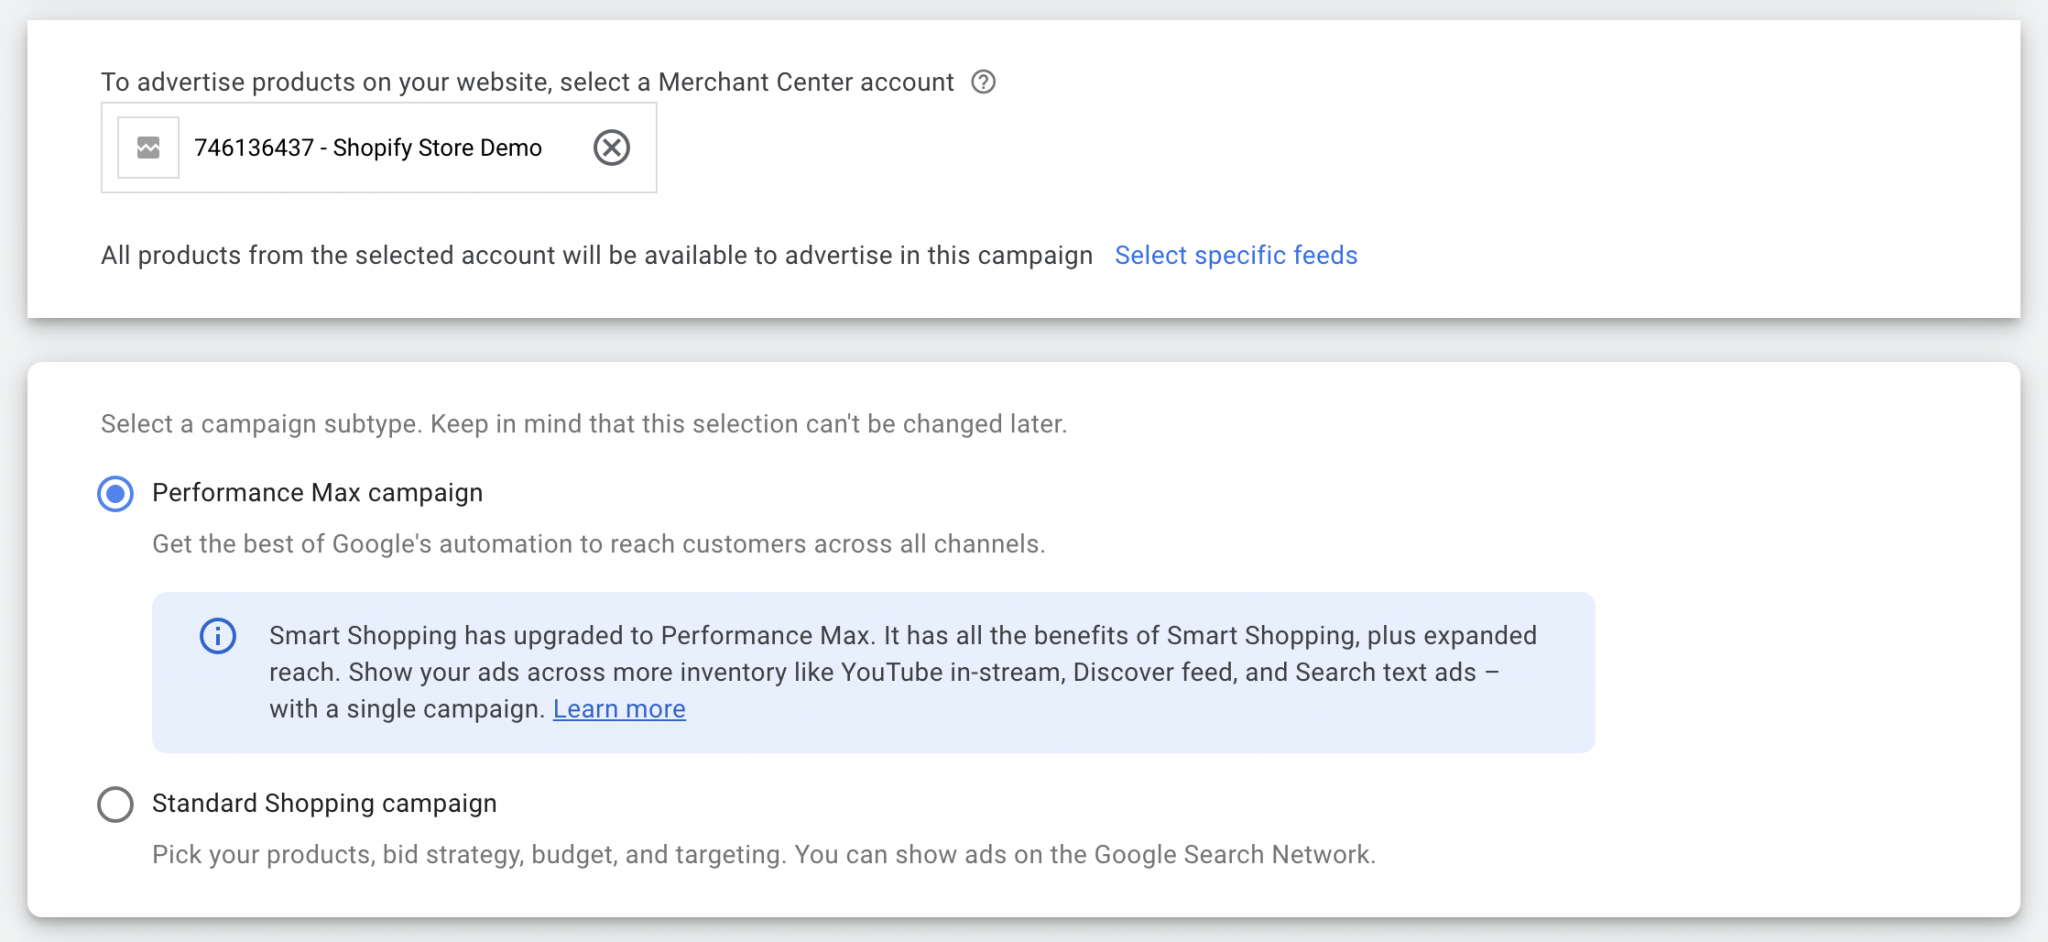
After selecting the adequate options, it’s time to set your campaign name; you’ll need to choose a name that’s easy to describe your campaign motive.
For example: Rather than writing it as ‘ad-1’, name it like ‘Brown Clay Plant Pot’ – It fits the exact motive of your campaign and is also easy to remember since you’ll eventually need to run multiple ads on the platform.
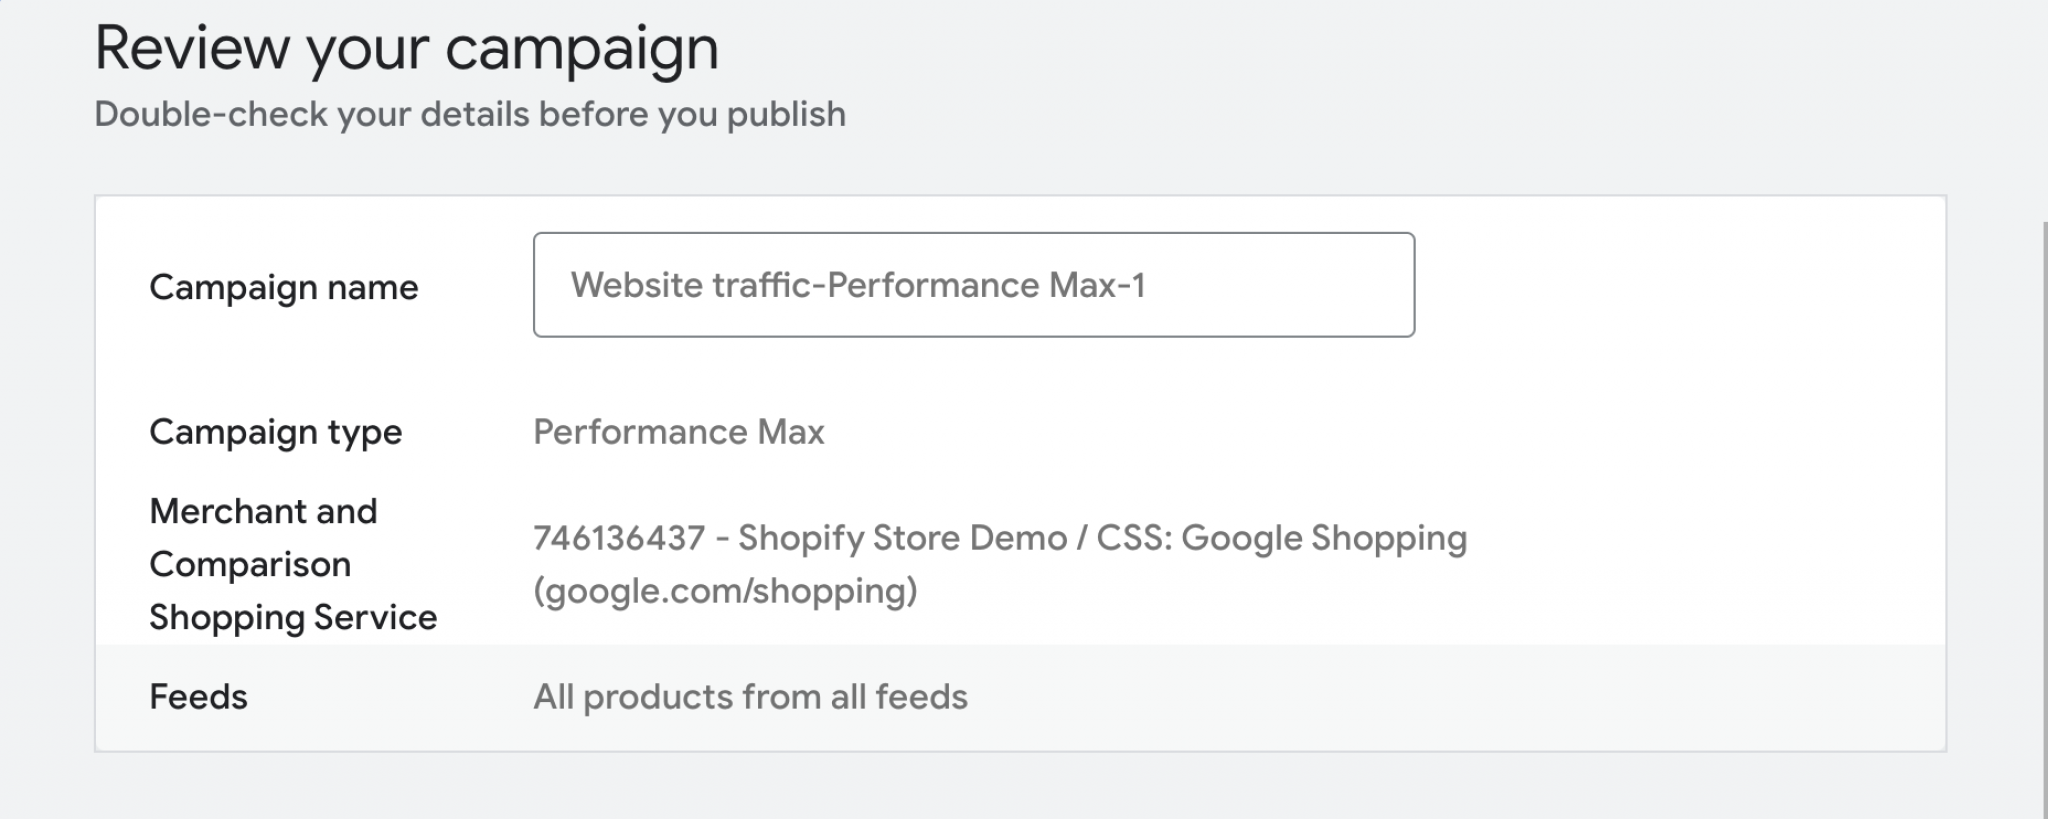
Since it’s our demo campaign, we’re going with the default campaign name.
Press Continue when done.

Bidding is the most essential process you need to understand when it comes to deciding on an ad strategy.
Understand and choose which type of bleeding you want to go with since you can choose from multiple needing options on the platform:
✓ Cost Per Click (CPC)
✓ Cost per thousand impressions (CPM)
✓ Cost per thousand view impressions (vCPM)
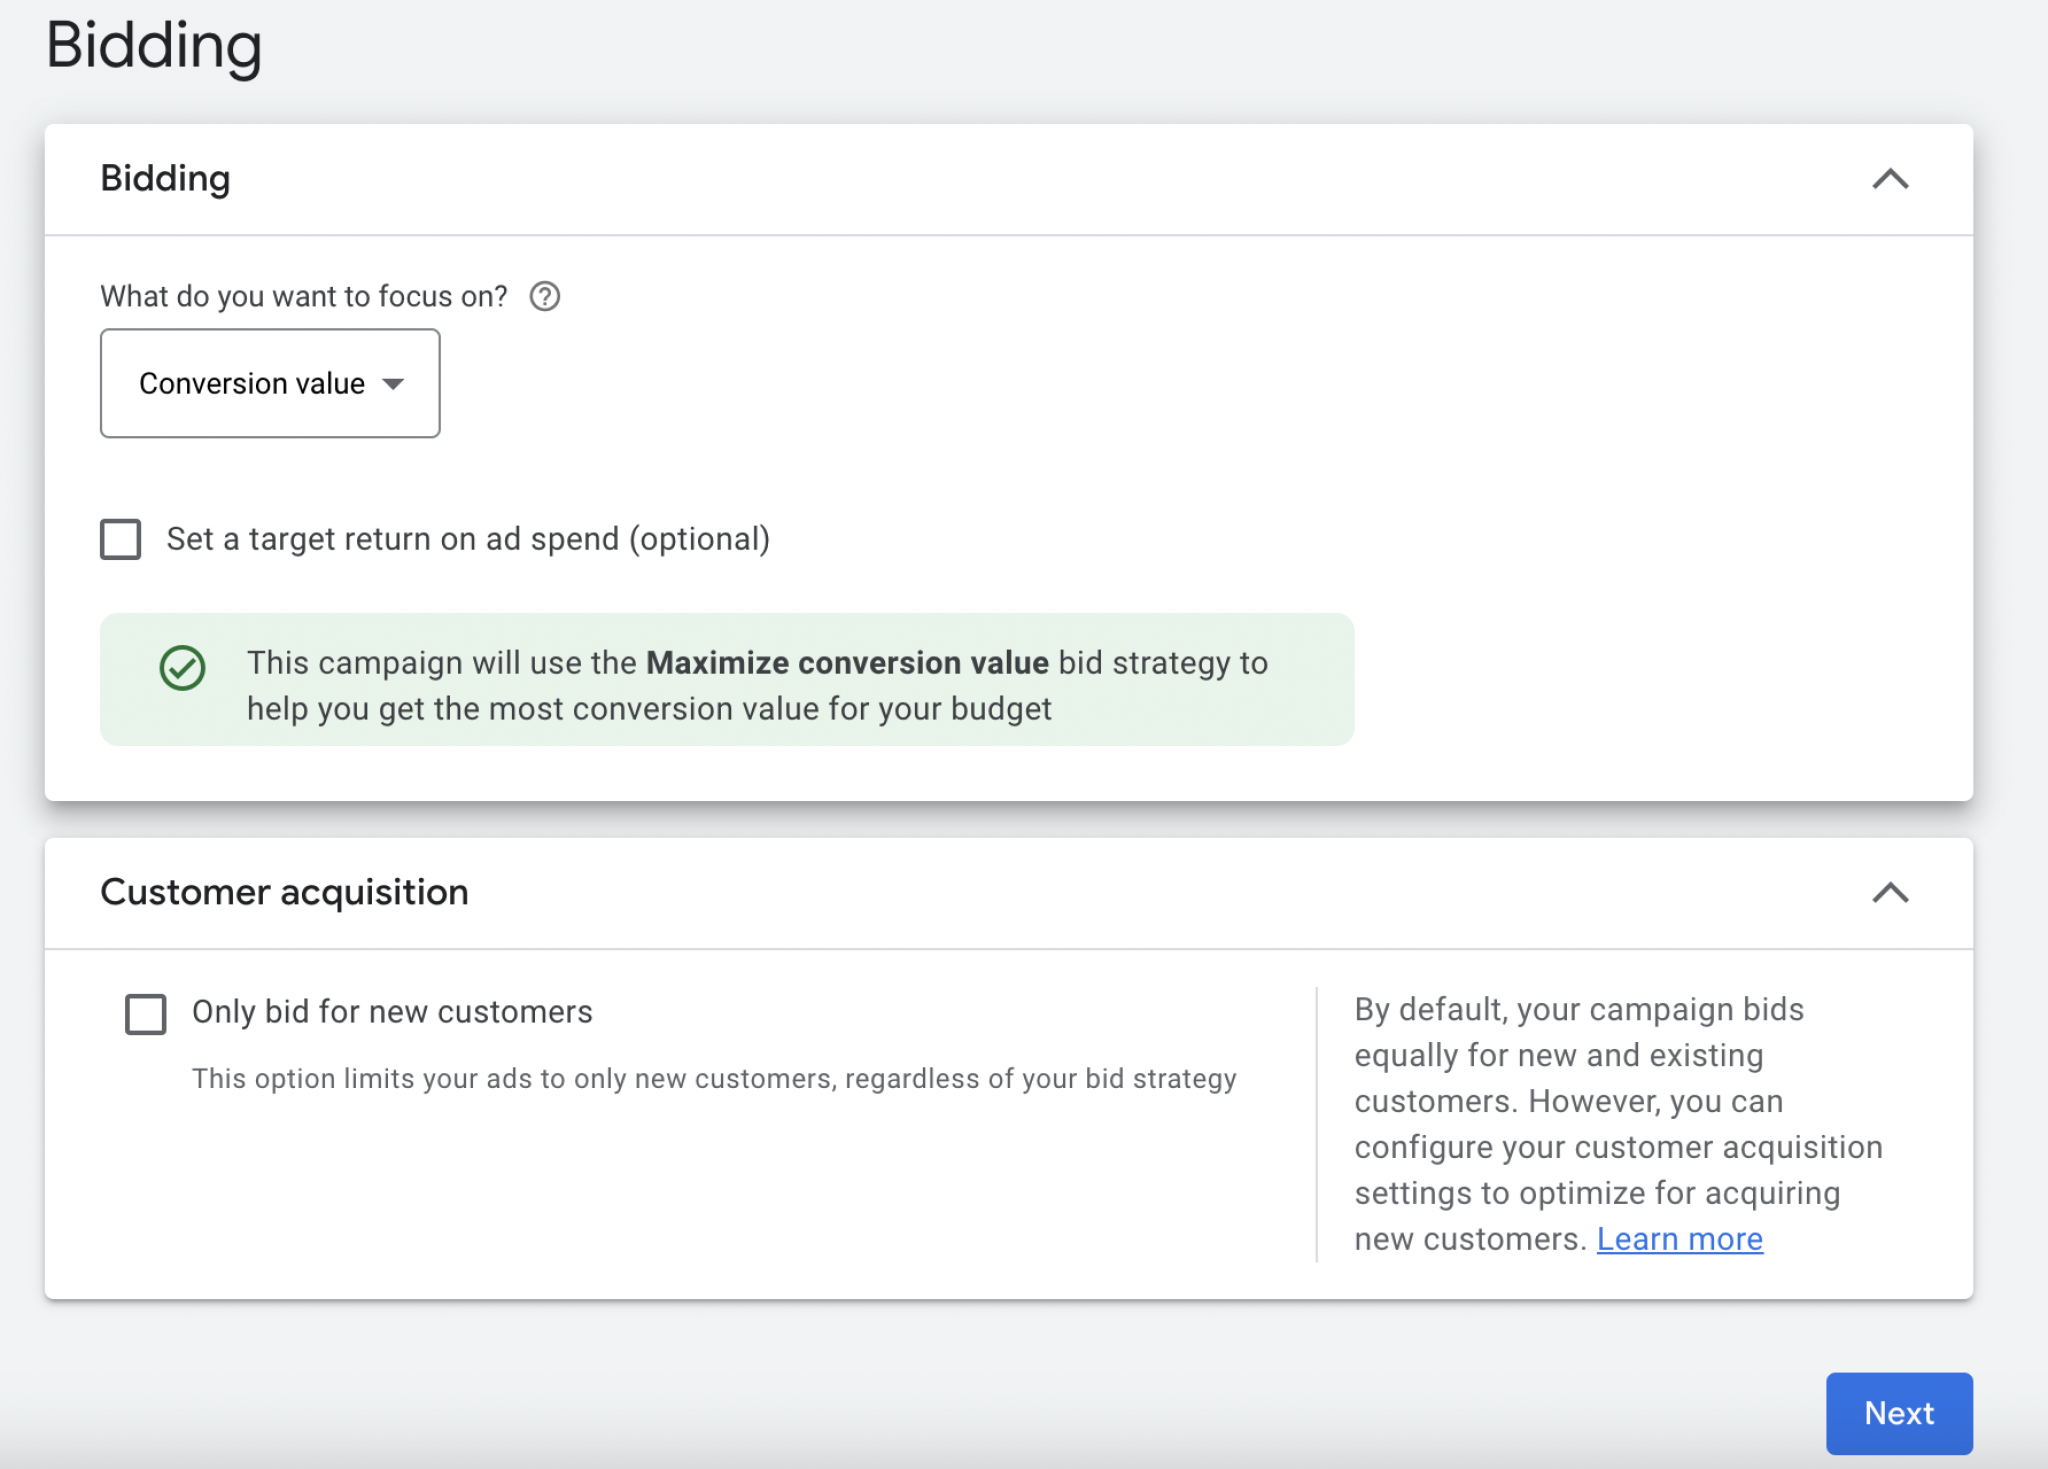
Generally, we use the Cost Per Click (CPC) bidding for our ad strategy, but if you are willing to build brand awareness, you can go for other bidding strategies accordingly.
Select your focus goals and check the target return on ad spend (optional).
You can also choose to bid only for new customers under customer acquisition.
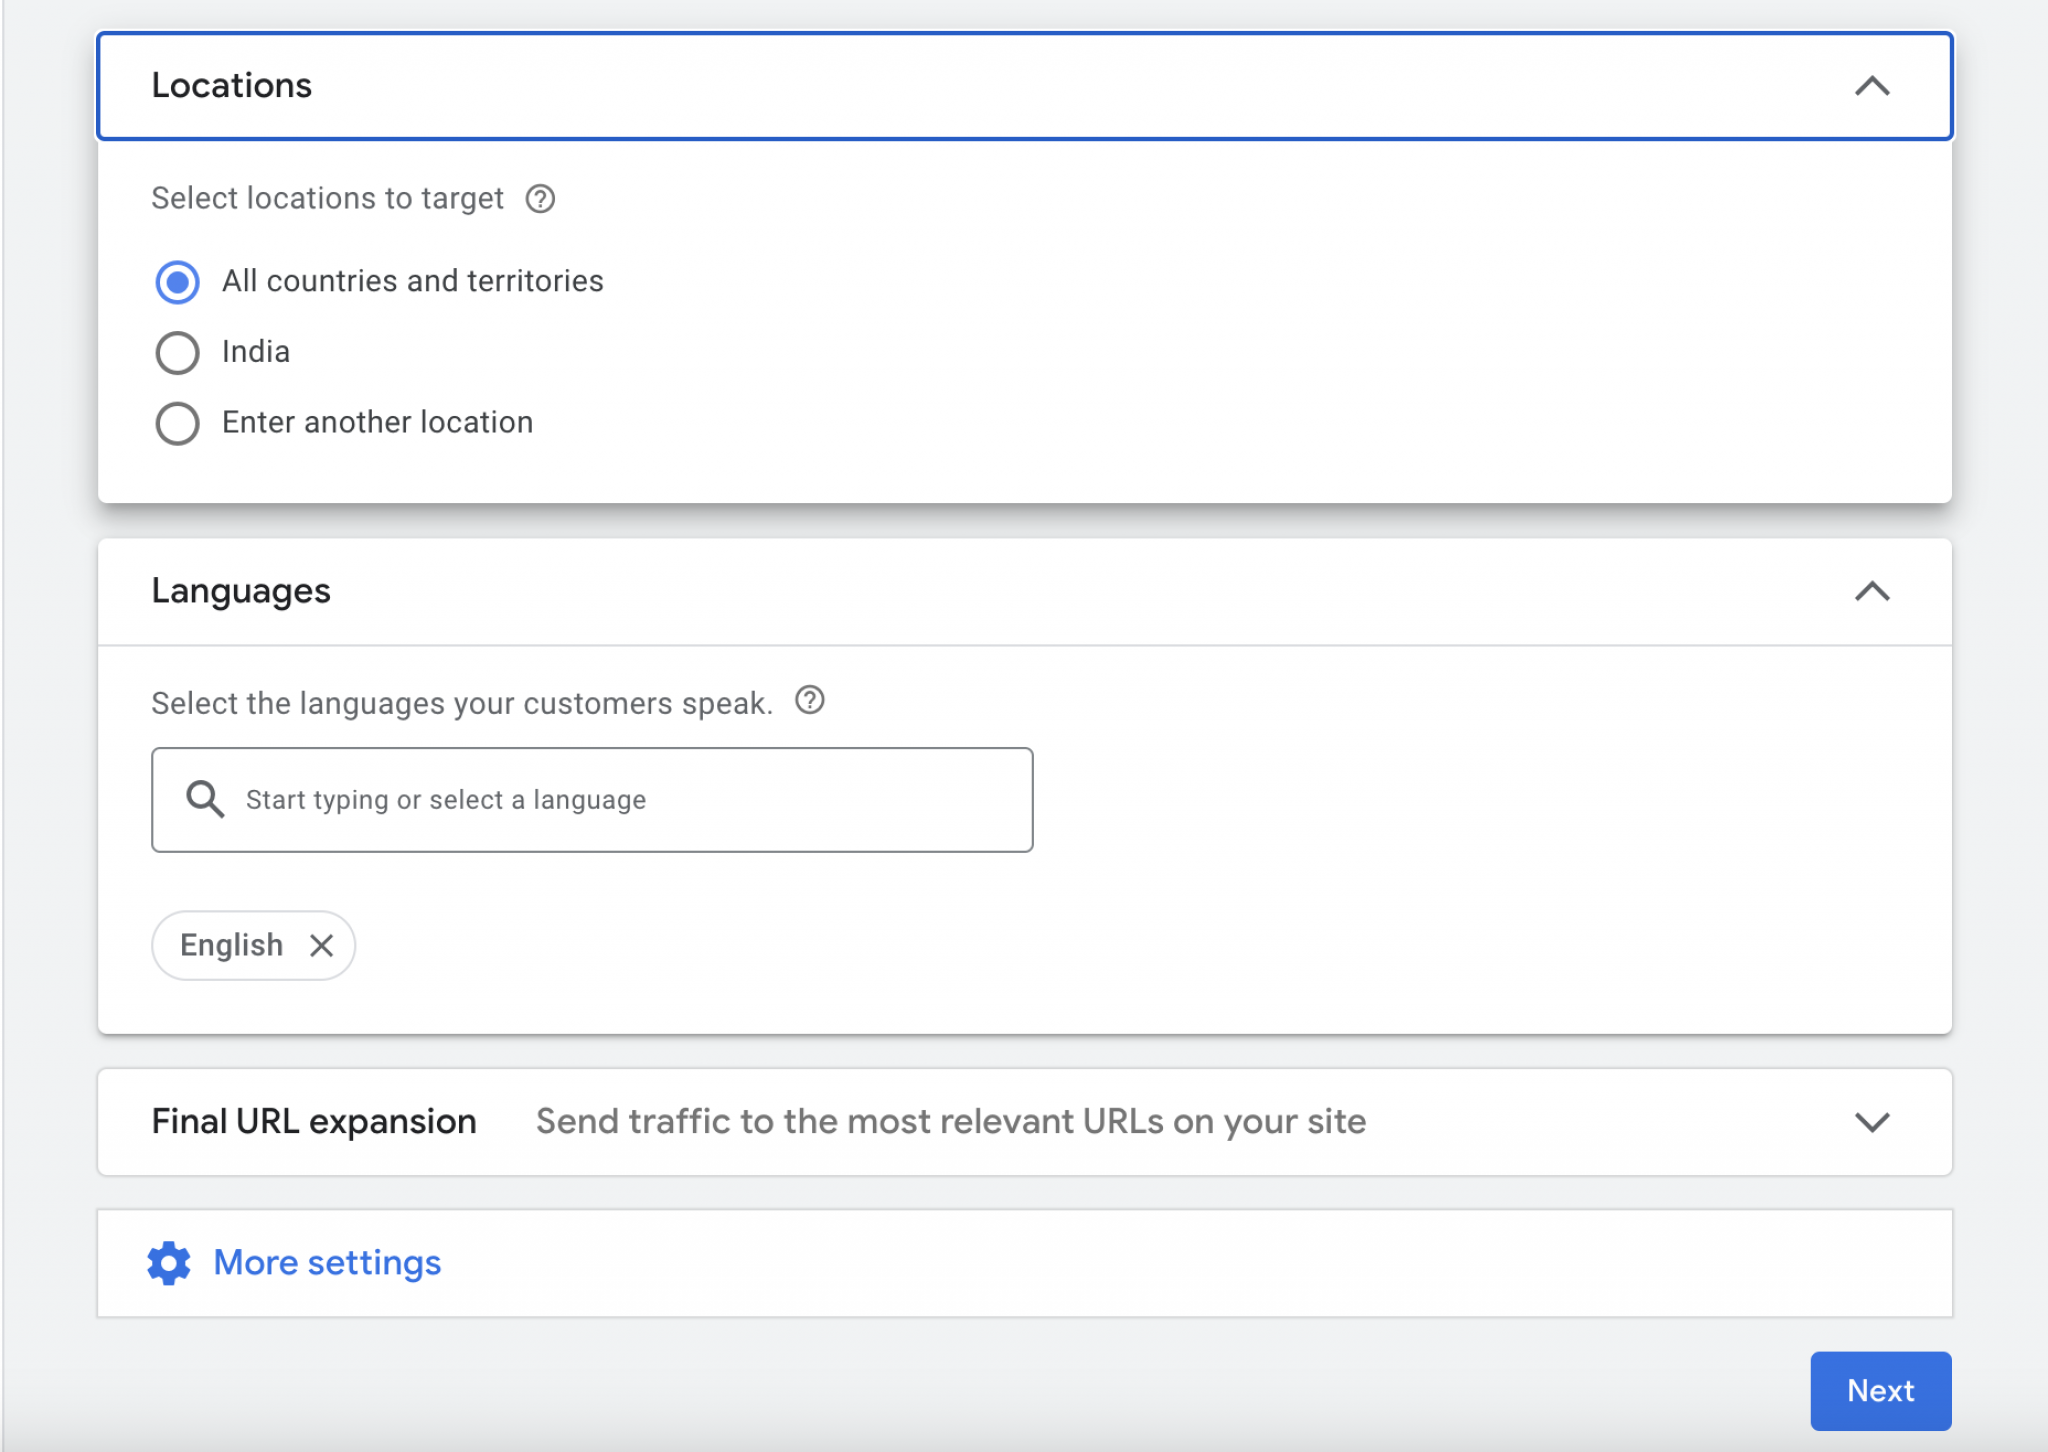
Set a country of sale by targeting your preferred locations from the given options.
It is important to let Google know where you’re selling your products and the people buying them.
This information helps Google show ads in the right locations in people’s searches.
Select the language of your communication between you and your customers.
Press Next.
If you have multiple products in your arsenal, you don’t need to create a new add campaign but, rather you can create multiple asset groups.
You can create up to 100 asset groups for a single shopping ad campaign, each asset group can hold particular procuts to target on listing groups.
In the listing groups, you can show how many products you want to include in your campaign.
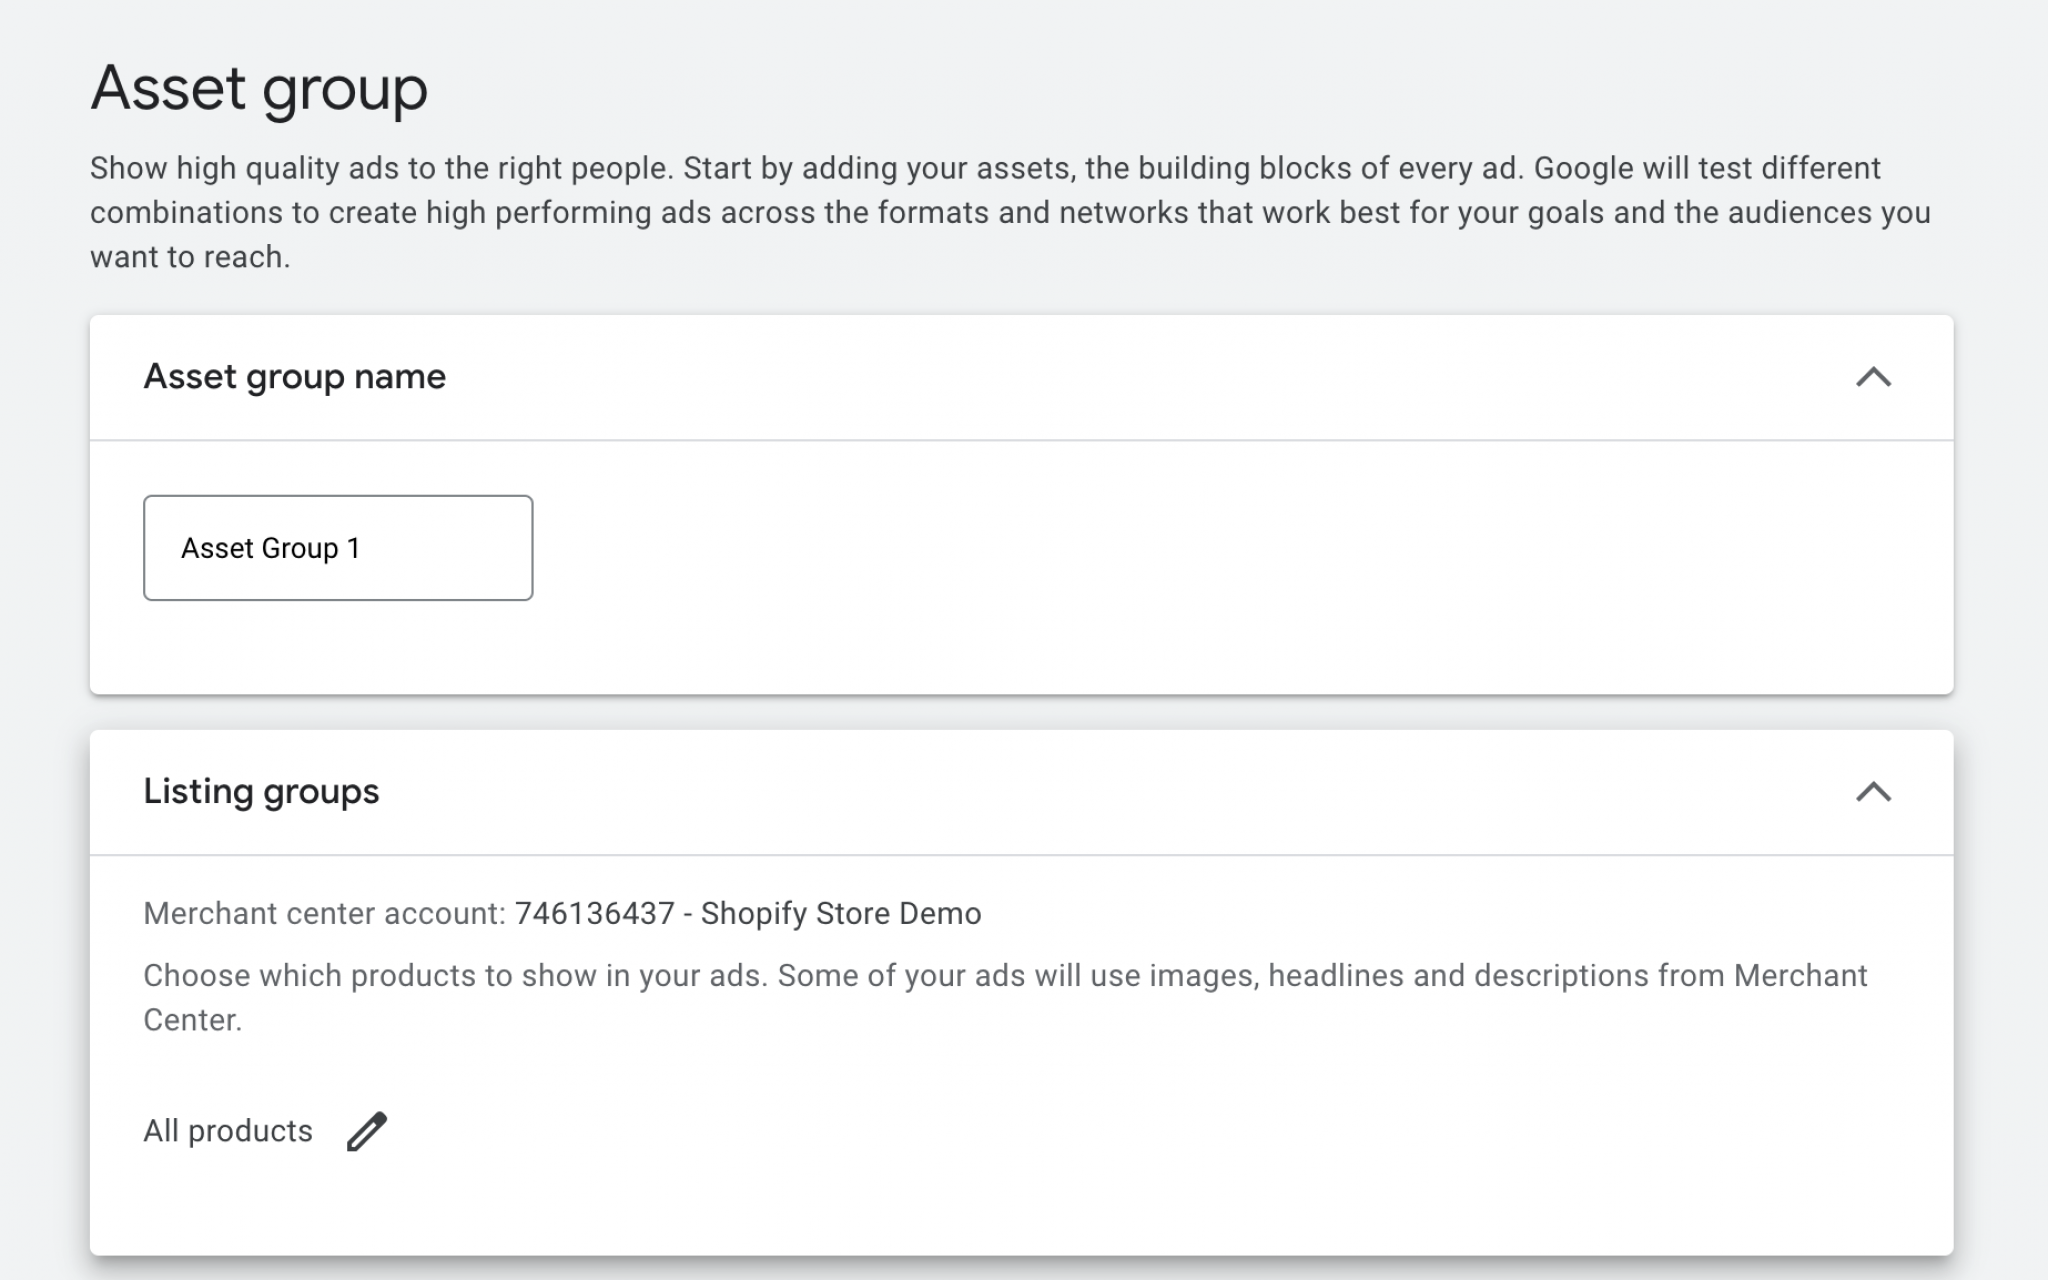
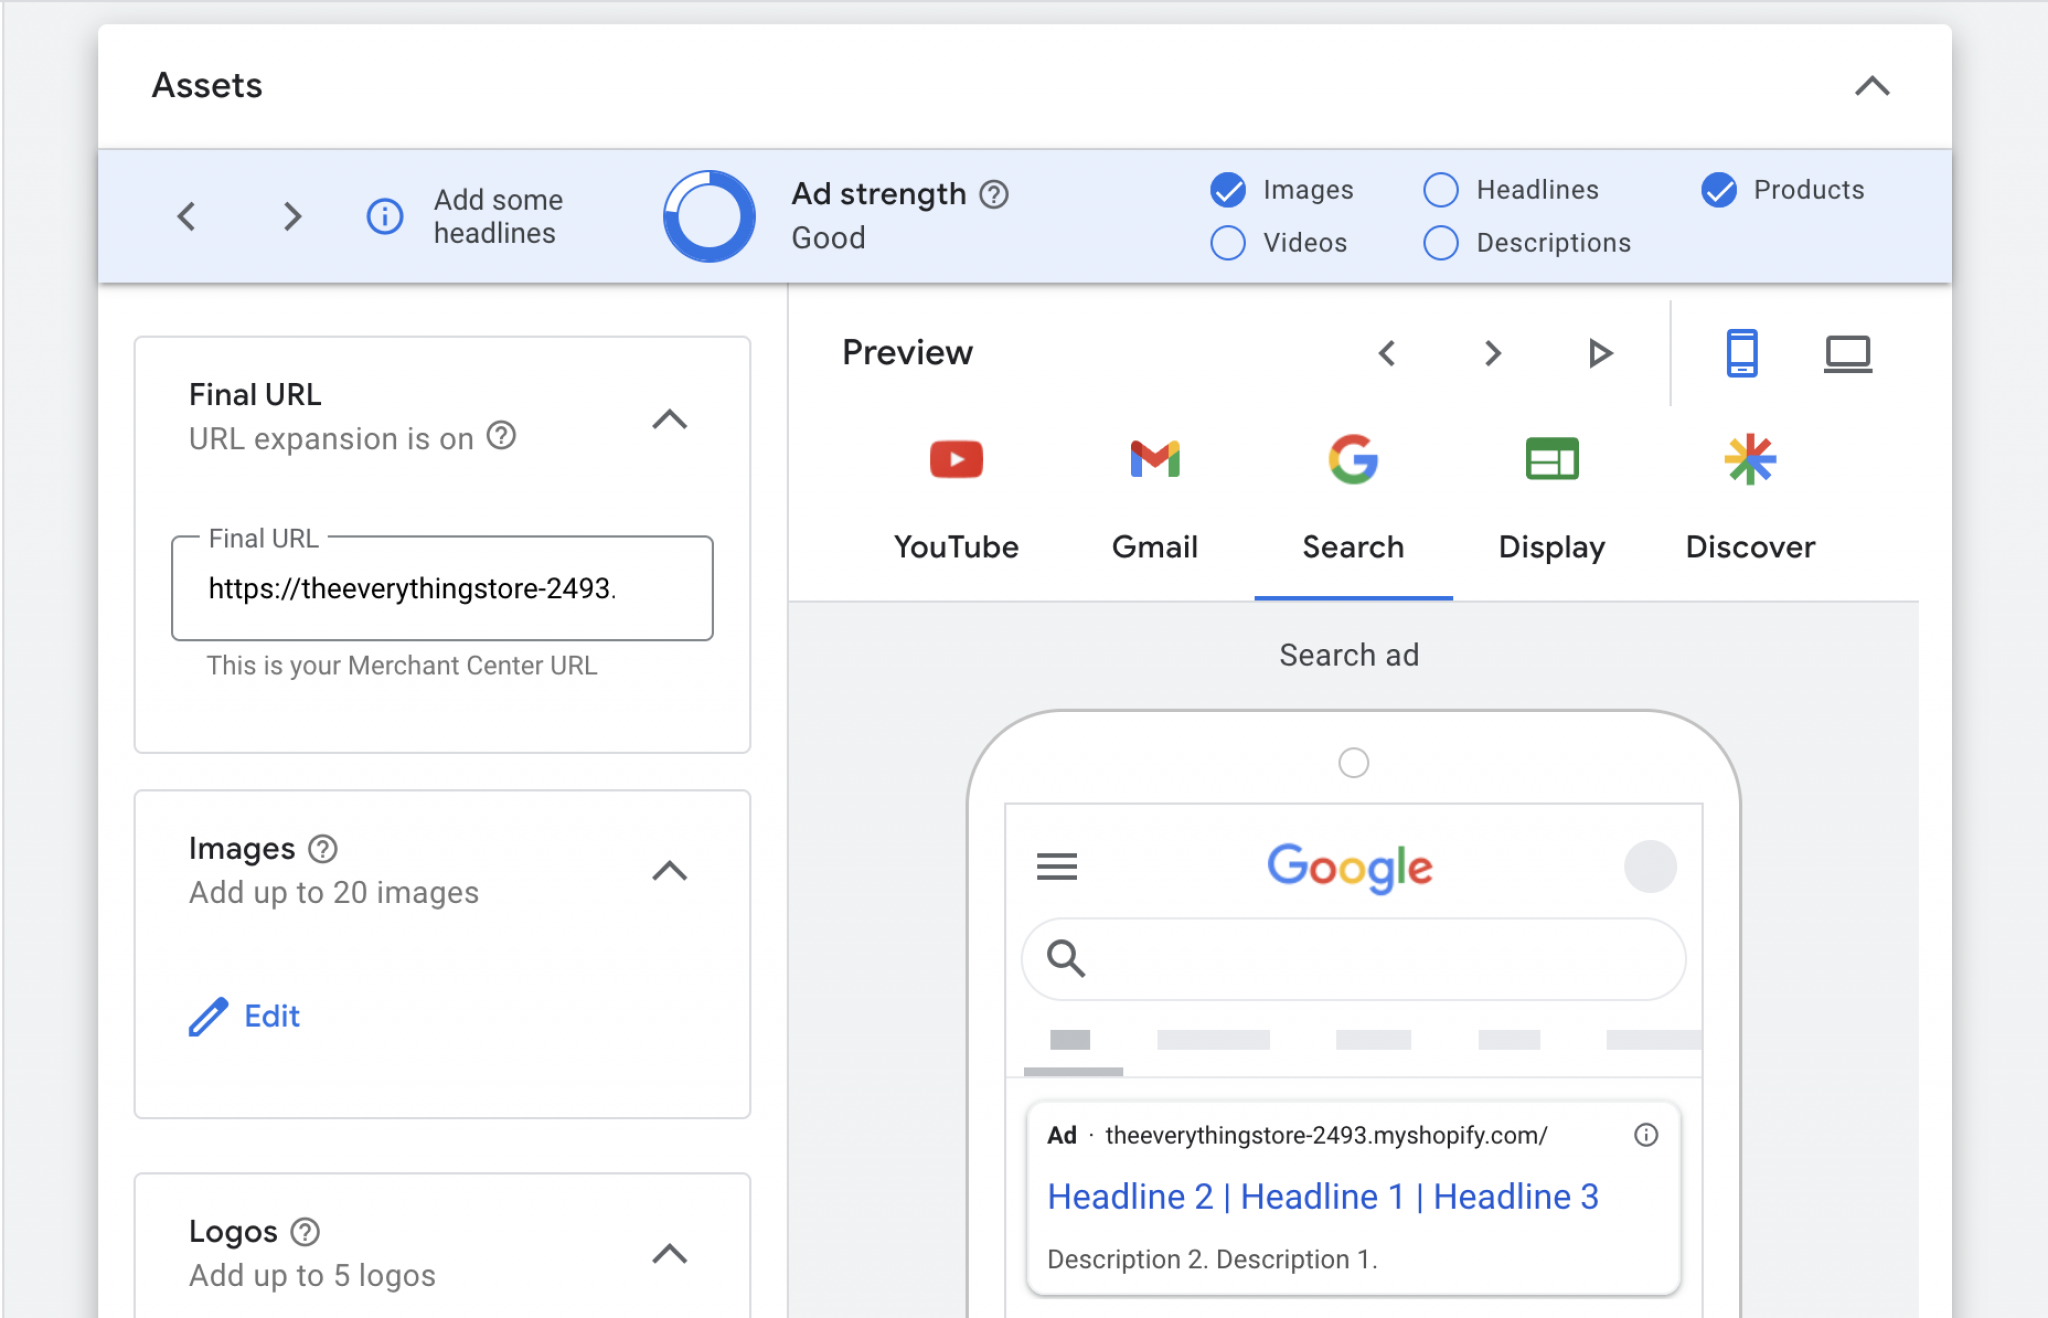
After adding the asset group name, it’s time to add your final URL for the product site, particular images for the products with their respective guidelines, logos as your store favicon (you can upload up to 5 logos).
We recommend you to create a product video for more engagement, infact a simple 360 product video works perfectly rather than a high production promotional video.
You can create your product headlines by understanding the ‘suggestions’ section on Google.
Regardless of your use of suggestions, you must create robust and eyecatching headlines that’ll capture your shopper’s interest.
Now, you can add long headings for your products along with appropriate product descriptions and a call to action.
Note: We suggest you to leave the call to action button as automated by Google.
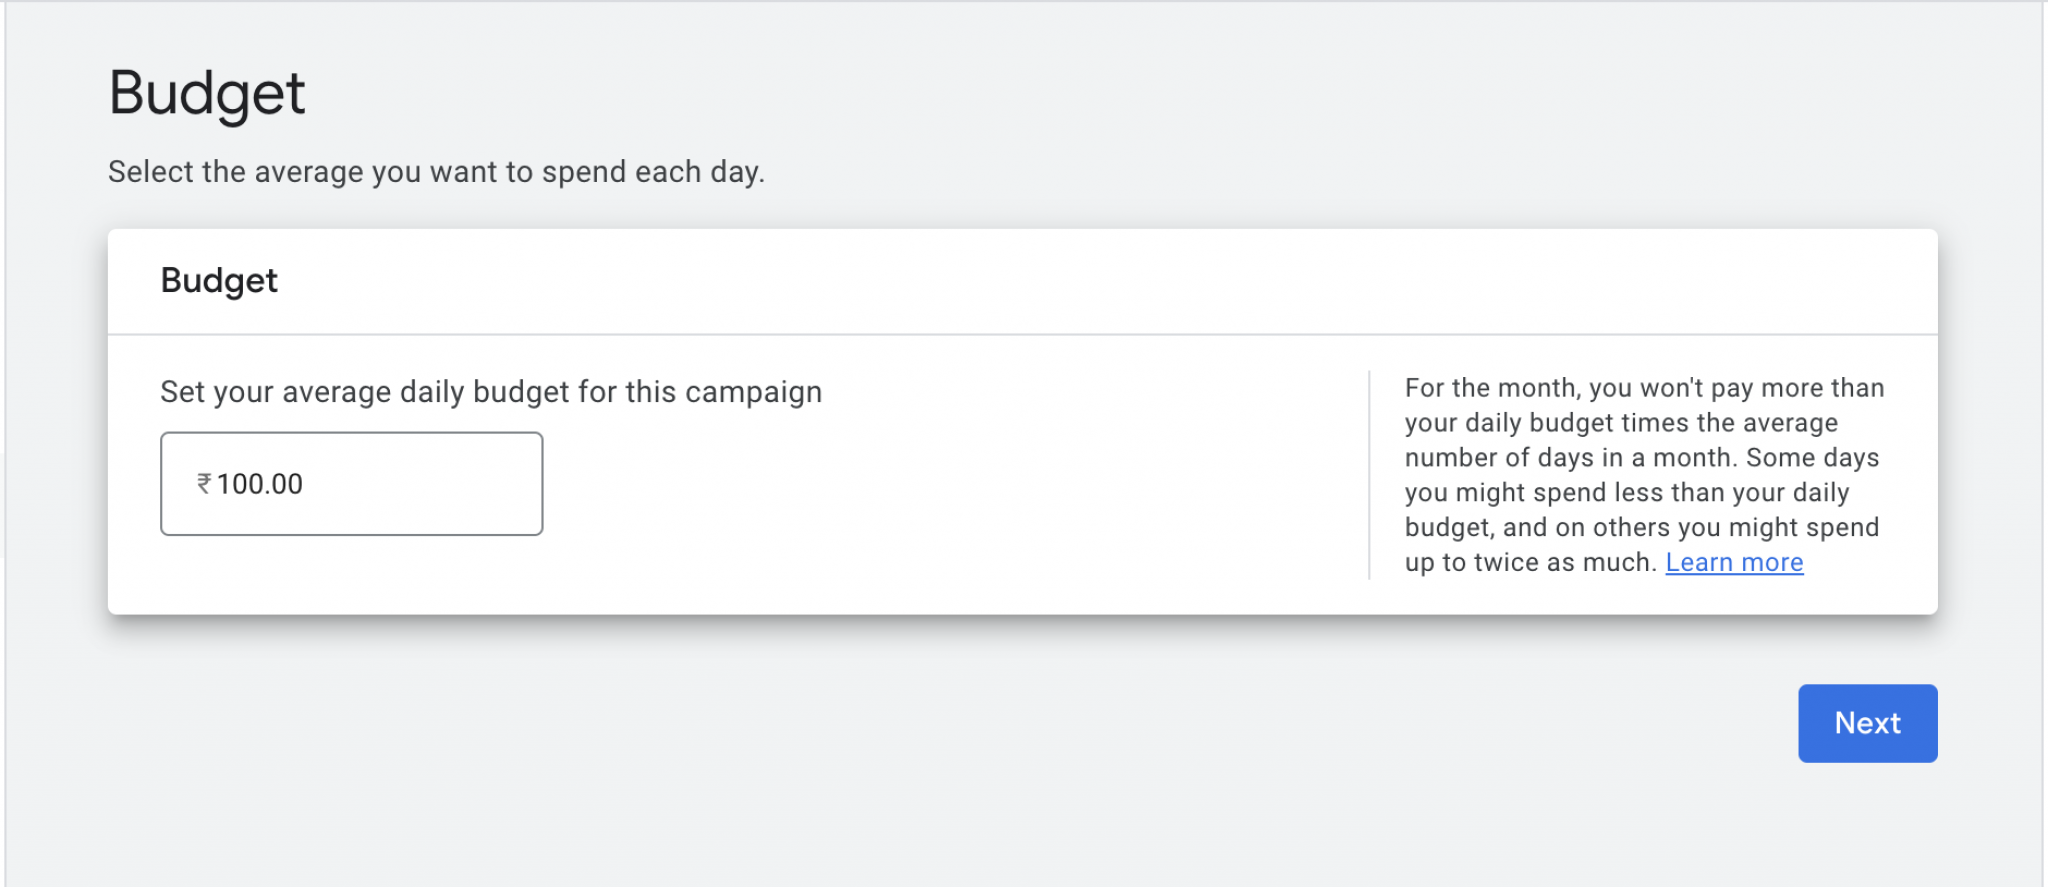
One of the crucial steps in creating a Google ads campaign is considering how much money you’re going to spend per day.
You must plan a substantial budget to get the best out of your initiative as your budget is the overall fuel to determine how much clicks you’ll obtain from your campaign.
Now, there is no fixed amount you have to spend while planning your budget, but you can choose the number that works for your specific store preferences.
After all the preferences are set, you can review the campaign and ensure all the details are set so you can finally publish it.
After ensuring all the settings properly, click Create.
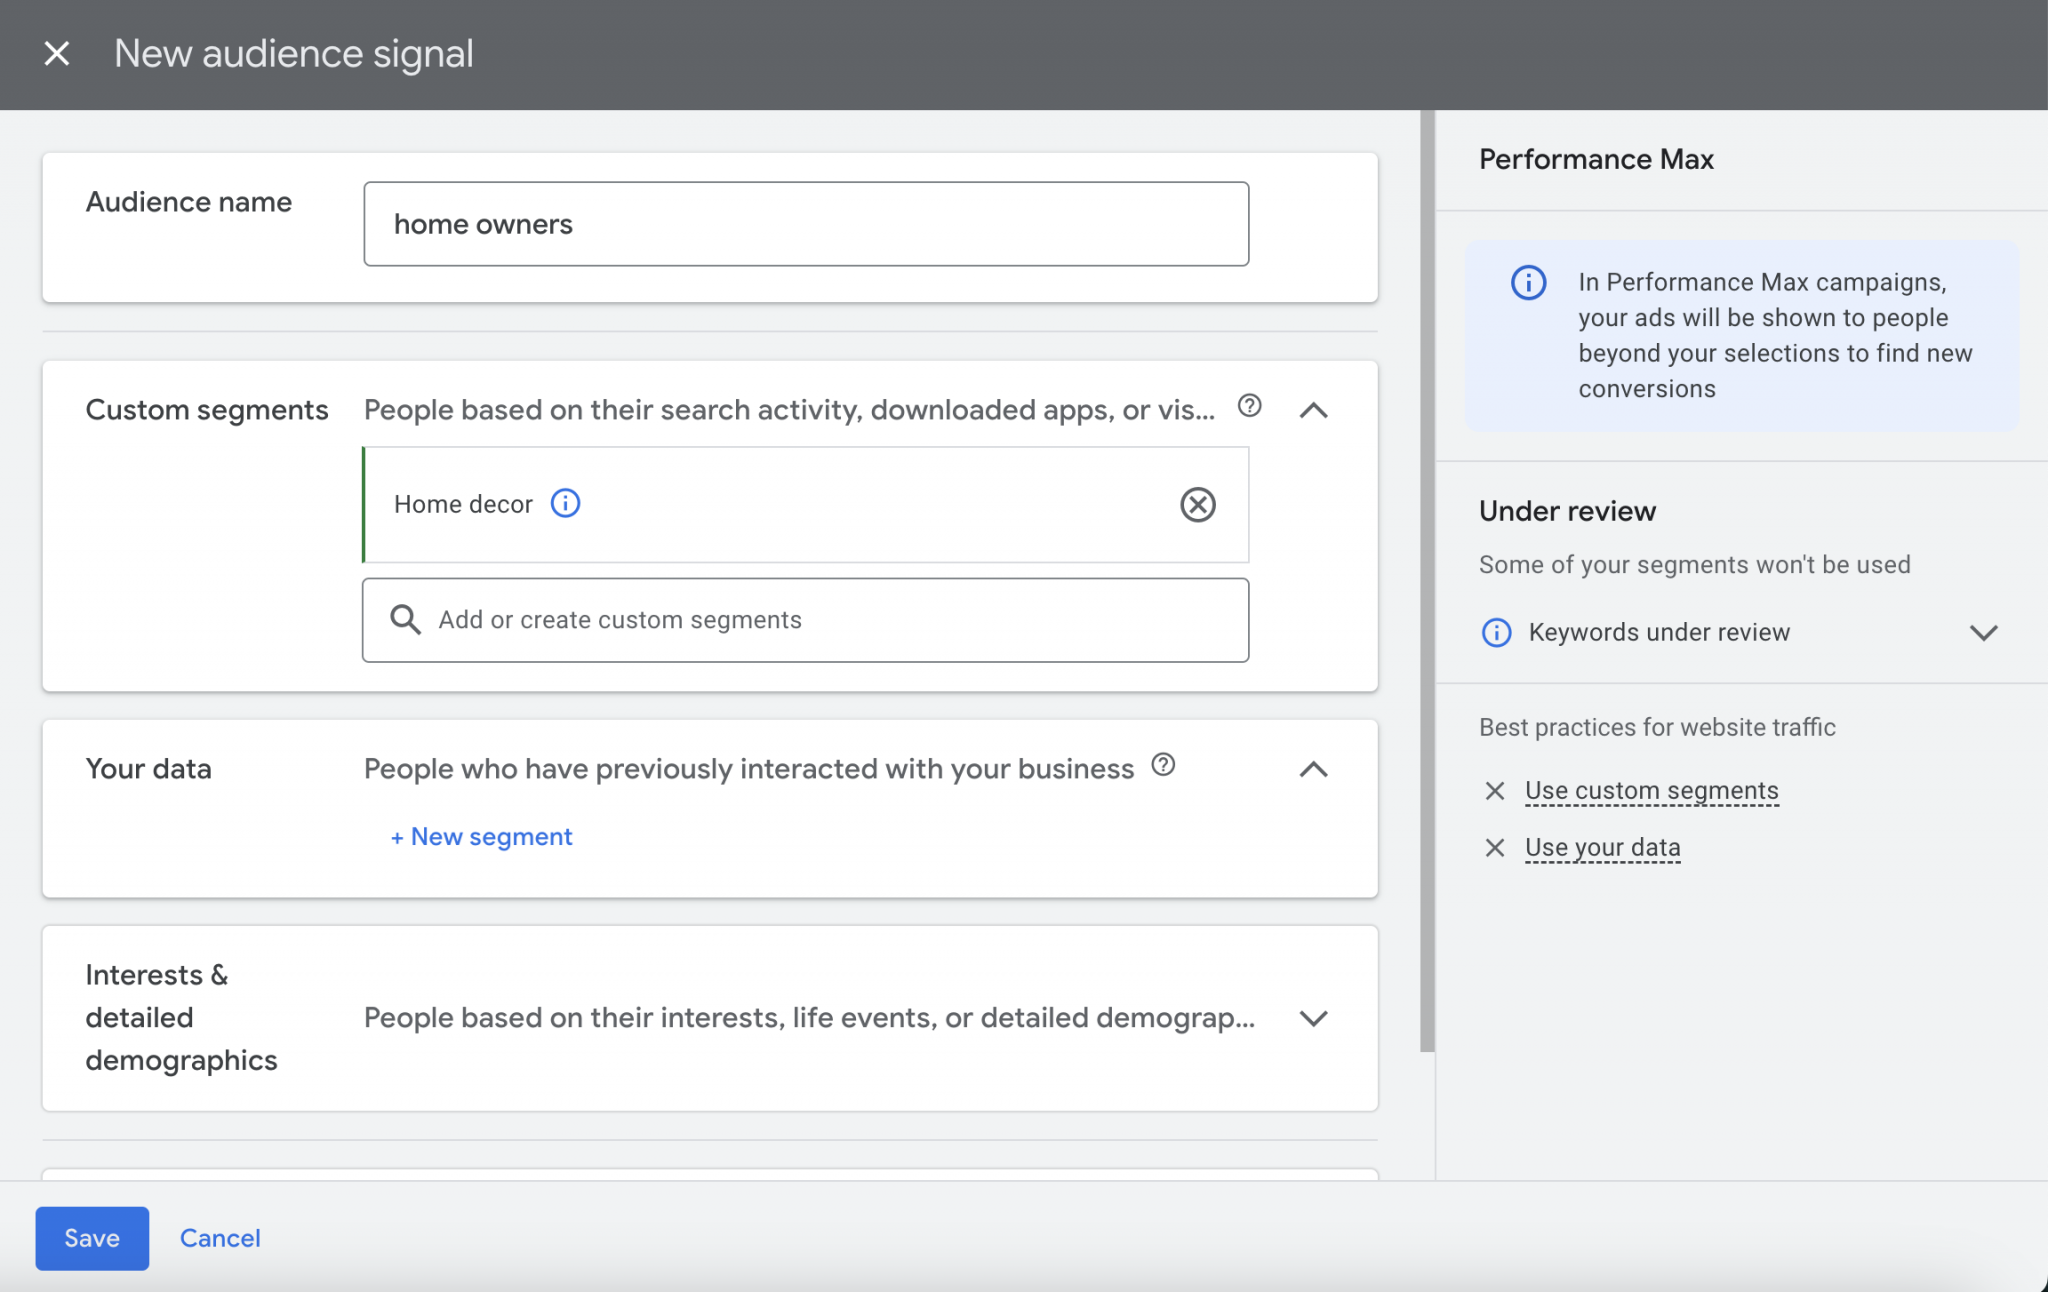
You can also go one step ahead by ensuring your audience name and custom segments.
These pointers are used to ensure your exact audience niche by including your data and demographic interests.
Google Shopping is making everything virtually available as a single hub for all products. If you are also willing to market your products and want to do it effectively, we at ValarDigital are the just right people to help you.
In the era of online shopping, it’s the right time to grow your business online and take the next big step in the e-commerce industry.
Contact us: https://valardigital.com/contact/