If you'd rather speak to someone now, call
+91 7219084311.
You can also email us at hello@valardigital.com
+91 7219084311.
You can also email us at hello@valardigital.com


Google Analytics 4, famously known as GA4, was unleashed by Google on Wednesday with next-generation features to collect, store and filter data to bring big market shifts for adoption.
The new system includes AI-powered features, deeper integration, predictive insights with Google Ads, granular data manipulation, and measurement capabilities.
This article will take you through the step-by-step process of how to set up Google Analytics 4 (GA4) through Google Tag Manager (GTM).
Here's a process summary you'll learn in this article:
✓ How to create a new GA4 property
✓ How to create a data stream (We've focused on the Web stream)
✓ How to find the Measurement ID
✓ How to create a Google Analytics 4 Configuration tag
✓ How to set the Tag to fire on All Pages
✓ How to Preview/test the new Tag
✓ Publish your changes in Google Tag Manager
Before going any further, you have to have your Website (in this case: We've created a Shopify store.) If you haven't made one already, here's an essential guide to creating a Shopify store!
If you're willing to create a new GA4 property, head over to the Admin section of your Google Analytics interface by clicking the Admin button on the bottom left corner.
After revealing the Admin panel, find the property section and click Create Property.

Now enter your property name; it could be anything from your website, brand, or company name. Choose your country, timezone, and the currency your business manages.

Now click Next, answer a few questions asked by Google, click Create, and your new GA4 property is ready.
Now that we've created a new GA4 property, the next step is successfully configuring your first data stream.
A data stream is a data source to collect all the events sent to your Google Analytics 4 property. Marketers can have multiple data streams from multiple sources in a single property such as Web, Android app, and IOS app.
We'll be focussing on the Web data stream for this article.

After selecting your preferred data source, enter your website/Shopify store URL (i,e., https://ga4demo-valardigital.myshopify.com) & your preferred stream name. (i,e., ga4demo valardigital)
Note: Enter your Website address as the https:// protocol is already selected.
After creating a web data stream in GA4, you'll discover Enhanced measurements right below the setup.
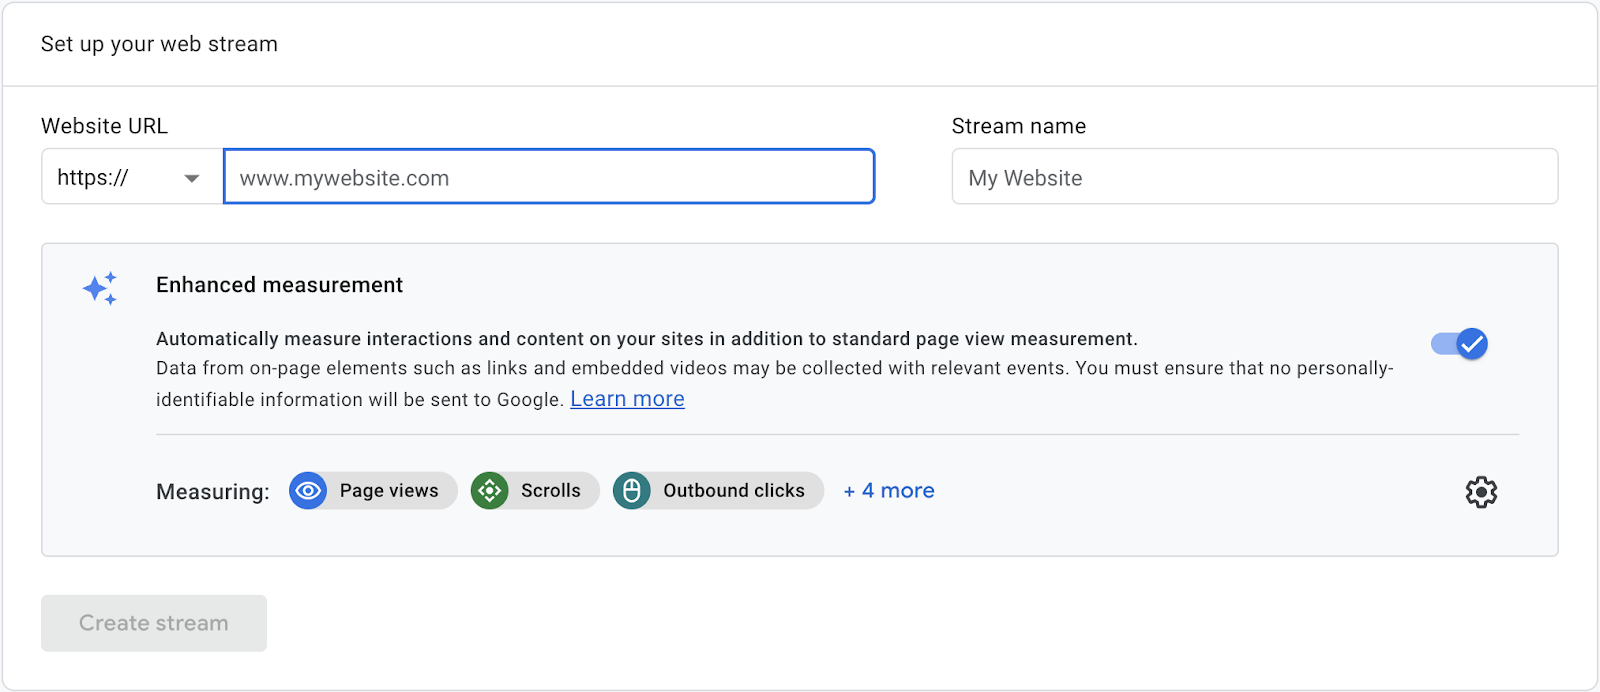
Enhanced Measurements are designed to offer many more events in the marketing reports without any TAG configurations or development teams. You'll be given the option to turn Enhanced Measurements ON/OFF during the setup.
The Enhanced Measurements feature is enabled by default in the data setup to track the following events:
You can also turn the Enhanced Measurements option after the setup by clicking the gear icon in the Enhanced Measurements section and then toggling between.
After done, press Create Stream.
Firstly, you must set up a container on Google Tag Manager. GTM is just another product offered by Google, so log in and create a container using these steps:

In the Account Name section, enter your company's name; it could be your client's business or private business. If you're an agency, informing the client before creating a new GTM account is suggested. Even better if you ask them to create it and then share access with you.

Enter your/client's website domain (e.g., ga4demo-valardigital.myshopify.com) in the Container Setup field. Now select the target platform from Web, IOS, Android, AMP, and Server (In this article, we're selecting a web platform).
The Google Tag Manager account works with your Google Analytics account. Your GA account is mostly for your company/client, whereas a container is for your website/application/server.
One container can hold many tags and triggers. But if more websites belong to one business, feel free to use a single container for those websites.
To configure GA4 through GTM, you'll need a Measurement ID. Where to find a measurement ID? You'll find a measurement ID beside the stream name in the data stream section.
Copy the tracking ID from the top right corner of your newly created Property to use it in the Google Tag Manager (GTM).
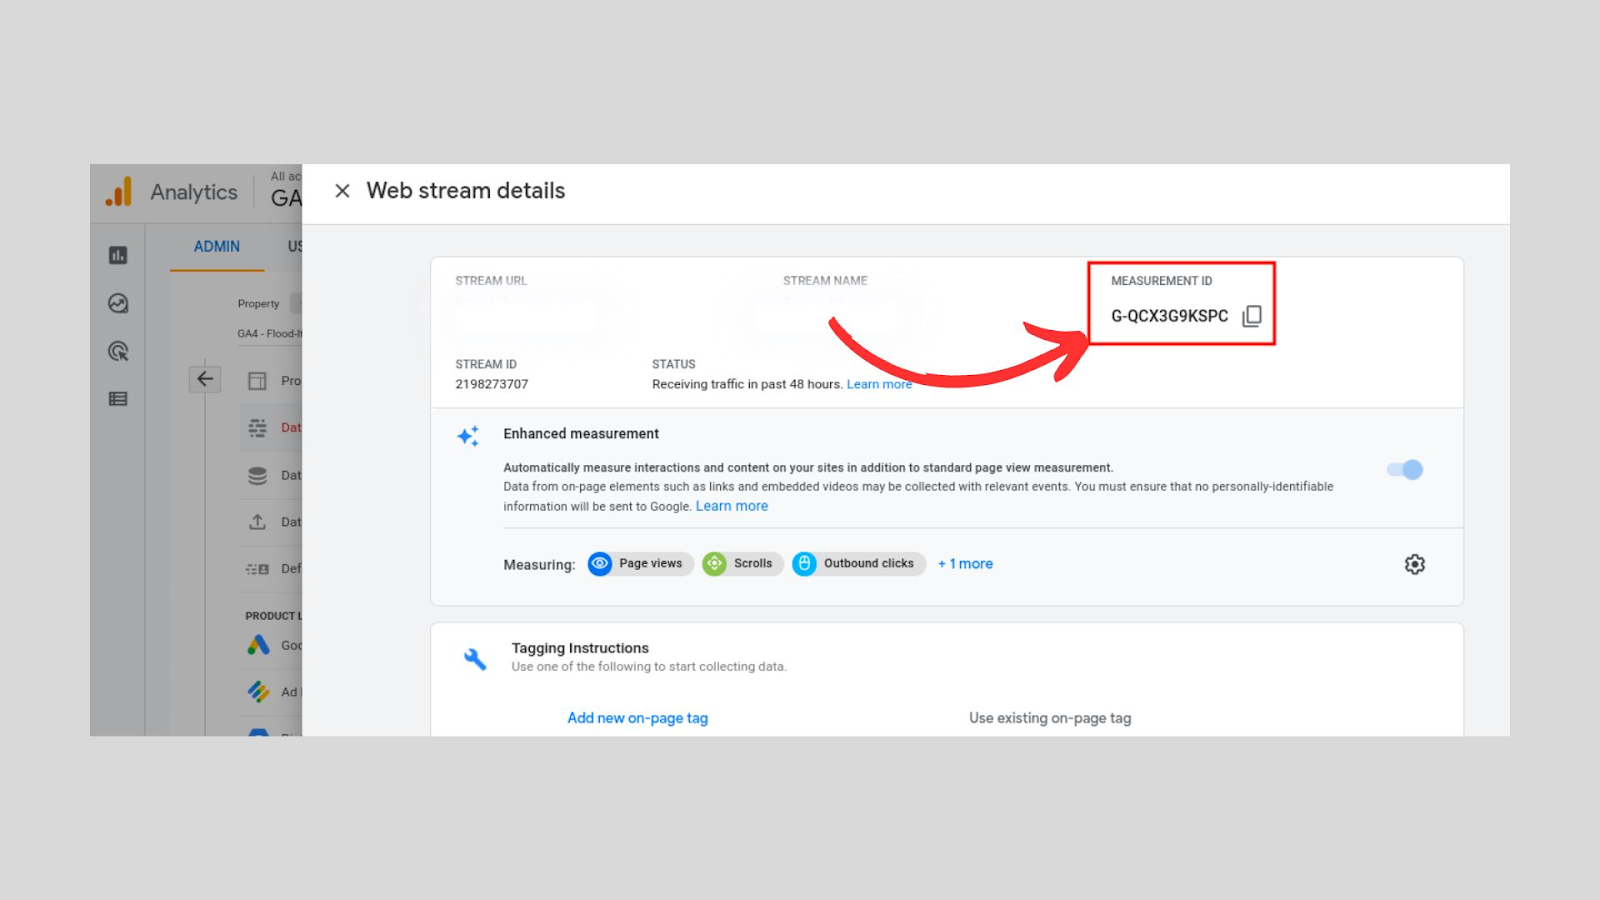
Go to Admin > Data Streams > Choose the newly created stream, and return to the same page to get the Measurement ID.
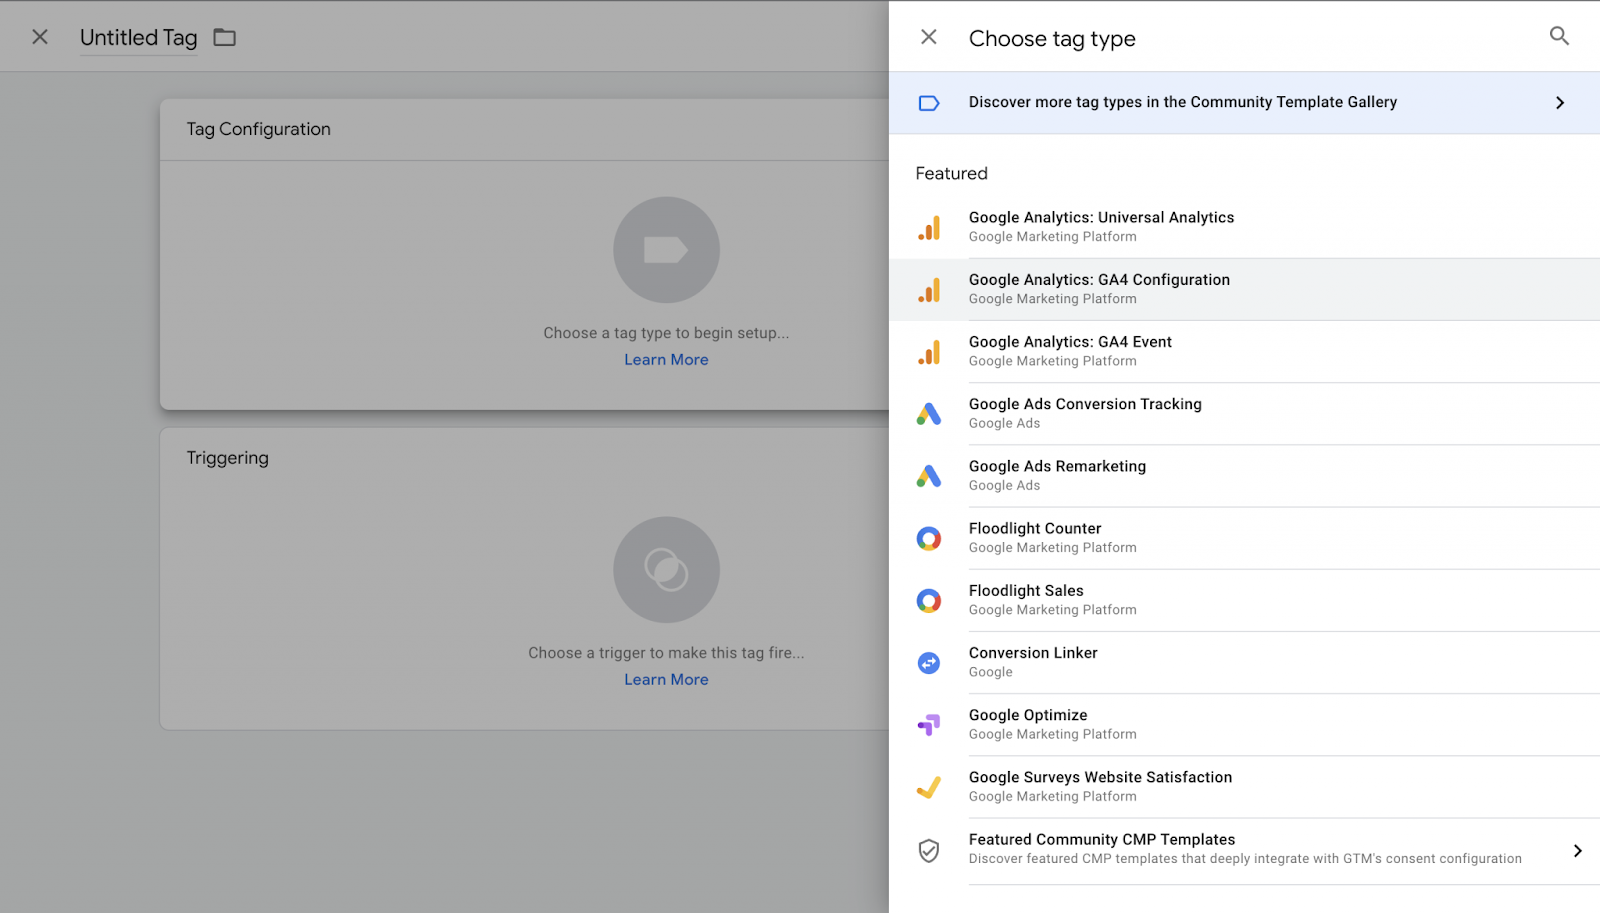
To add a new GTM Tag, open your Google Tag Manager container. In the Tags section, choose GA4 configuration.

Enter the prior Measurement ID copied from the GA4 interface in the Measurement ID field.
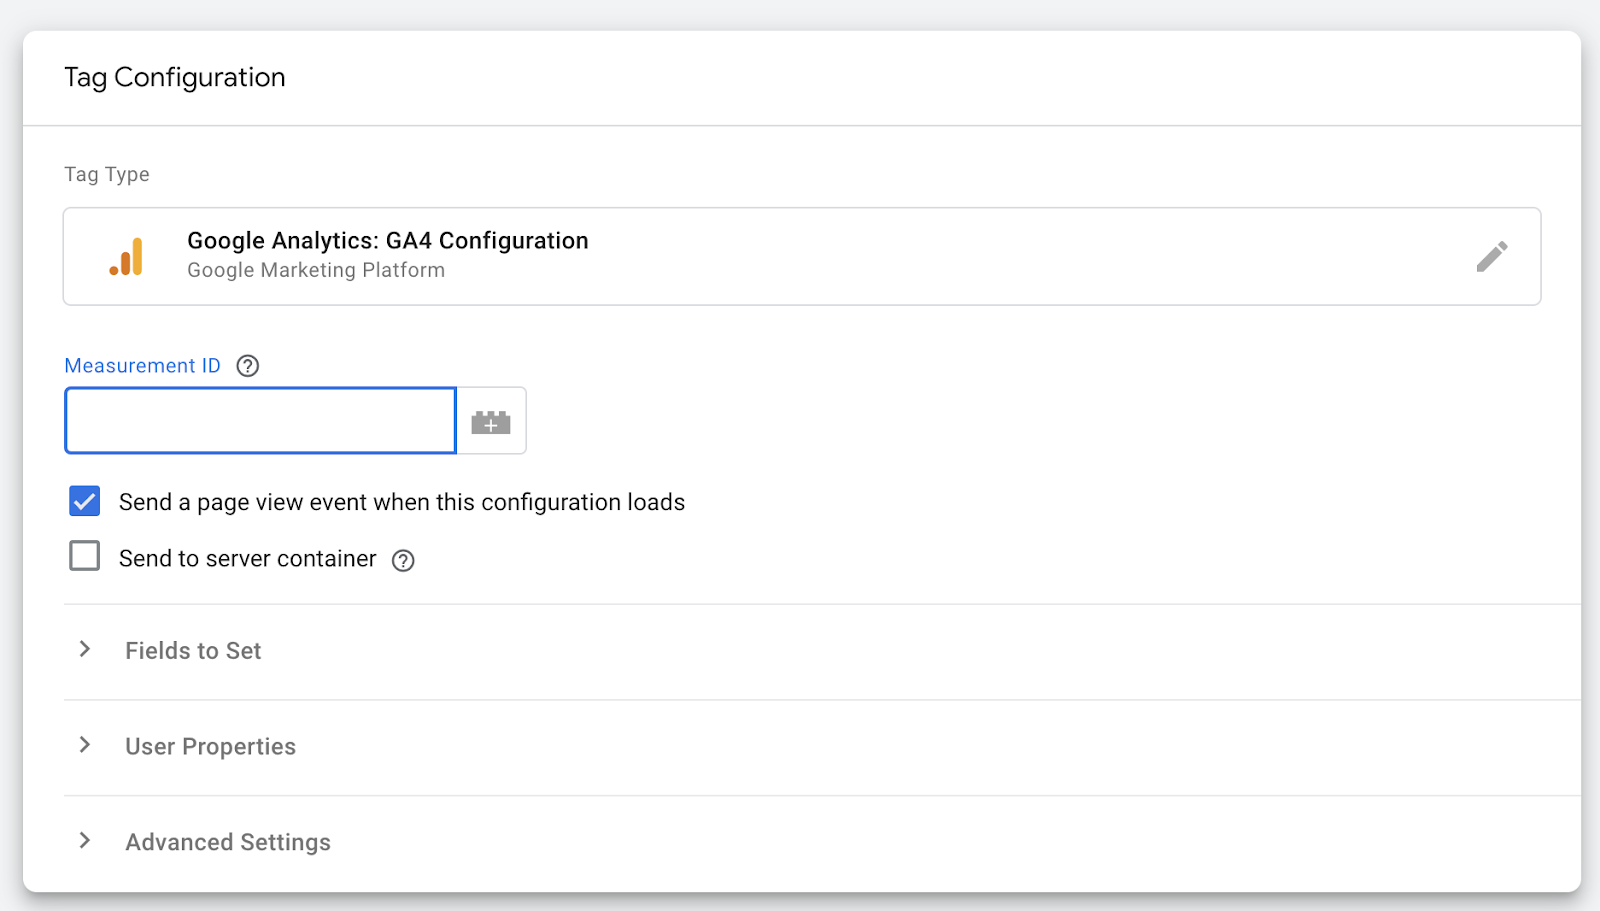
Note: If you want to track the page views automatically, select 'Keep the Send a page view event when this configuration loads.' Deselect it if you have a single-page application. It's recommended to have a standalone configuration tag if you're running a single-page app.
In the Triggering section, select All Pages and name your Tag however you like, for example, GA4 – demo pageview.
That's all you need to know! Now Save the Tag, and you're ready with the GA4 implementation. If you want to install a standard tracking with GA4, you can create a configuration tag that is the same as adding a new tag tracking code to your Website's source code.
This is the main step you've to process. After creating a container in the Google Tag Manager, you'll be offered two code blocks you must implement on your Website (In this case, we have a Shopify store).
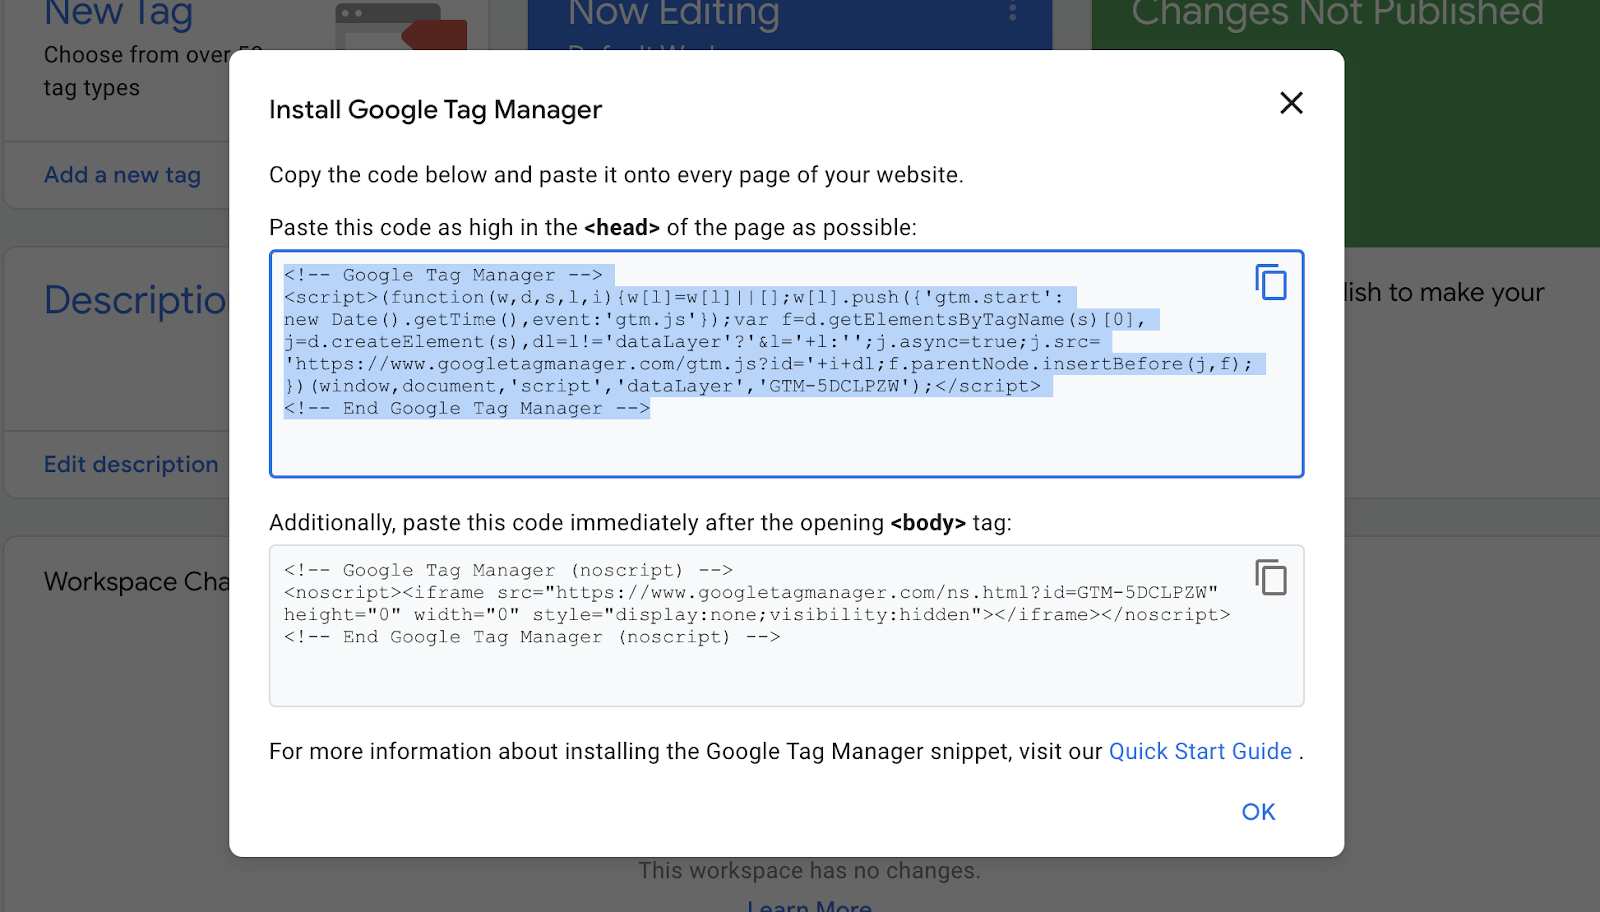
Your developer team can do this step if the instructions are followed carefully. You must copy and paste the first code block in your Website's first <head> Tag.
If you're using a Shopify store, log in to your admin account > settings > Theme.
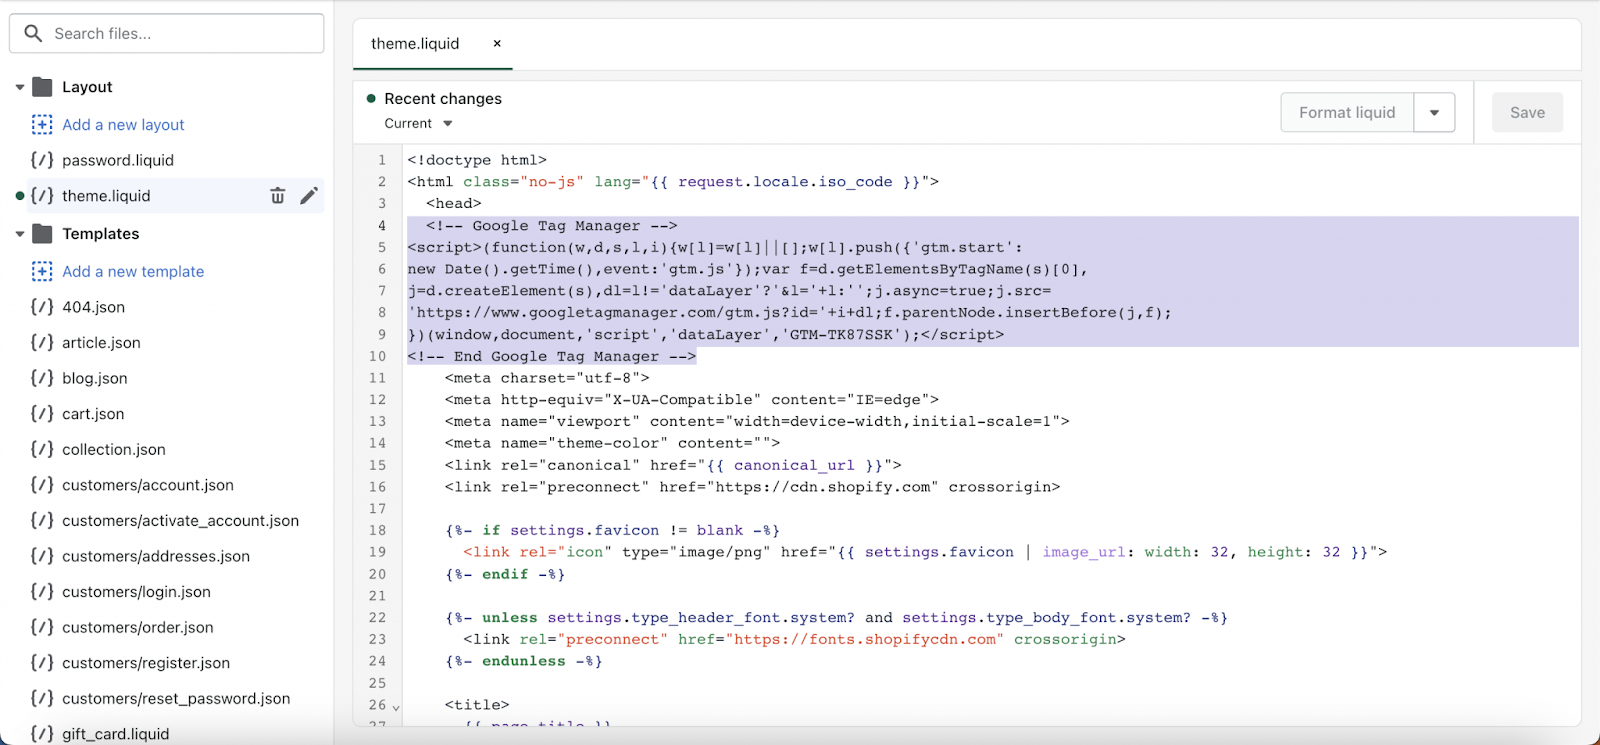
In the themes section, go to code and include the code block in the theme.liquid & theme.checkout HTML file, and you're done!
If the code implementation goes successfully, all the tags will be fired after configuration.
Before publishing the changes, we must ensure the configuration has gone correctly and initiate the visitor tracking. That's where the Google Tag Manager Preview Mode comes into play.
The GTM preview mode allows users to browse the GTM code-implemented websites.
To initiate the GTM Debug mode, press the Preview button on your screen's top right corner (near the Submit button).

After clicking the Preview button, a new browser tab under the name tagassistant.google.com will be opened.
In the new tab, a popup will appear where you must enter the website URL you want to debug. It could be your homepage or a specific page you want to test (In our case, it's a Shopify store).

Press Connect after entering the URL.
A new browser window will appear where you'll see a message saying Debugger connected successfully.
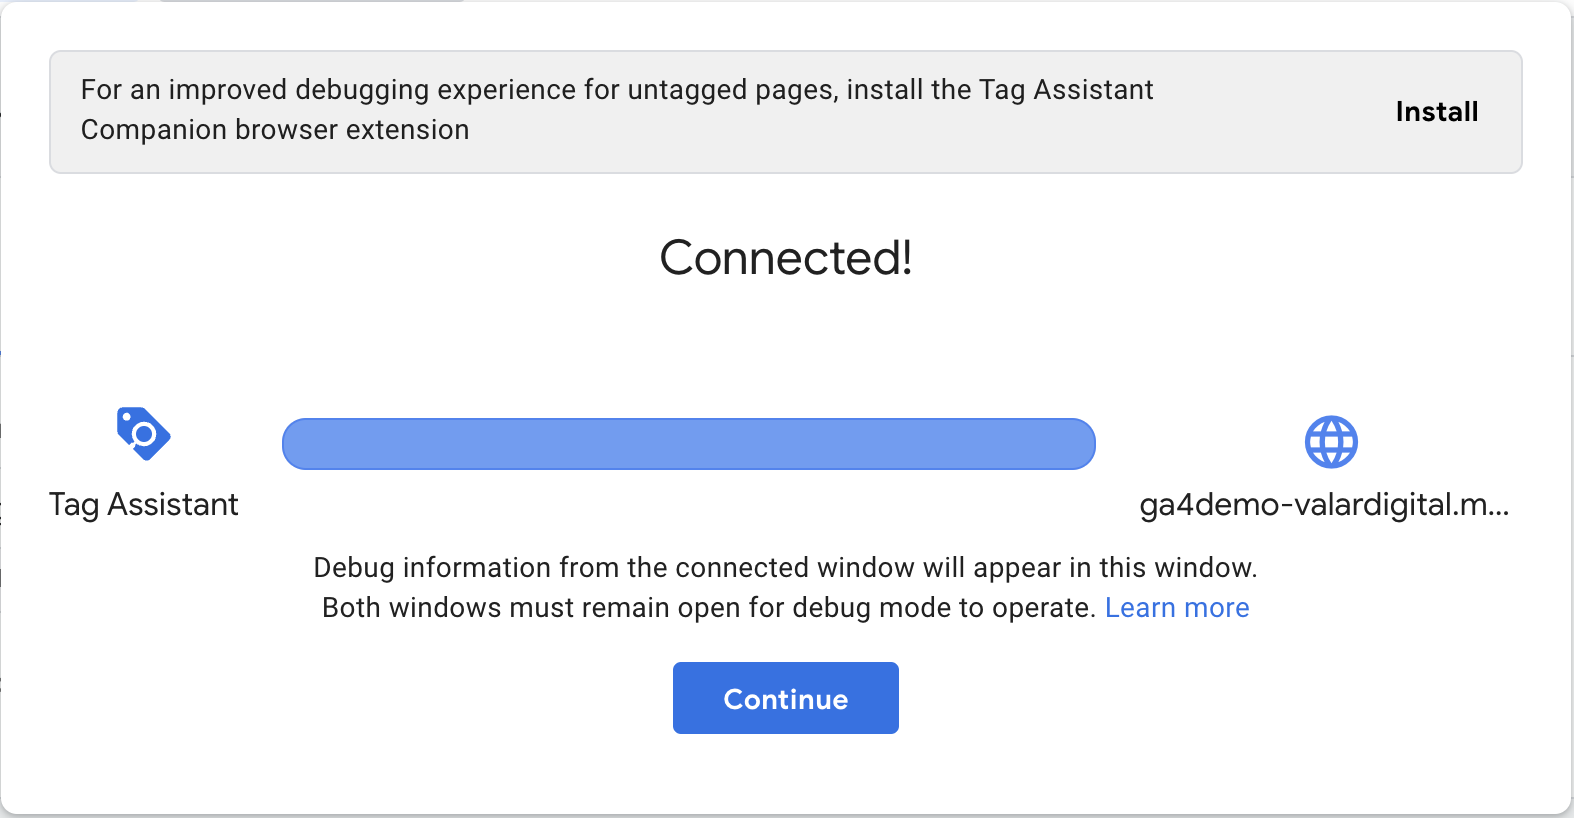
Click Continue in the popup window, and a Debug/Preview page will be revealed.
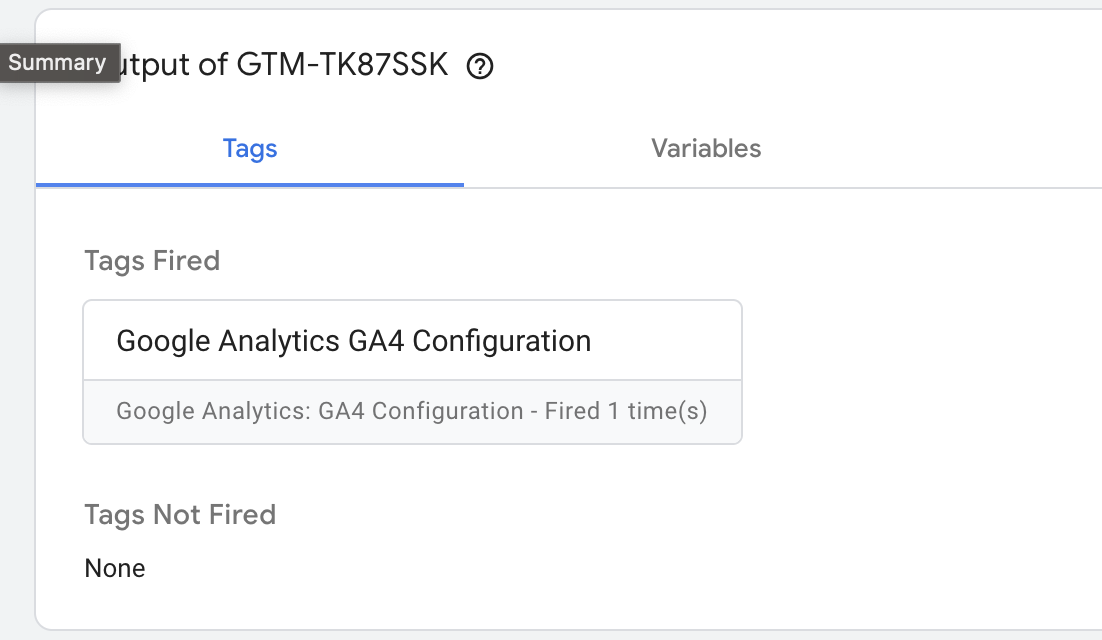
When the preview mode is enabled, click the Container Loaded event on the left side, where the earliest moments of the Tag can be seen fired.
Every time a tag is fired on selected All Pages, it actually means all the contained events are loaded. A GA configuration tag in the 'Tags Fired' section can be seen after clicking the Container Loaded button.
If you've come this far, Good Job!
You've created your first Tag and successfully connected to your Website! Before celebrating your progress, we must ensure the data has reached Google Analytics with the right GA property.
Go to Google Analytics and select the primary feature for debugging GA4 data in the DebugView section. Find this option on the left side of your GA4 interface: Admin > DebugView.
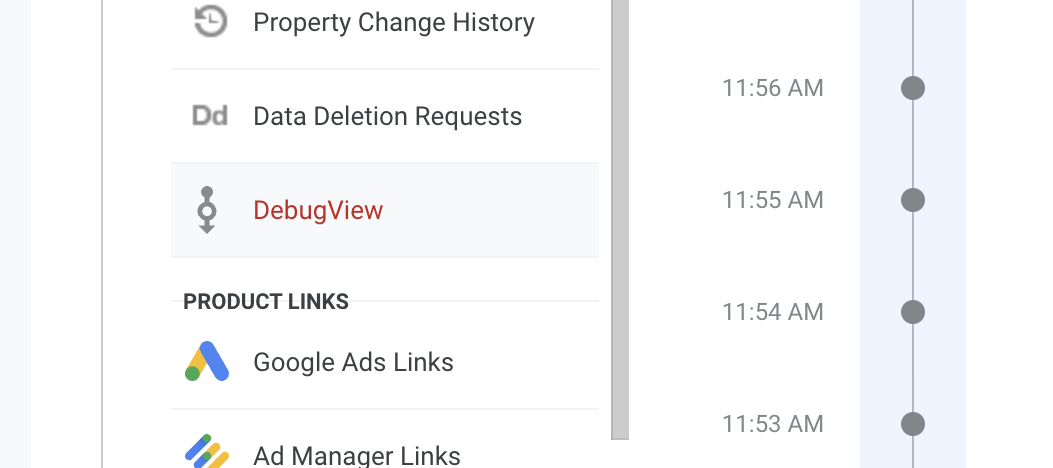
Do not confuse GA4 DebugView with GTM Preview, as they offer different powers!
Google Tag Manager Preview mode is developed for debugging tags stored in a GTM container such as GA4, Google Adds, Facebook Pixel, etc.) Google Analytics 4 DebugView is designed to see the approaching data in your GA4 property.
Here are a few options where you can enable the GA4 to debug mode:
But since we're already working with GTM, enabling the Preview mode will directly set the debug_mode to true, and the data is presented in the GA4 DebugView.

After the data is added to the DebugView, the events will get fired as a list of parameters can be seen. You can continue your granular debugging by clicking the parameters to catch the values received in GA4. That's it.
The good news is that we can now have a native integration of Shopify and GA4 after the release of Shopify Events & Customer Pixels.
Managing all the customer pixels on the same Website without having any third-party team or script is a main item on the marketer's bucket list. To their surprise, you can finally integrate GA4 on your Shopify Store!
In this article, we've worked on our own Shopify store to make it work, and you can see the results below. The GA4 code integration in customer pixels can help significantly with e-commerce events like:
✓ View Item
✓ Add to Cart
✓ Purchase Product
✓ And Many More
To configure any event for your Shopify store, you must implement the necessary code on your Website. Follow the steps below to have a seamless experience.
Log in to your Shopify store with your Admin account, and then go to Settings.
In the settings page, find and select the Customer Events option, and press Add Customer Pixel.
Name the pixel properly to track down the versions and click Save.

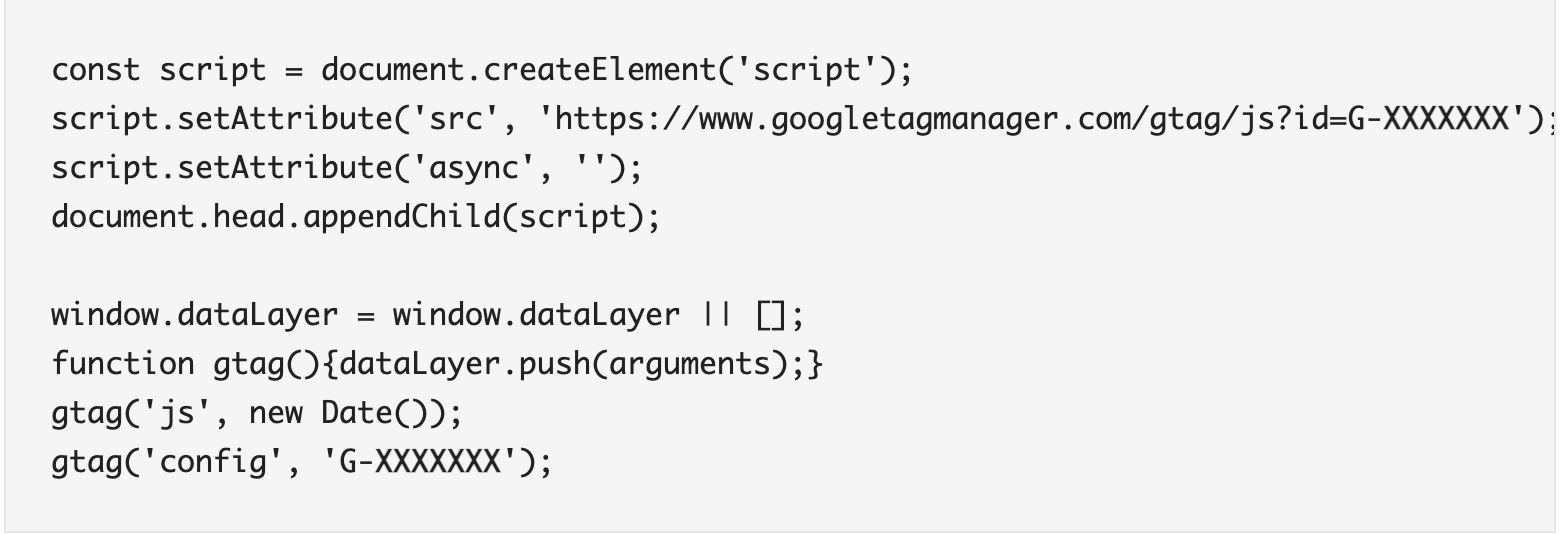
Now enter the script code that is completely open source and doesn't involve any third-party script. Enter your G – ID in the ID section of the code.
To make the process work, you must press Connect (on the top right corner) after making the changes accordingly. After pressing connect, the button will turn to Disconnect. That's where you've connected it properly.

To create a custom event to trigger when the user has added a particular item to the cart, you must create their respective variables first. Here's how:
Below is the script for a custom tag event implemented in customer pixels. The script contains an event called add_to_cart.
In the add_to_cart event, there are three item variables: currency, value, and items.
Currency: To display the native currency type of the product for sale.
Value: To display how much the product is worth in an actual price.
Item: To display what and how many items are added to the cart.

Now that we have understood these variables let's go to Google Tag Manager and create a brand new event.
Go to the Google Tag Manager and press NEW in the event section.

Enter a new Tag name to keep track of the version.
Now let's configure the Tag: click the Tag type column and select Google Analytics: GA4 Event (Google Marketing Platform).

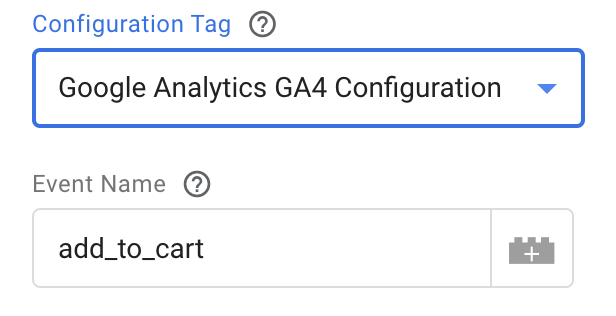
In the Configuration Tag section, select your current Google Analytics GA4 Configuration.
Enter the event's name; in this case, it'll be Event Name: add_to_cart.
After finalizing the event name, you must include all the event parameters. Event parameters are the set variables we've created in our script.
Enter the parameter name, for example, currency, value, and items. And inject values to that event by pressing the little Lego icon on the right.

After pressing the Lego icon on the right, a variable window will appear. Now let's create new variables for our event by pressing the plus icon on the top right corner of the screen.

After pressing the add (+) icon on the top right of the screen, a variable configuration window will be revealed. Select the appropriate variable name and choose the variable type to begin with.

After clicking the big Lego icon, a list of variable types will be given from which you need to select Data Layer Variable.
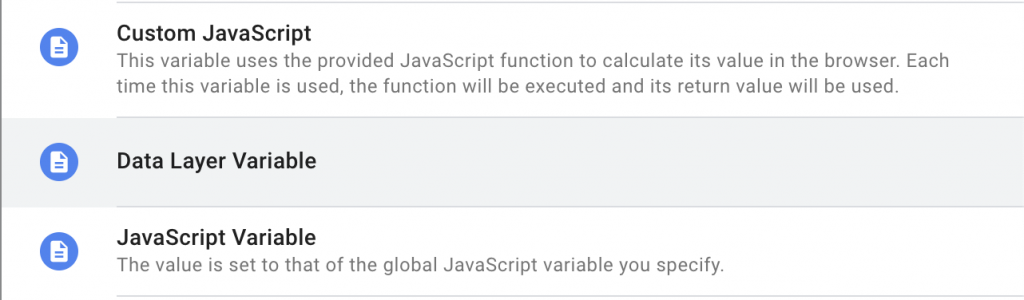
Now add the suitable Variable name and click Save.

If done correctly, you'll see a variable value as {{currency}} in the event parameters. Follow the same for the other two variables: value and items.
Now open more settings, check ✓ the Send E-commerce data option, and set the data source to the Data layer. Doing this will help you visualize the data in Universal Analytics when the data starts to populate.

In Google Tag Manager, all the events are responsible when tags are fired. A trigger is a link to connect to your data stream, in this case, a web page, for events such as page_view, link clicks, add_to_cart, or purchases.
A trigger enables the particular Tag when the configured event is detected on the Website. Therefore, users must ensure every created Tag has at least one specified trigger.
To create a new trigger, scroll down to the trigger section of the Tag and select trigger configuration.
In the Trigger Configuration section, select the name of the trigger in the top left corner and choose the Trigger Type as Custom Event.
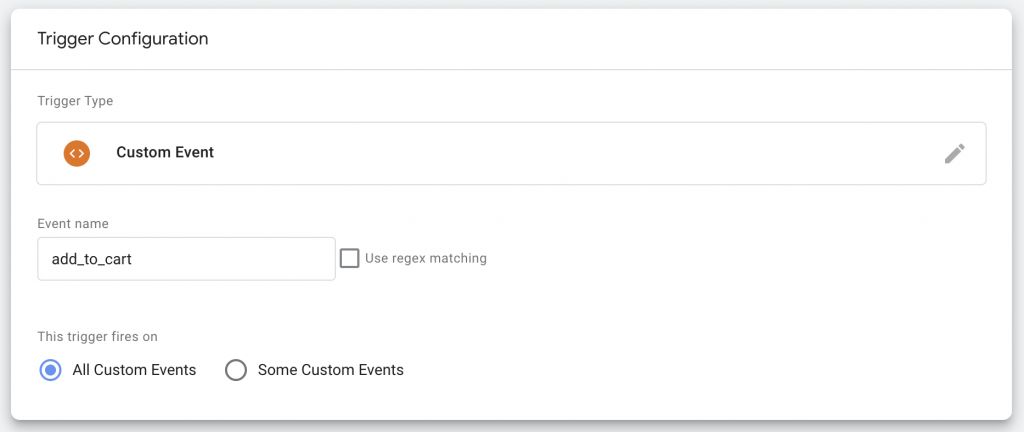
Enter the Event name and when you'd like to fire this trigger. You can choose All Custom Events to let it fire when the user-defined events are fired, or you can choose any specific custom event when you'd like to fire on the store. Click Save.
Click Save again to save the Tag.
If done properly, you'll see a new tag add_to_cart has been created in the list with its respective trigger.

Now, go ahead and preview the changes by clicking Preview on the top right, next to the submit button. A new Chrome tab will appear under the name of Google Tag Assistant, where you must check whether your website URL is correct and press Connect.
Your Shopify store will appear in preview mode. Now explore the page, select any product of your liking, and add it to the cart.
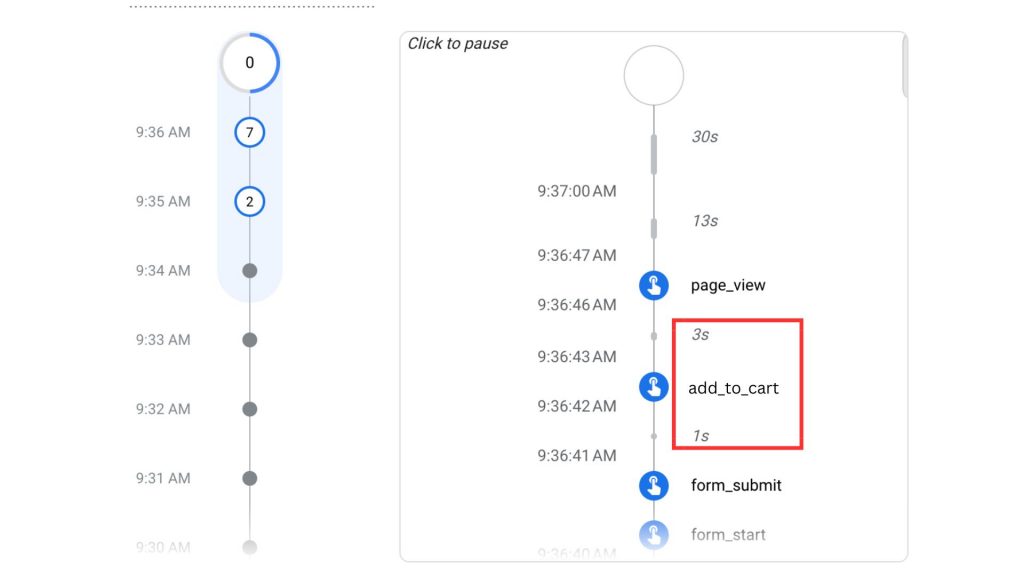
To check if the add_to_cart event is fired properly, return to the Google Tag assistant and press continue. A debug dashboard will appear where you'll see all the default and user-defined tags that are fired and not fired.

Ensure the add_to_cart Tag is fired in the Tags fired section, and you're done!
Now that you've successfully fired your new GA4 Tag, it's time to check if the data is being populated in Universal Analytics.
Open Universal Analytics > Admin > Your Store Property > Scroll down to select DebugView.
Go ahead and add an item to the cart again to check if the event is fired In the DebugView.
Reference image down below:
Now that you've understood how to successfully create a GA4 Event Tag, you can follow the same process for a product purchase to track when a user has purchased products from your Shopify store.
To start the process, you'll need to include a new GA4 event layer in your custom pixels:

Now you can create a new custom event with specified variables and triggers by following the same process as before in your Google Tag Manager.
You need to create a purchase event to track the event that fires when users have purchased a product from your Shopify store. But there's a twist! You cannot access the payment gateway without buying the Shopify e-commerce subscription plan.
What to do? You can still fire the purchase event in a preview mode in GTM with Shopify's Bogus Payment Gateway. Here's how you can set up before purchasing a Shopify plan:
Log in to your Shopify admin page and open settings from the down-left corner of the window. In the Settings menu, select Payments.

In the Payments section, find the Payments providers block and select Choose a Provider.

A third-party payment providers list will appear, among which you have to select the Bogus Gateway option for testing the event. Now, checkmark the option and click Activate Bogus Gateway.

Now Set the Google Tag Manager into Preview Mode and go ahead to purchase any product from your Shopify Store.
When a payment gateway is offered to include your card information, you can include the following:
✓ Enter 1 for simulating a successful payment testing.
✓ Enter 2 for simulating a failed transaction.
✓ Enter 3 for simulating an error occurrence and exception window.
Add any name you want as a cardholder, and any date would work in a further future to proceed. You can include any three-digit security/CVV code, such as [999], and click Pay Now.
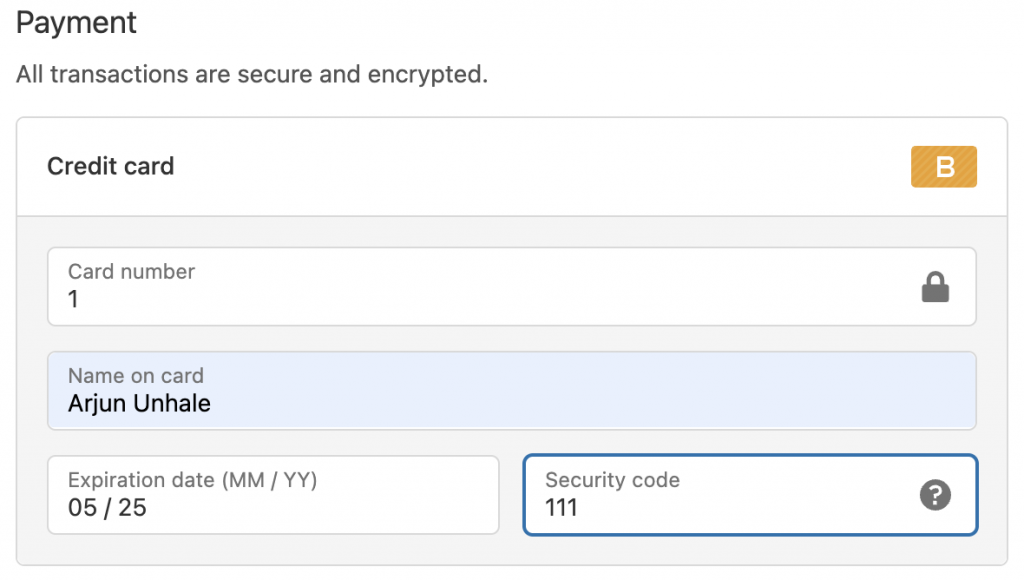
If done properly, your test order will be placed successfully with a confirmation ID.

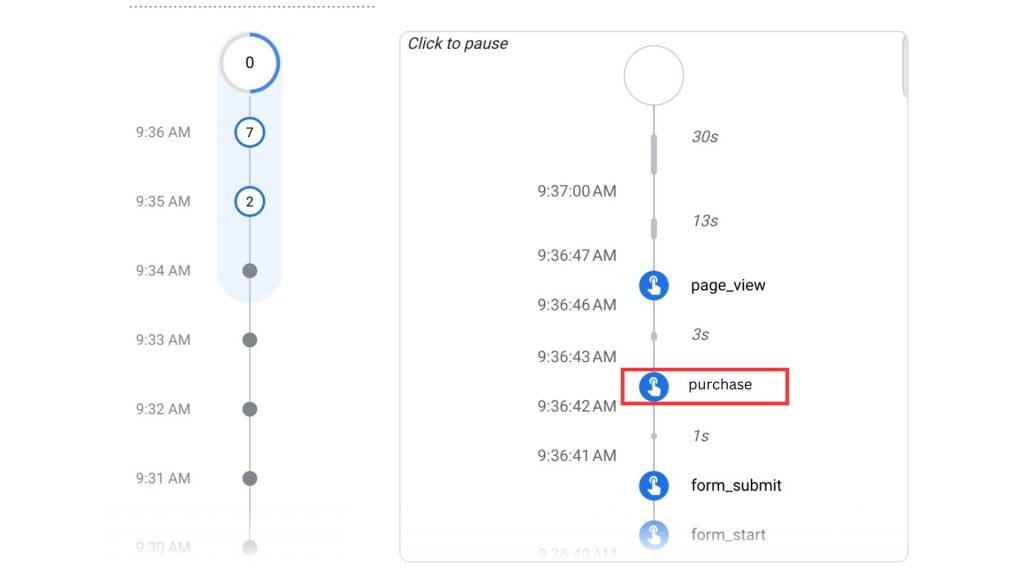
You can now check if the event has been fired in the Google Tag Manager and the DebugView of the Universal Analytics property.
Here's a quick summary of what we've learned:
✓ Integrating GA4 script into Shopify Custom Pixels.
✓ Creating a custom Event.
✓ Creating a custom Tag.
✓ Creating a custom Variable.
✓ Creating a custom Trigger.
And how to set up a Bogus Payment gateway on your store for testing and debugging purposes. Stay connected with us to keep updated on the latest GA4 News and Guides!